
We're an affiliate
We hope you love the products we recommend! Just so you know, we may collect a share of sales or other compensation from the links on this page. Thank you if you use our links, we really appreciate it!
We built the subfloor in our camper van conversion for stability and longevity to “stand” the test of time. Down the road, if we want to change our layout and refresh the van, we want to just re-arrange some cabinets. We don’t want to make any changes to the subfloor!
Our components are simple:
- Bottom – 2” x 3” joists glued to the van metal floor
- Middle – 1” polyiso insulation set between the joists on the van metal floor
- Top – 1/2″ in plywood, screwed down to the joists
This is step 1 of the van floor! Once you finish off your subfloor, check our run down of best flooring for camper vans.
If you go with vinyl plan flooring, check our step-by-step vinyl plank install.
Insulating the Van Sub-Floor
Insulating the floor is important – but it isn’t as important as insulating our walls & ceiling. The warmth inside our van will be rising. Every inch of insulation we add is an inch of headroom we lose in the van. We chose 2” of insulation in the ceiling (our Ceiling Panel Installation) and 1” in the flooring.
We used polyiso insulation for two reasons. First, it has the highest R Value per inch (6.0) of any rigid insulation. Second, it has high compressive strength of 16-25 pounds per square inch. This means we and all our friends can (and will!) stand and jump on our floor without fear of it collapsing.
Attaching Joists to Van
Some builders screw or bolt their joists into the van metal. We did not consider it necessary. Sikaflex 221 adhesive on the joists secures the subfloor to the van.
- Cabinets and interior elements are bolted to van walls, not the floor. In a car accident, these hold our cabinets and everything in place. The subfloor is for standing on and that’s it. It doesn’t provide structural integrity for any of our build
- High strength glue will last many years. Gravity is on its side! If glue fails, joists still won’t move as they are each screwed wide spans of plywood.
- Screwing through the van metal floor was undesirable as it would create potential rust/leak spots
A van build calls for lots of adhesive, and the best choice is Sikaflex-221. Its insanely strong on metal, water resistant, non-corrosive, lower-VOC, and flexible (it’s in the name).

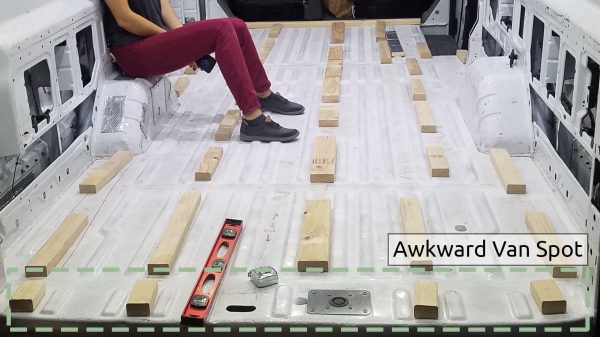
Awkward Van Spot
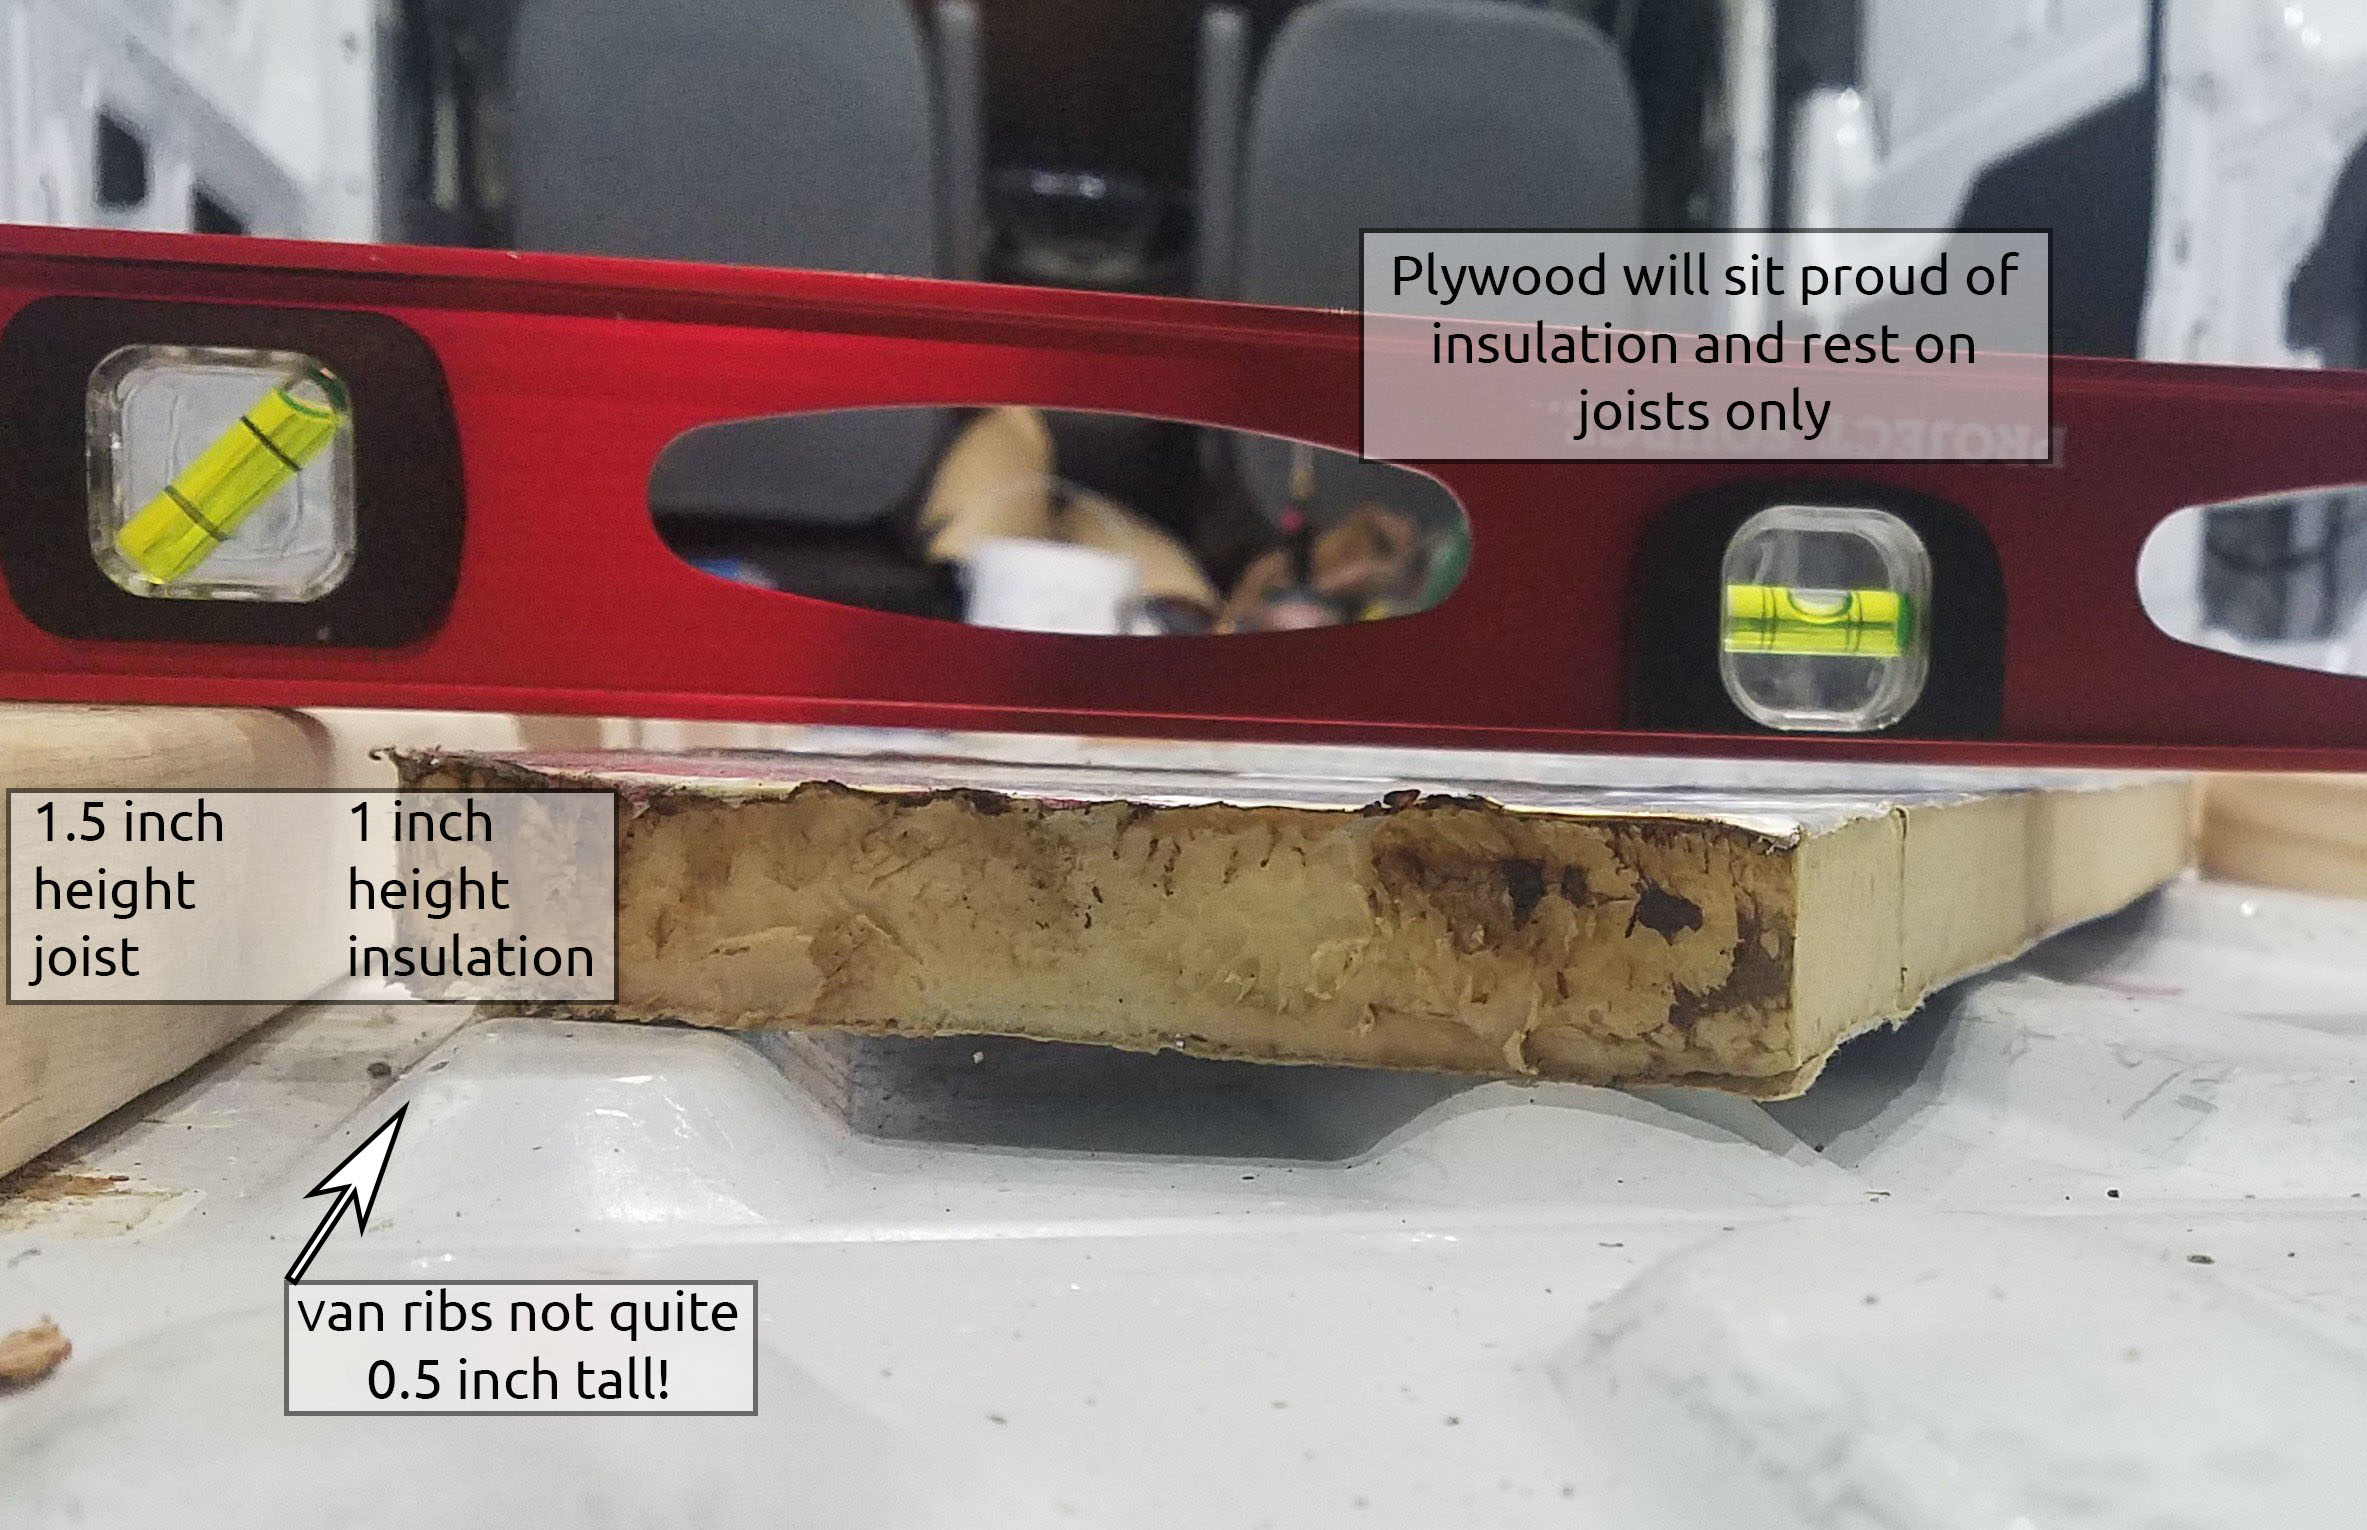
The Transit’s van metal floor has ribs. These are almost 0.5” tall, but not quite! We tried to fill those low spots with something 0.5” tall. But the ribs are shorter than 0.5″, so that filler did not create a level surface.
In the end, we placed 1.5” tall lumber in the low spots as joists, and 1” polyiso sitting on the ribs. The lumber was 2” x 3” (actual measurement 1.5” x 2.5”).
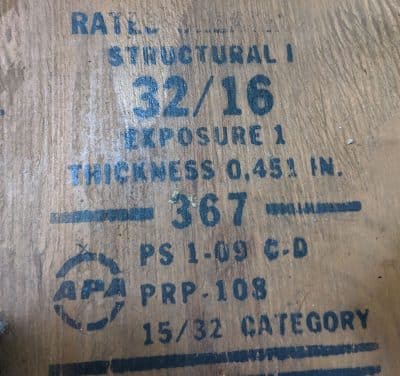
Thickness of Plywood for Van Sub-Floor
In standard construction, subfloors are ¾ inch plywood or thicker. But we want as thin as reasonable. Benefits of our 1/2″ plywood include lighter weight, lower cost, and an extra ¼ inch of headroom!
The spacing of the joists supporting the floor determines the plywood thickness.
How far apart should the joists be, both side-to-side and front-to-back? We can say that our subfloor feels super sturdy! Side-to-side spacing between our joists is 18 inches on center at its greatest. This span rating for plywood defines how far apart joists can be. The span rating for 1/2 inch plywood is 32/16. That’s 32” when plywood is sheathing for a roof (not much expected weight on it), and 16 inches as a floor (lots of expected weight on it).
We’re comfortable slightly exceeding the recommended subfloor spacing. The interior of our van is (hopefully) quite light. Also, the polyiso is sitting about 1/8″ underneath our joists. The polyiso’s high compressive strength means it could support any plywood sag.
Span ratings for standard sheathing plywood are printed in big black letters. These are good to know, but we don’t intend to subject our van to the same stresses a commercial building undergoes. The following numbers represent “roof sheathing span / subfloor span” per the APA – The Engineered Wood Association (exciting group!)
- 5/16”: 20/0
- 3/8”: 24/0
- 1/2”: 32/16
- 5/8” 40/20
- 3/4”: 48/24
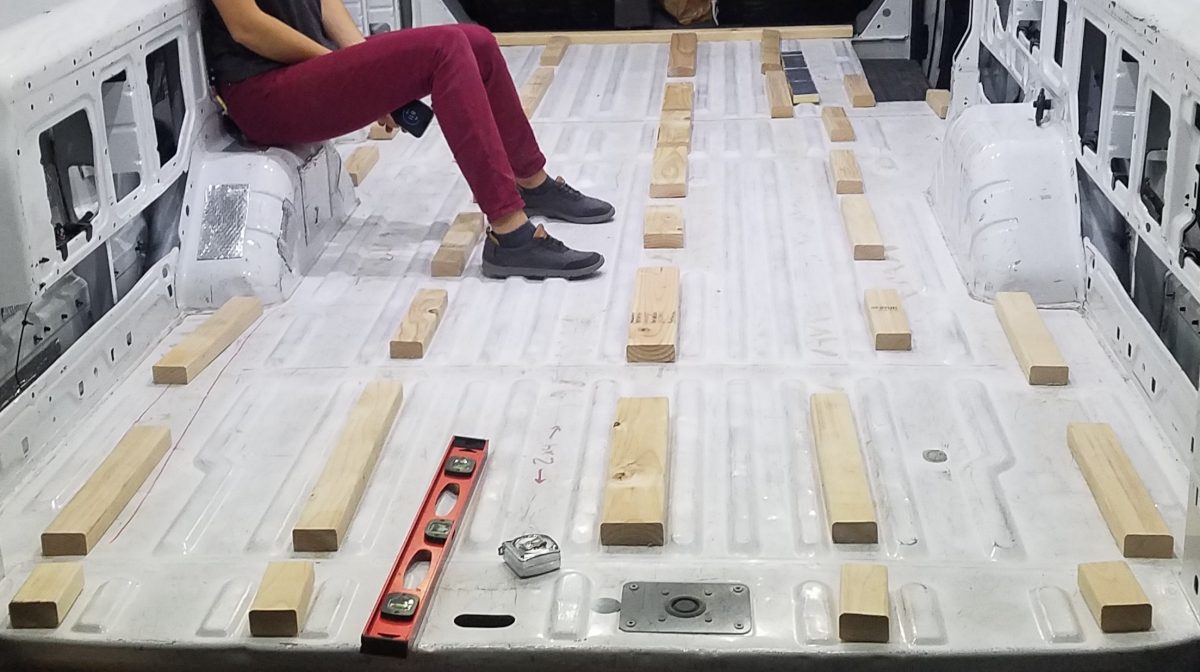
Layout of Floor Joists
We are ever mindful of weight and cost, which is why we took the time to cut our joists into smaller pieces. We could have used long 12’ foot lumber from front to back, but that’s not necessary!
The edges of the plywood sheets are their weakest spot. We used four 4×8 sheets of plywood.
- A joist is necessary underneath all joints/edges of plywood. First we measured and planned where the edges would land. We ensured a joist would bridge the gap between the plywood sheets.
- Our main entryway at the van sliding door will endure a lot of traffic and it needs support. However there is a metal rib in the way of putting a normal joist there. Thus we notched the underside 0.5” depth with a table saw. We used a 2”x4” for this so that it spanned the width of the rib. Now the 2”x4” is sitting on the van metal floor. Later we used 1″ screws to attach the plywood subfloor to this joist due to its shorter depth after the notch. We used 1.5″ screws elsewhere.
Awkward Van Spot
The back one foot or so of the van metal floor is not flat and curves up (and down) ever so slightly. This was not significant enough for any drastic alterations, and our solution was:
- Make the back joists very short (4” or so). Thus the unlevel metal was in contact with the shortest possible material
- Glob lots of adhesive on the portions of the joists that wouldn’t be flush with metal. This hopefully fills in any gap between the wood and metal
- Use a plywood that was slightly bowed. The goal is that the plywood’s bow matches the upward curve of the joists.
Installing Joists on the Van Floor
Simple – we put adhesive on the lumber, set them on the metal, and put some weight on top of them! But we committed a rookie mistake. We used standard Liquid Nails adhesive because we had some on hand.
We need to read the label first, and make sure the adhesive is compatible with metal. Metal needs a stronger adhesive than other materials since it is not porous. We did it right the second time and used Sikaflex.

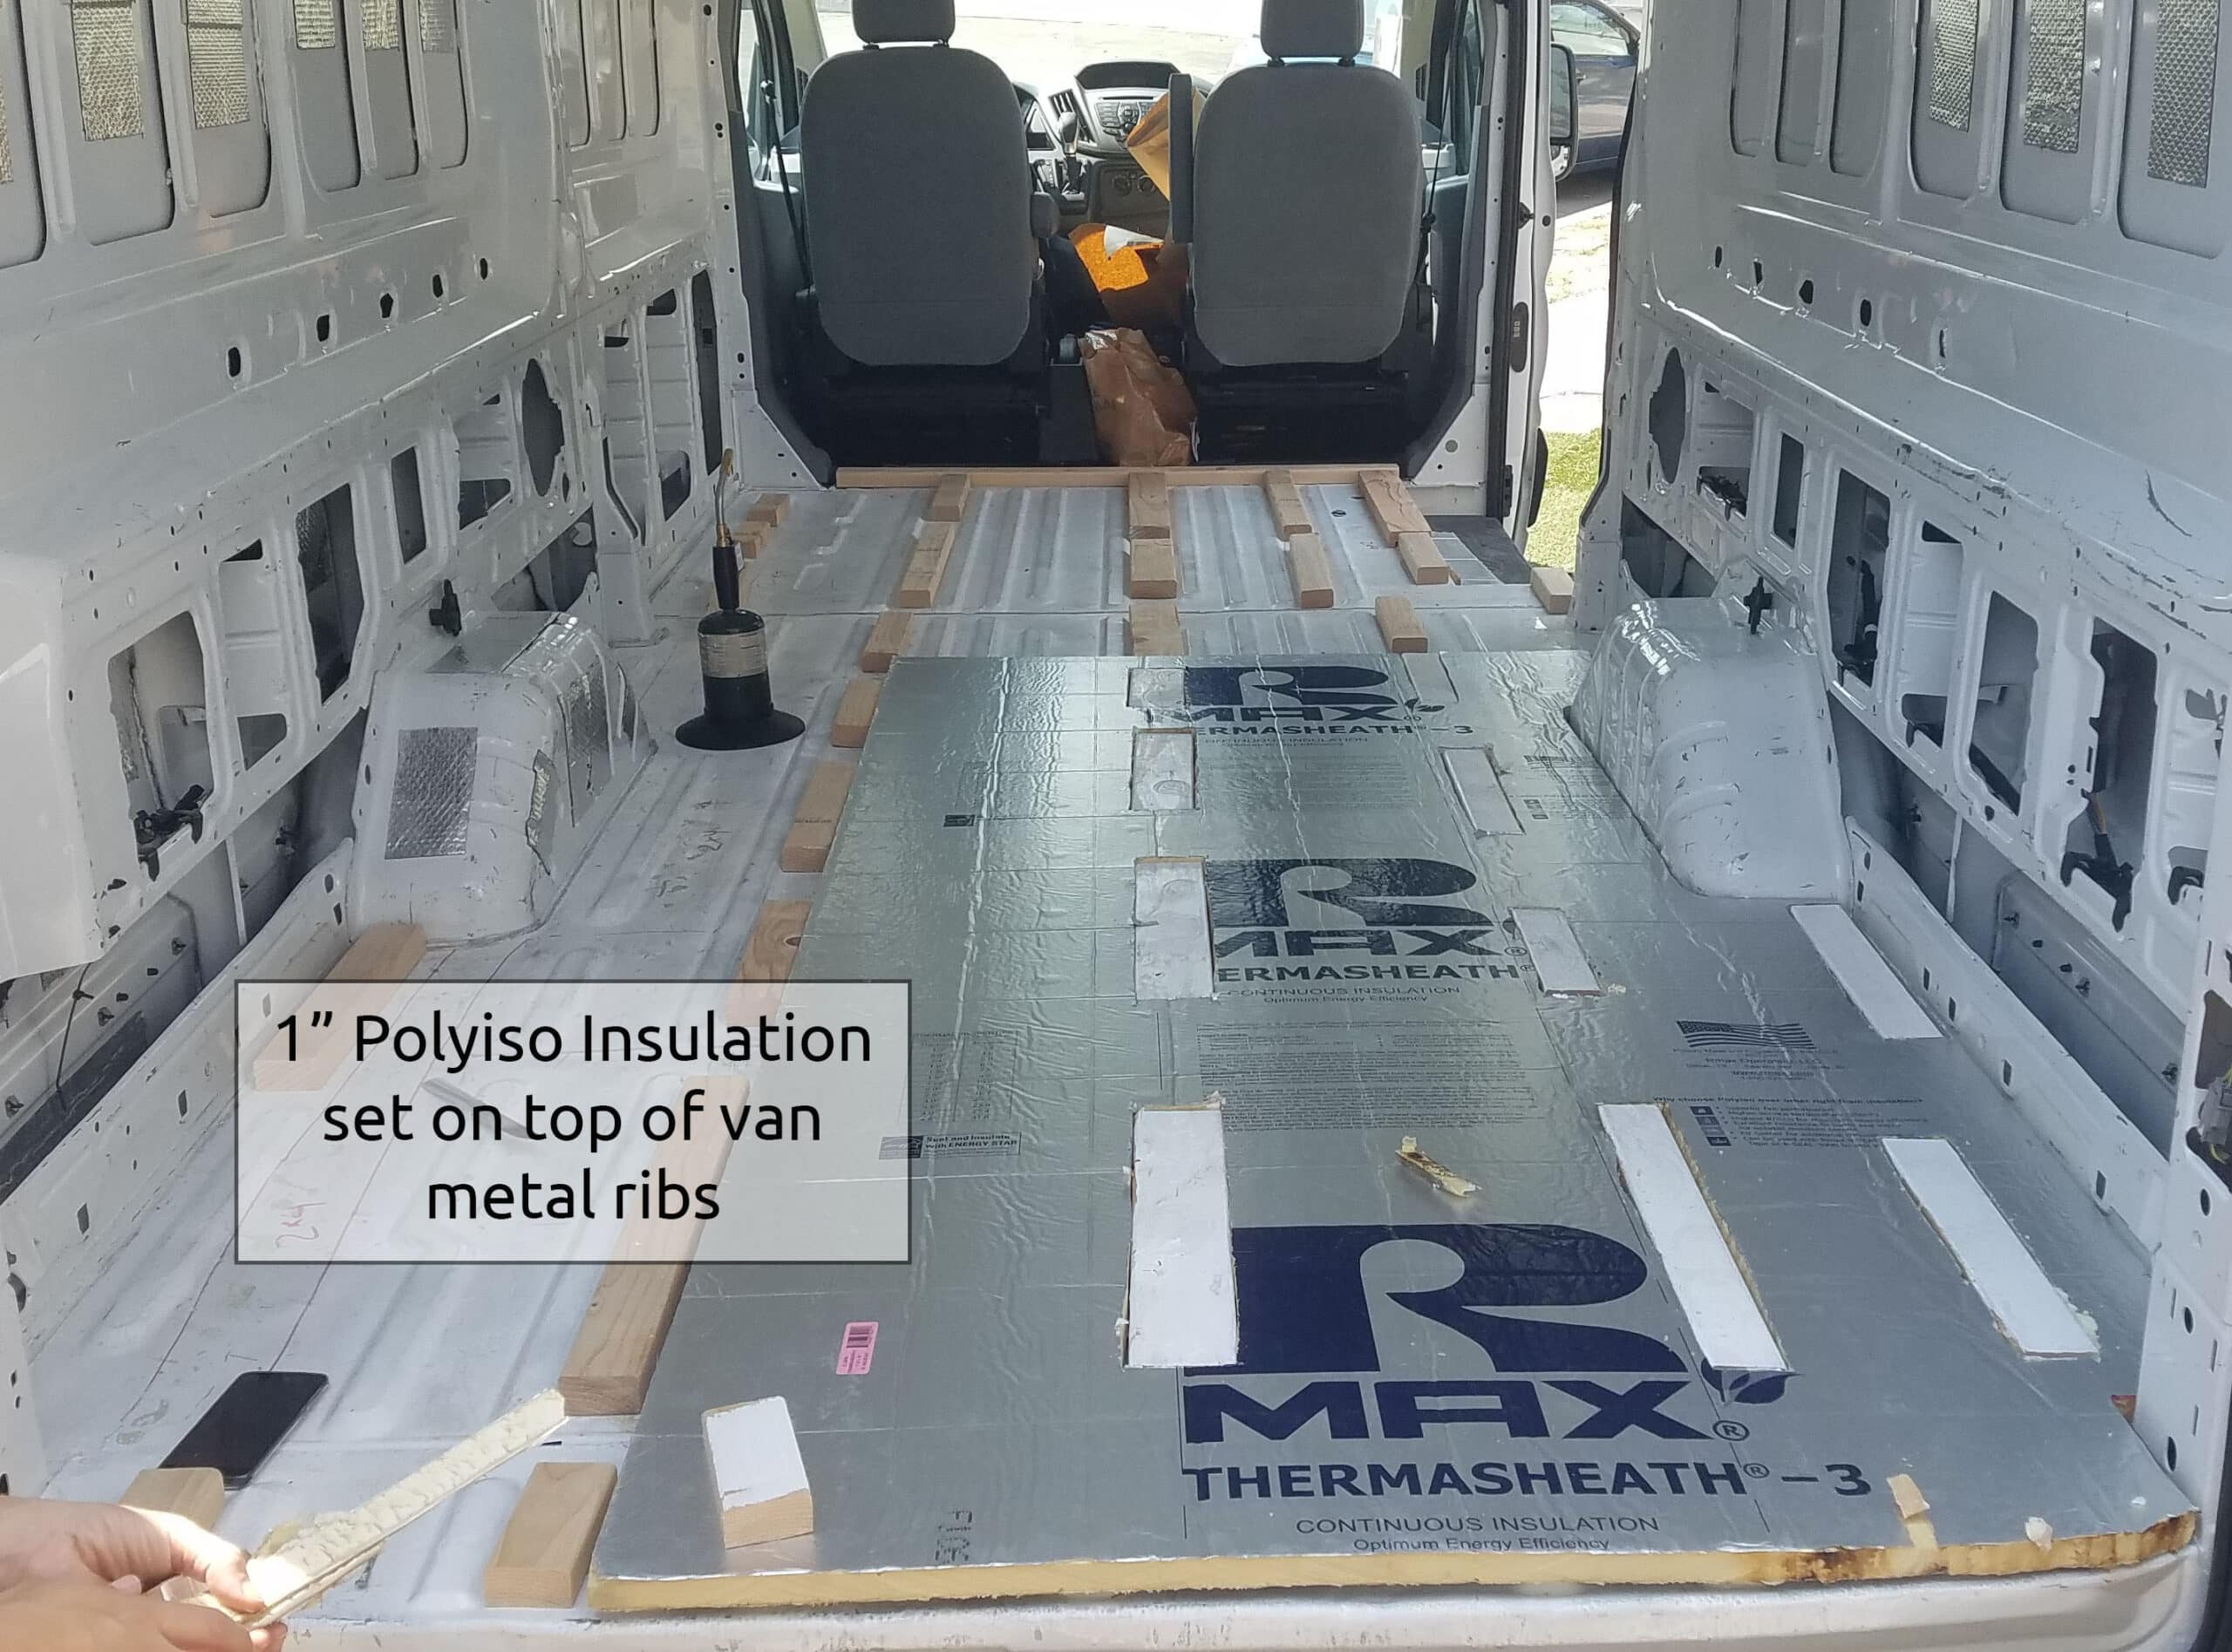
Installing Rigid Insulation
 For maximum coverage and strength, we used full 4’x8’ sheets of polyiso insulation. We notched spaces for the joists in the insulation. There’s a simple trick to this!
- Cut polyiso to size, including wheel well area and notches for various vertical ribs
- Paint the joists
- Place the polyiso on top of the wet joists
- Voila, flip your polyiso over and cut out the parts where the wet paint marked the insulation!
We ran our polyiso perpendicular to the plywood (polyiso is front to back, plywood is side to side). This maximizes stability in the final floor.
The easiest way to cut polyiso insulation is to heat up a butter knife until red hot (we used a propane torch). The knife will slice like butter. A saw will tear the insulation which is much less pleasant or precise.
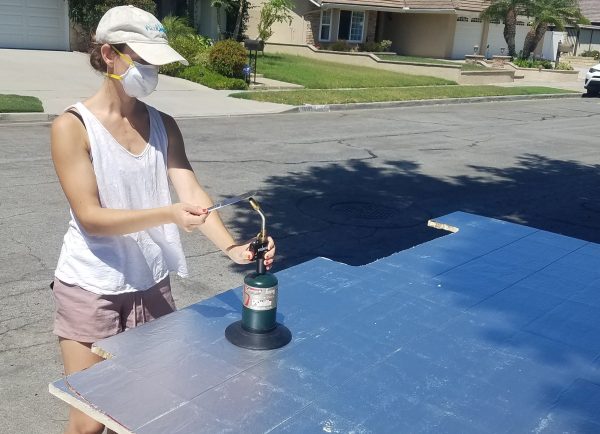
Safety Note. Cutting polyiso with a hot knife produces vapor/fumes that smell funny. We assume they are unhealthy to inhale. In our picture Nadia is wearing a dust mask. In reality this does very little to stop these fumes because the dust mask is too porous.
We placed aluminum foil tape over all the polyiso joints to complete the vapor barrier in the floor. We ended up abandoning the plan for a vapor barrier for the rest of the van. In the end we don’t believe this step is necessary.
Awkward Van Spot
The spare tire is under the van, and is lowered by turning a bolt housed in a compartment with a black cover. The lug wrench and jack handle are in compartment below passenger seat. We wanted to bring our flooring all the way to the back of the van. So, we need to keep this compartment on the metal floor accessible!
Using a 2″ holesaw, we made a hole in our subfloor and final floor to keep this accessible.

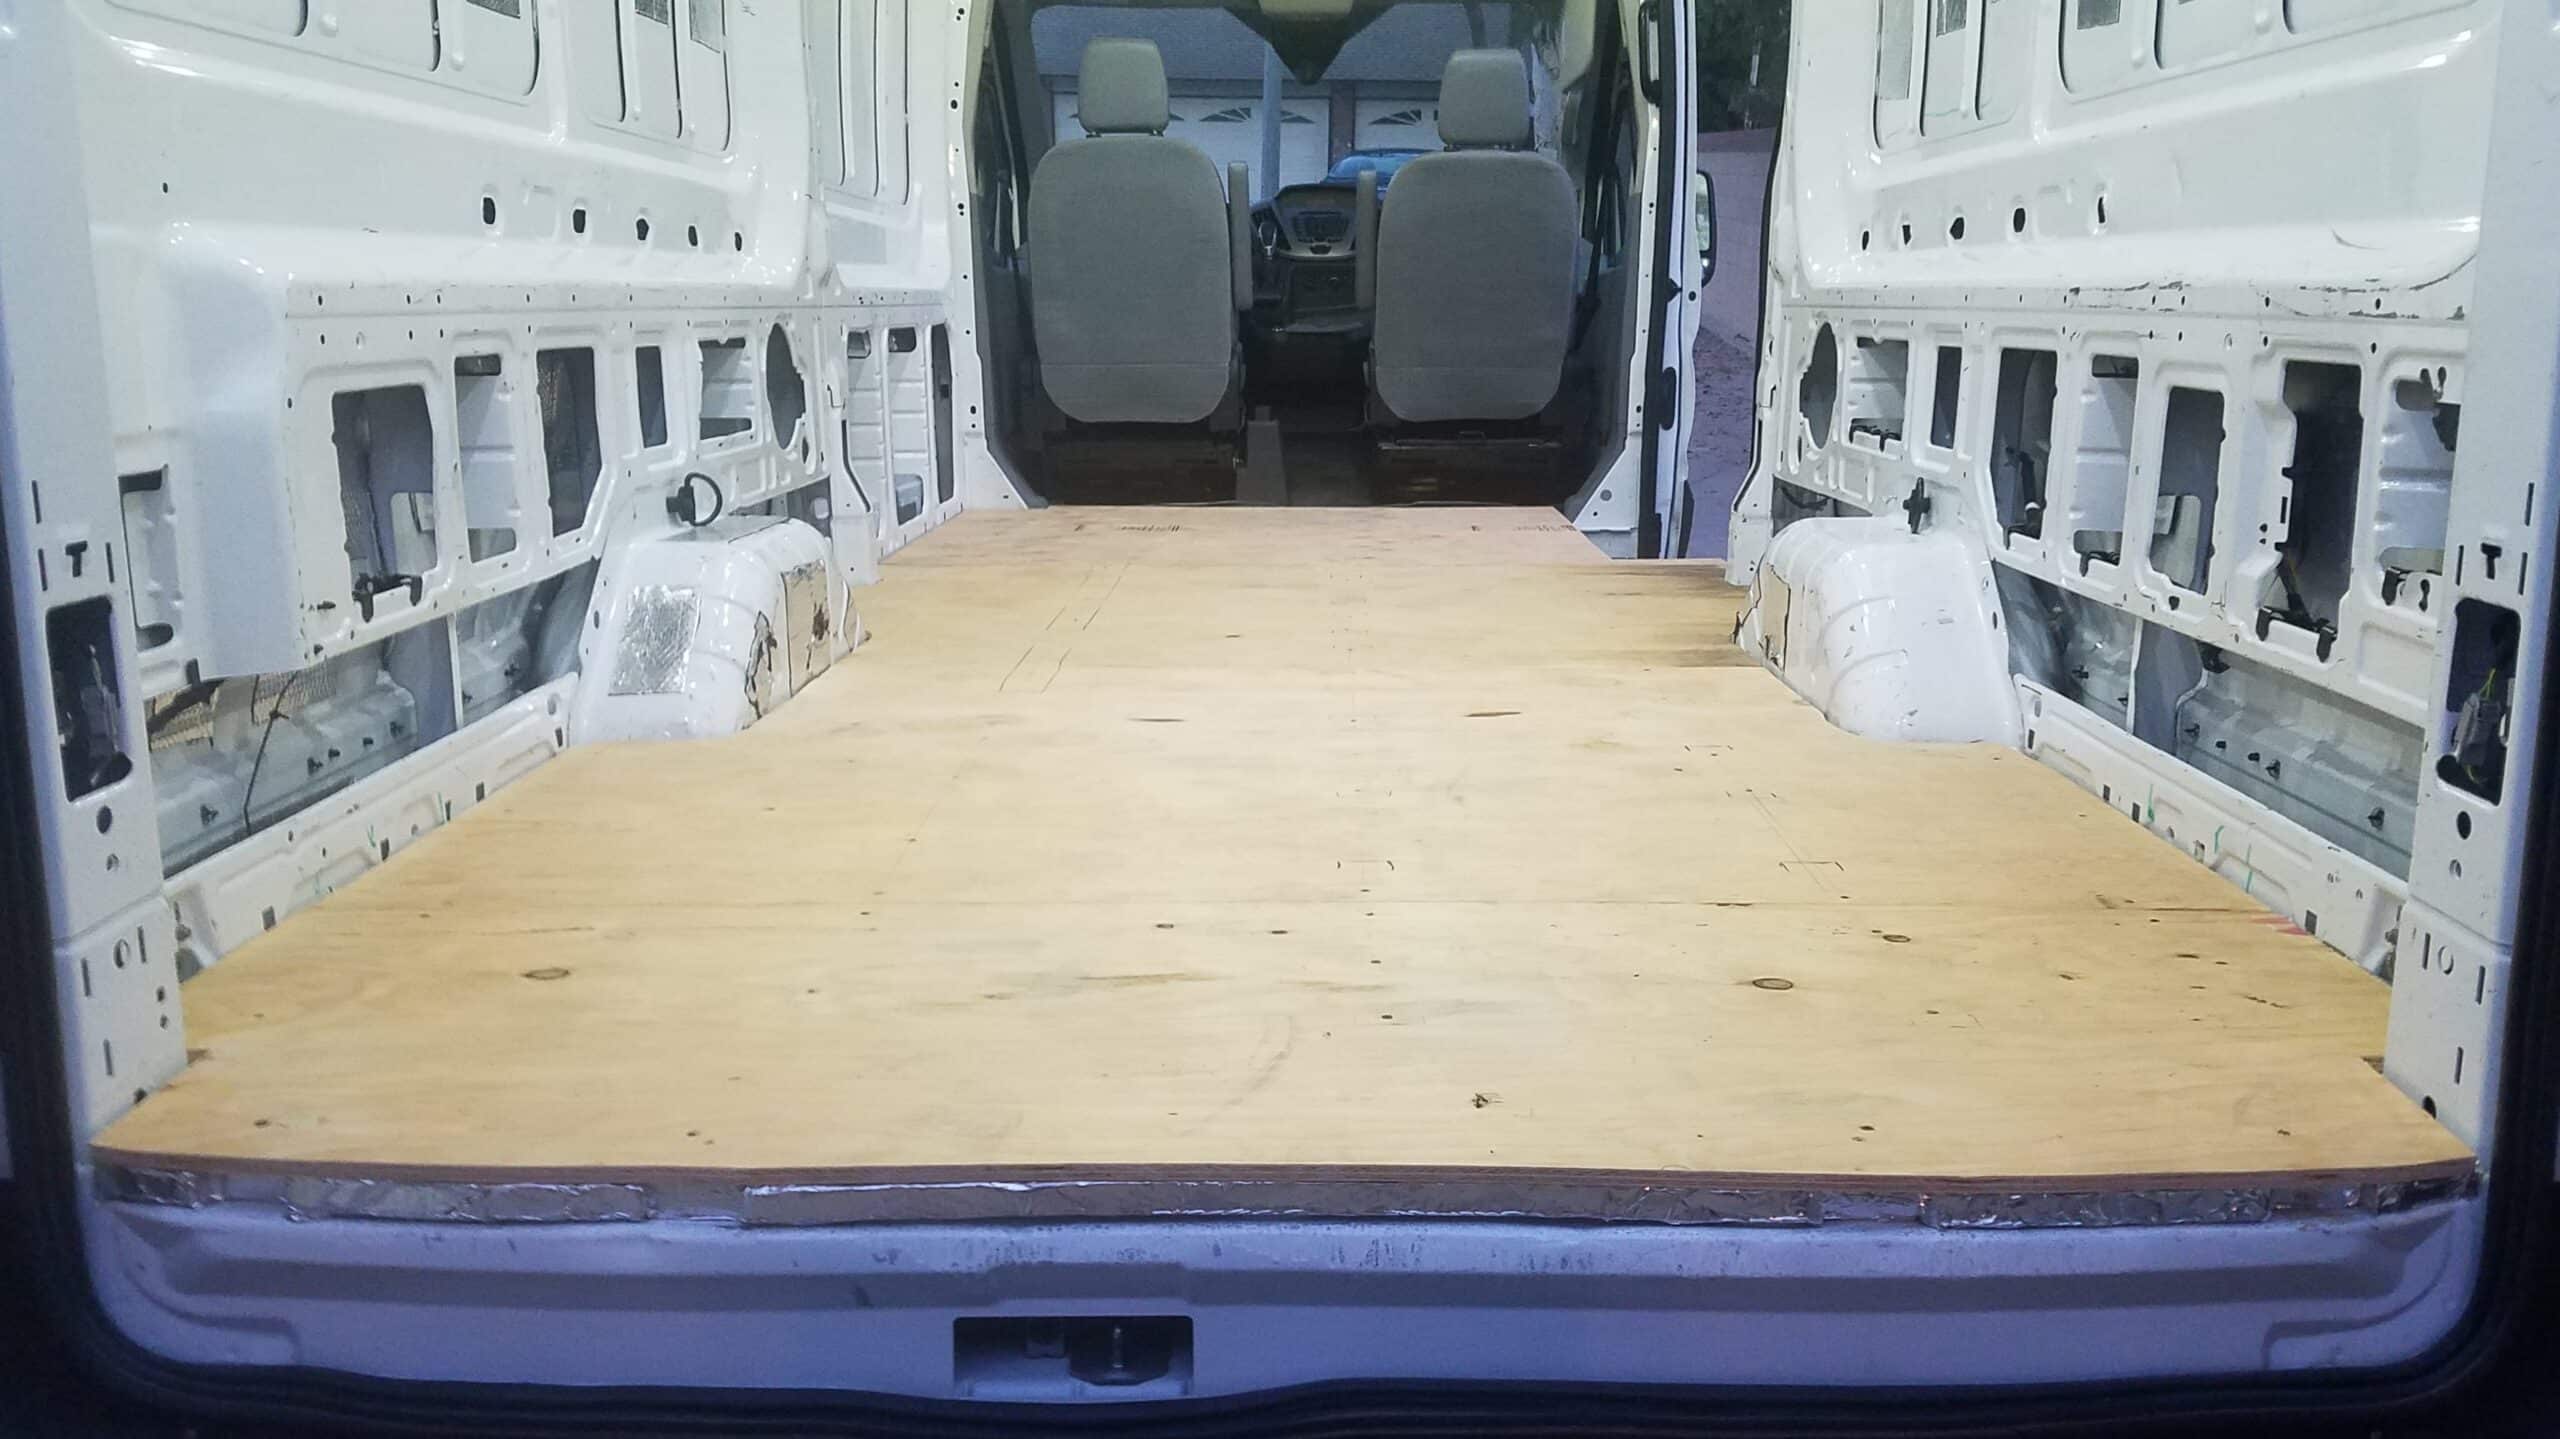
Cutting and Installing Plywood Subfloor
We cut the 4×8 sheets of ½ inch plywood to size using a circular saw. We left approximately 1/16″ inch of space between each plywood sheet, and between the plywood and the van walls. These expansion gaps are necessary as the plywood will naturally expand and contract. If there is no gap, then the plywood will bend and buckle when it expands.
Next came templates for the wheel wells, and we measured the notches for any other necessary cut outs. Fortunately these do not need to be perfect. 1) expanding foam will fill the gaps, 2) a flooring material will be on top of all the plywood anyways, and 3) wheel wells won’t be visible from the living area!
Now comes the fun part, fastening the plywood! We used 1.5” screws that countersink (any screw that has a cone head instead of a flat head). We started with the front plywood panel. We measured the joists’ locations in relation to the the front and the walls. These measurements were transferred to the plywood. These marks indicated where screws should be placed. For the other three plywood panels, the process was easier:
Completing the Subfloor: Trim and Spray Foam on Edges!
We sprayed expanding spray foam along the edges of the plywood where they meet the van walls. These gaps were anywhere from 1/8″ – 1/2″. Once dried, the spray foam was carved down to be flush with the plywood.
Check our guide to best floors for a camper van, and our step-by-step install of vinyl plank flooring.
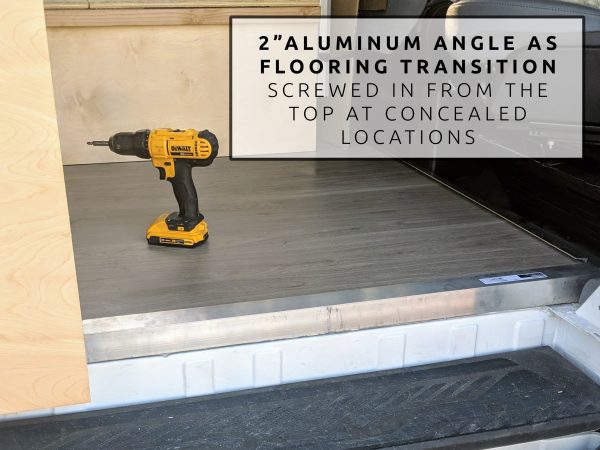
We finished the edges with aluminum angle. The aluminum was screwed down through the floor into joists. We added the trim after installing our cabinets and vinyl plank flooring (in that order). Yep, we had to ensure there were joists installed on the edges of the floor. This ensured stability at vulnerable weak points at the edges, and material for screwing in this aluminum angle.
When you’re done with your comfortable subfloor, enjoy macarons and sparkling white grape juice with friends!

Ready for more info?
Visit the Van Conversion Build GuideWe sincerely hope this information is helpful on your build journey!
This post contains affiliate links that may earn us a commission if a product is purchased. But, we always strive for the reuse and repurpose of materials – so we encourage searching for a local used option before buying from our links.


Hi there, so glad we found your site, wish we had a couple of months ago, tho😊. Wondering about the fumes and how long it took the smell to go away inside the van from the silkaflex 221. I was reading the Amazon reviews and someone stated that it took a whole month before the smell dissipated. Did you find that to be the case? Also, I was wondering why you used a sealant instead of the silkaflex adhesive in the floor.
Thank you so much for all the details! Wonderfully written and easy to understand, great job!
Elizabeth
Thanks for the feedback Elizabeth! We actually did not use Sikaflex in our own floor build.. we had bought a product from Home Depot before we happened upon Sikaflex which is a superior product. So, I cannot comment on any Sika smell. For your second question, I’m not sure what sealant you are referring to
Hello, My son and I were getting ready to do our subfloor when we stumbled onto your site. I have to admit that your system seems to be much simplier. I have a couple of questions.
1) What was the purpose of the 1/8″ gap between the top of the battons (or bottom of the plywood) and the top of the Polysio. Your comment: “Don’t try to fill the low spots with something 0.5” tall, because those will be slightly proud of the ribs (we speak from experience)!” May I ask what your experience was? Our present plan is to have the battons and the polysio all flush, no gap.
2) How did you finish or cap off the back door and side door edges?
3) How much space did you leave from the walls to spray foam?
You put together a well thought out plan.
Thank You for your time.
John
Thanks for the comment John. We went through a lot of designs and iterations!
1) The metal ribs are the van floor are about 1/8″ shorter than 0.5″. As such inherently when we layer 1″ Polyiso on top of the approximately 3/8″ ribs, that was about 1/8″ shorter than a 1.5″ piece of Lumber.
2) Aluminum angle
3) About 1/8″ gaps around the plywood
Do you need to seal the subfloor – 2X4’s before installation with Sikaflex?
In our opinion no you do not need to seal the 2x4s that you use. We did not seal them (we used 2x3s, actually). They should be exposed to minimal, if any, moisture
Do you guys have issues with your insulation cracking or popping when you walk over it? I know the R Max is not as strong as some of the XPS insulation and was wondering if you guys have had any issues!
No issues with that at all. Actually, R Max is very strong, it has high compressive strength of 16-25 pounds per square inch.
There is a lot of discussion about how to do floors on the van forums. I don’t think your 2×4 system is necessary. Instead consider putting strips of Minicell in the valleys and then lay polysio on top and then your flooring. The perimeter should have 1x 3 wood to have something to anchor and provide support to step on the edge.
Yes, there’s an argument to be made for skipping the joist system (we used 2x3s actually, not 2×4). The trick becomes getting everything level. The valleys in a Transit are slightly less than 0.5″, so you would need to match that height with the Minicell.
I have been scouring the internet for an answer, but I cannot find one- Maybe you could help? I do not understand why joists are needed under the sub floor, when it is already a solid, flat base of metal ribs? It wastes so much valuable height putting in 2 inches of wood joists under the plywood. Why can’t the insulation go directly on the bare metal ribs with a spray foam insulation or other filler in the space between the ribs to level it…with the plywood laid directly on top of that? It seems that it would end up level, insulated, and solid, and any construction like seats, cabinets, etc. can be mounted to wall joists and L brackets screwed to the plywood where needed. But I have seen no one do it that way. What am I missing here? I really hope you see this and can tell me why I am an idiot for thinking this!
Hey Clay – you’re right, the joists are not strictly necessary. In the Transit, the ribs are about 0.5″. a 2×4 is actually 1.5″ tall. So in reality we are only using up 1″ of interior finished height. But since we would want to put 1″ minimum of insulation on the ribs anyways, then skipping the joists would end up at the same height. The bigger point would be that it would be an easier installation to simply skip the joists and anchor cabinets to the plywood floor as you describe, and would probably still be sturdy enough.
DaresDrives (on youtube) used the method you speak of, skipped the batton/joist system all together. Unfortunately although its installed, I don’t think he’s completed his van yet for a full review of how it holds up. Looks solid to me though, I’m going to do the same thing
Nice post thanks for sharing
Post is very useful. Thank you for this useful information.
It looks to be fantastic!
How come you don’t use sheep wool insulation for the floor?