
We're an affiliate
We hope you love the products we recommend! Just so you know, we may collect a share of sales or other compensation from the links on this page. Thank you if you use our links, we really appreciate it!
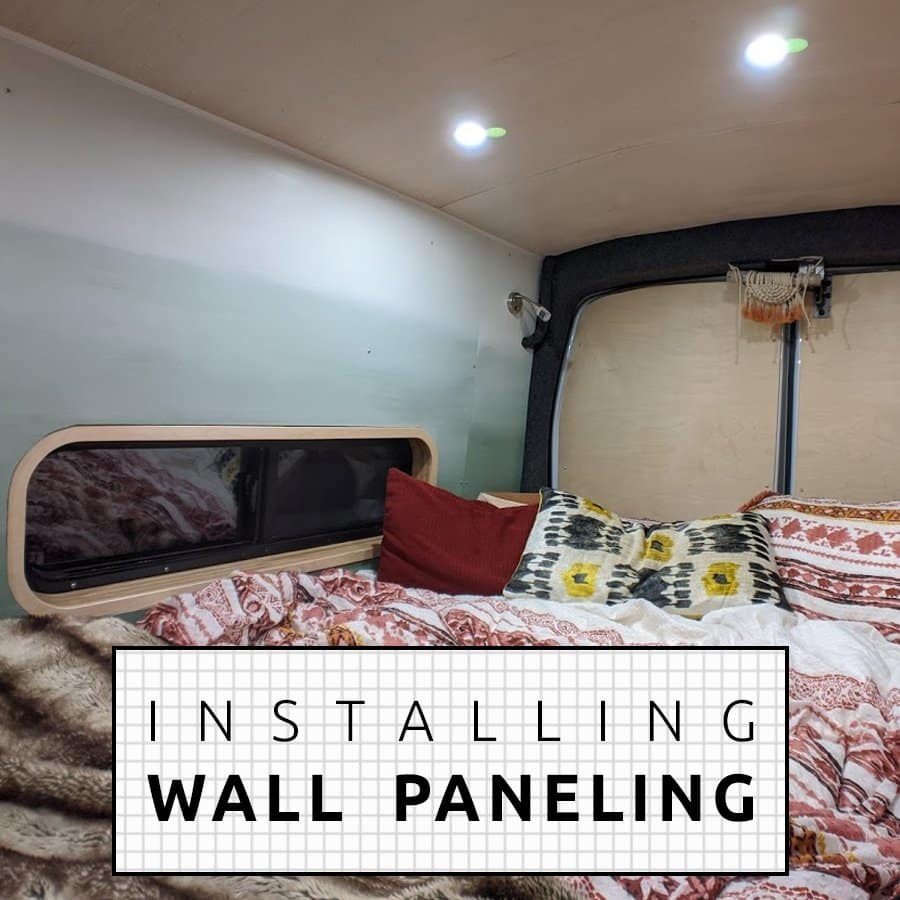
Our camper van’s ceiling panels are 5mm plywood (approximately ⅛ inch) which is lightweight and flexible. This is important because of the significant arch curve in van roof’s. The majority of the installation was not too difficult, with the main point being accurate cuts of the plywood.
Our big question mark going into the process was how to finish the back and front panels where they meet awkward van spots. We are happy with the solution structurally and aesthetically.. read on!
Framing the Ceiling
Furring Strips are pieces of wood that serve as spacers and are something for our finished ceiling panels to attach to.
We attached furring strips of ½ inch plywood to the ribs on the van’s roof using plusnuts (learn more in our Guide to Fastening with Plusnuts) and 1.5” long ¼-20 machine screws. The machine screws’ conical head allowed them, with enough drill torque, to countersink (sit flush) in the plywood. Three separate furring strips were used for each rib due to the ribs’ curves. The furring strips are 6 inches wide so that they overhang the ribs and we have space to nail the final panels without the nails hitting the metal rib.

Heard of plusnuts? They provide a very strong fastening point in existing holes in the van, minimizing the need to drill holes and risk rust. Read More >
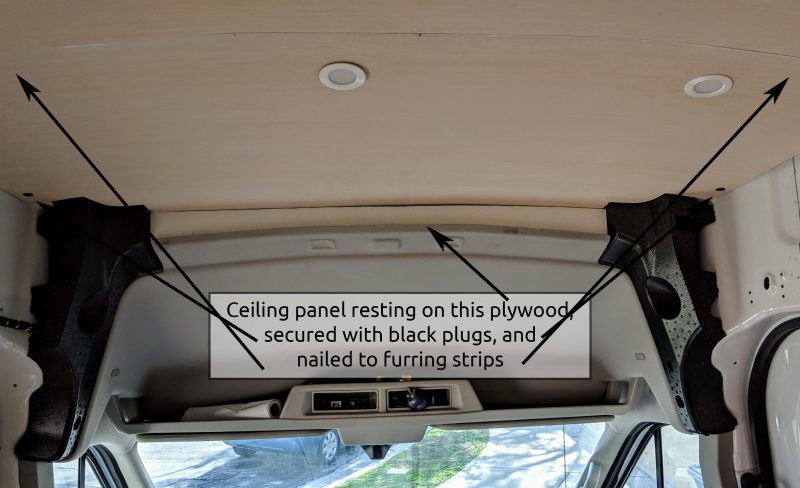
Back of the Van Attachment
(Before moving on and covering the ceiling, choose solar panels and run the wires from the roof).
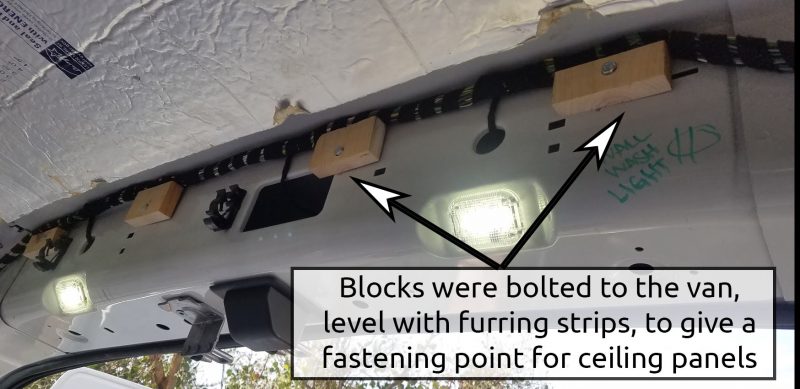
There are no obvious fastening locations at the front and the back of the van. At the back we installed four small blocks where plusnut holes were available.
We marked where the bottom of the blocks would be at a level height to the furring strips. The blocks were cut and the hole for the plusnut was measured and placed so the bottom of the blocks, when bolted on, were level to the furring strip.
The bonus was that the blocks were cut to a height that the ugly wiring harness just sat on the blocks and is now hidden underneath the ceiling.
On the driver side, the wiring harness is hidden inside cabinets. On the passenger side, the wiring harness was zip tied to the van metal, then a notch was cut in the ceiling panel for the harness to run down into the wall.
When we installed the panels, the plywood was simply nailed to the wood blocks.
There is still an ugly wiring harness on the Ford Transit passenger wall that cannot be hidden by wall or ceiling. We covered it as detailed in our post about carpet lining the exposed metal.
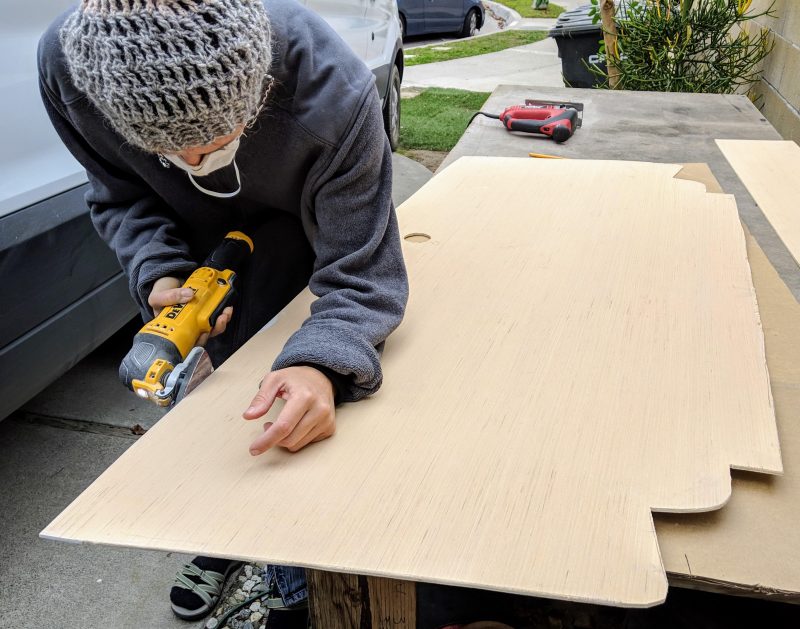
Measure and Cut Panels
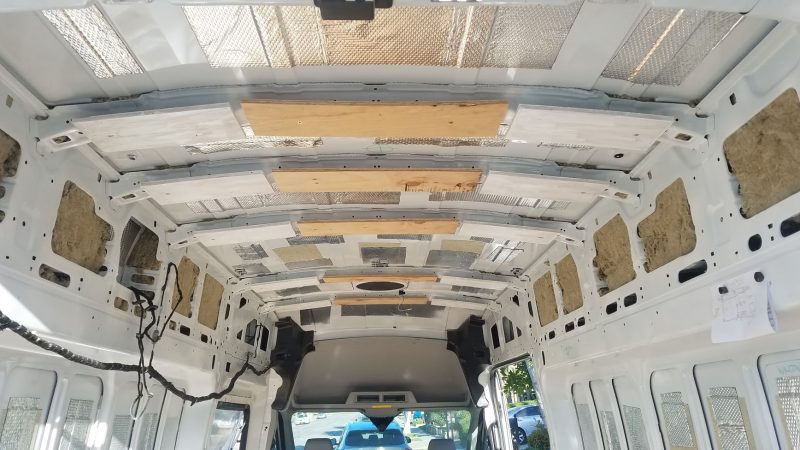
Once ceiling insulation was installed, we decided where the joints of the plywood would land. We needed five panels, but two of them are narrower, so only four 4×8 sheets of plywood were necessary. We recommend buying an extra sheet though, since mistake cuts are easy to make at this point, and you’ll read that we made one!
The joints of the panels fall on furring strips, but cannot fall right at a ceiling rib (or else we’d be shooting a nail into van metal).
Panels were cut with a circular saw with a finishing blade (for beautiful edges). The exposed face of the plywood should be face-down when cutting. A circular saw cuts on the upstroke, which often splinters the face-up side slightly.
All panels are cut the same width, and to save time we clamped two together and did two cuts. As we have ceiling height cabinets the entire length of the drivers side, as we progressed we ensured the cut side would be placed on the driver’s side (to hide any mistakes).
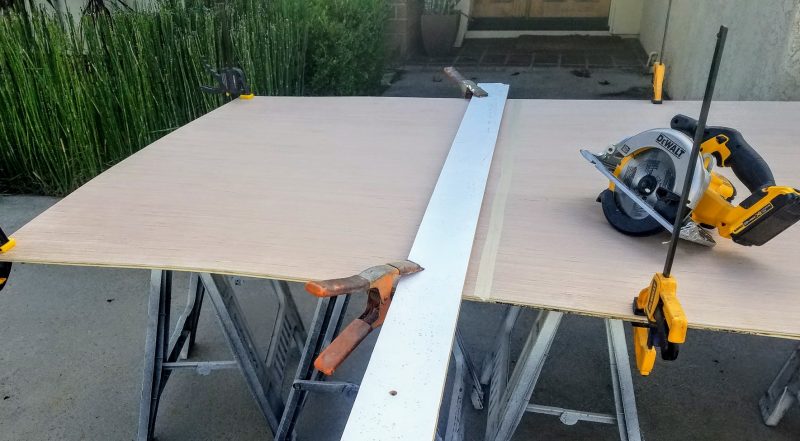
Measurements were then taken for the long cuts. Fortunately as the furring strips are so wide, there is ample nailing space for cutting errors more than ⅛ inch (not that we made any).
We installed the panels back to front, and there’s no space for error on the front panel cut. We saved those cuts until all the other panels were installed, and did the front panel cut and installation another day.
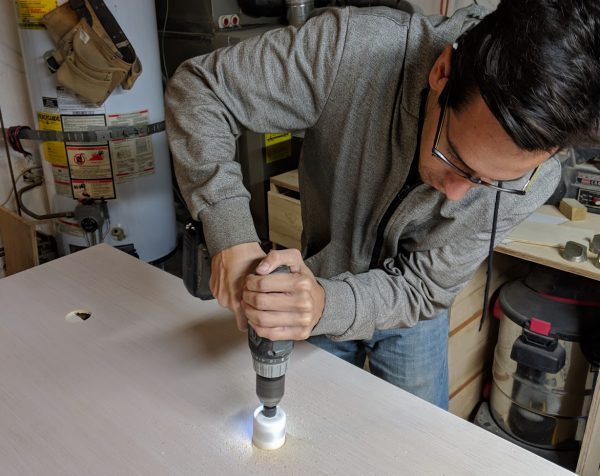
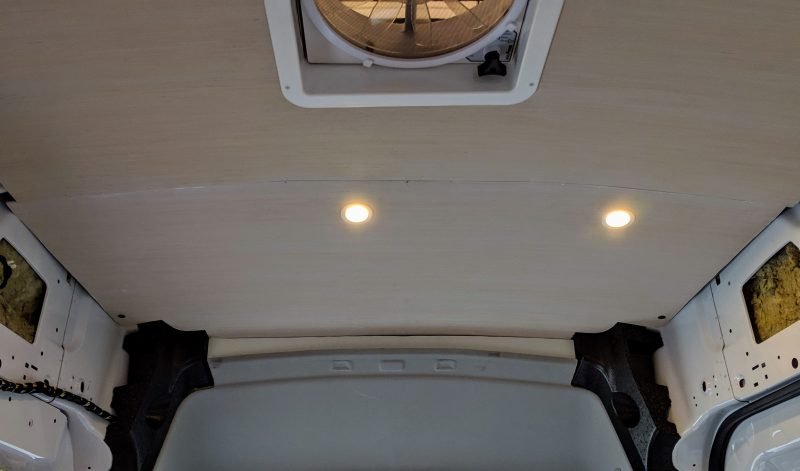
Cutting Holes for Recessed Lights
We wanted to cut the holes for the recessed LED lights and to run all the wiring before installing the ceiling panels. As opposed to just centering the recessed lights between the two van walls, we decided to center our lights between the van wall on the passenger side and where the upper cabinets on the driver side will fall.
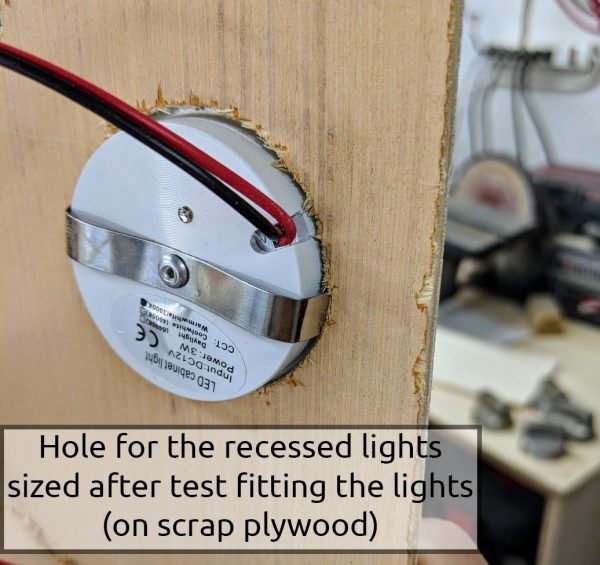
Our recessed lights were installed in a friction-fit type manner, and that required a 2 inch hole. We measured where the lights would land on each panel, and transferred those measurements to the panels already cut to size.
Important! For some reason Kevin couldn’t conceptualize that when the ceiling panels were installed, they would be rotated. Unfortunately, we drilled the holes in the wrong spot (it seemed right when we were drilling!) on one panel, and had to completely recut a new panel.
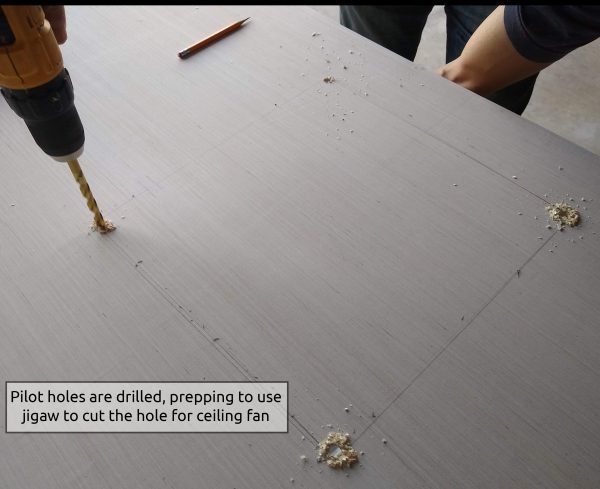
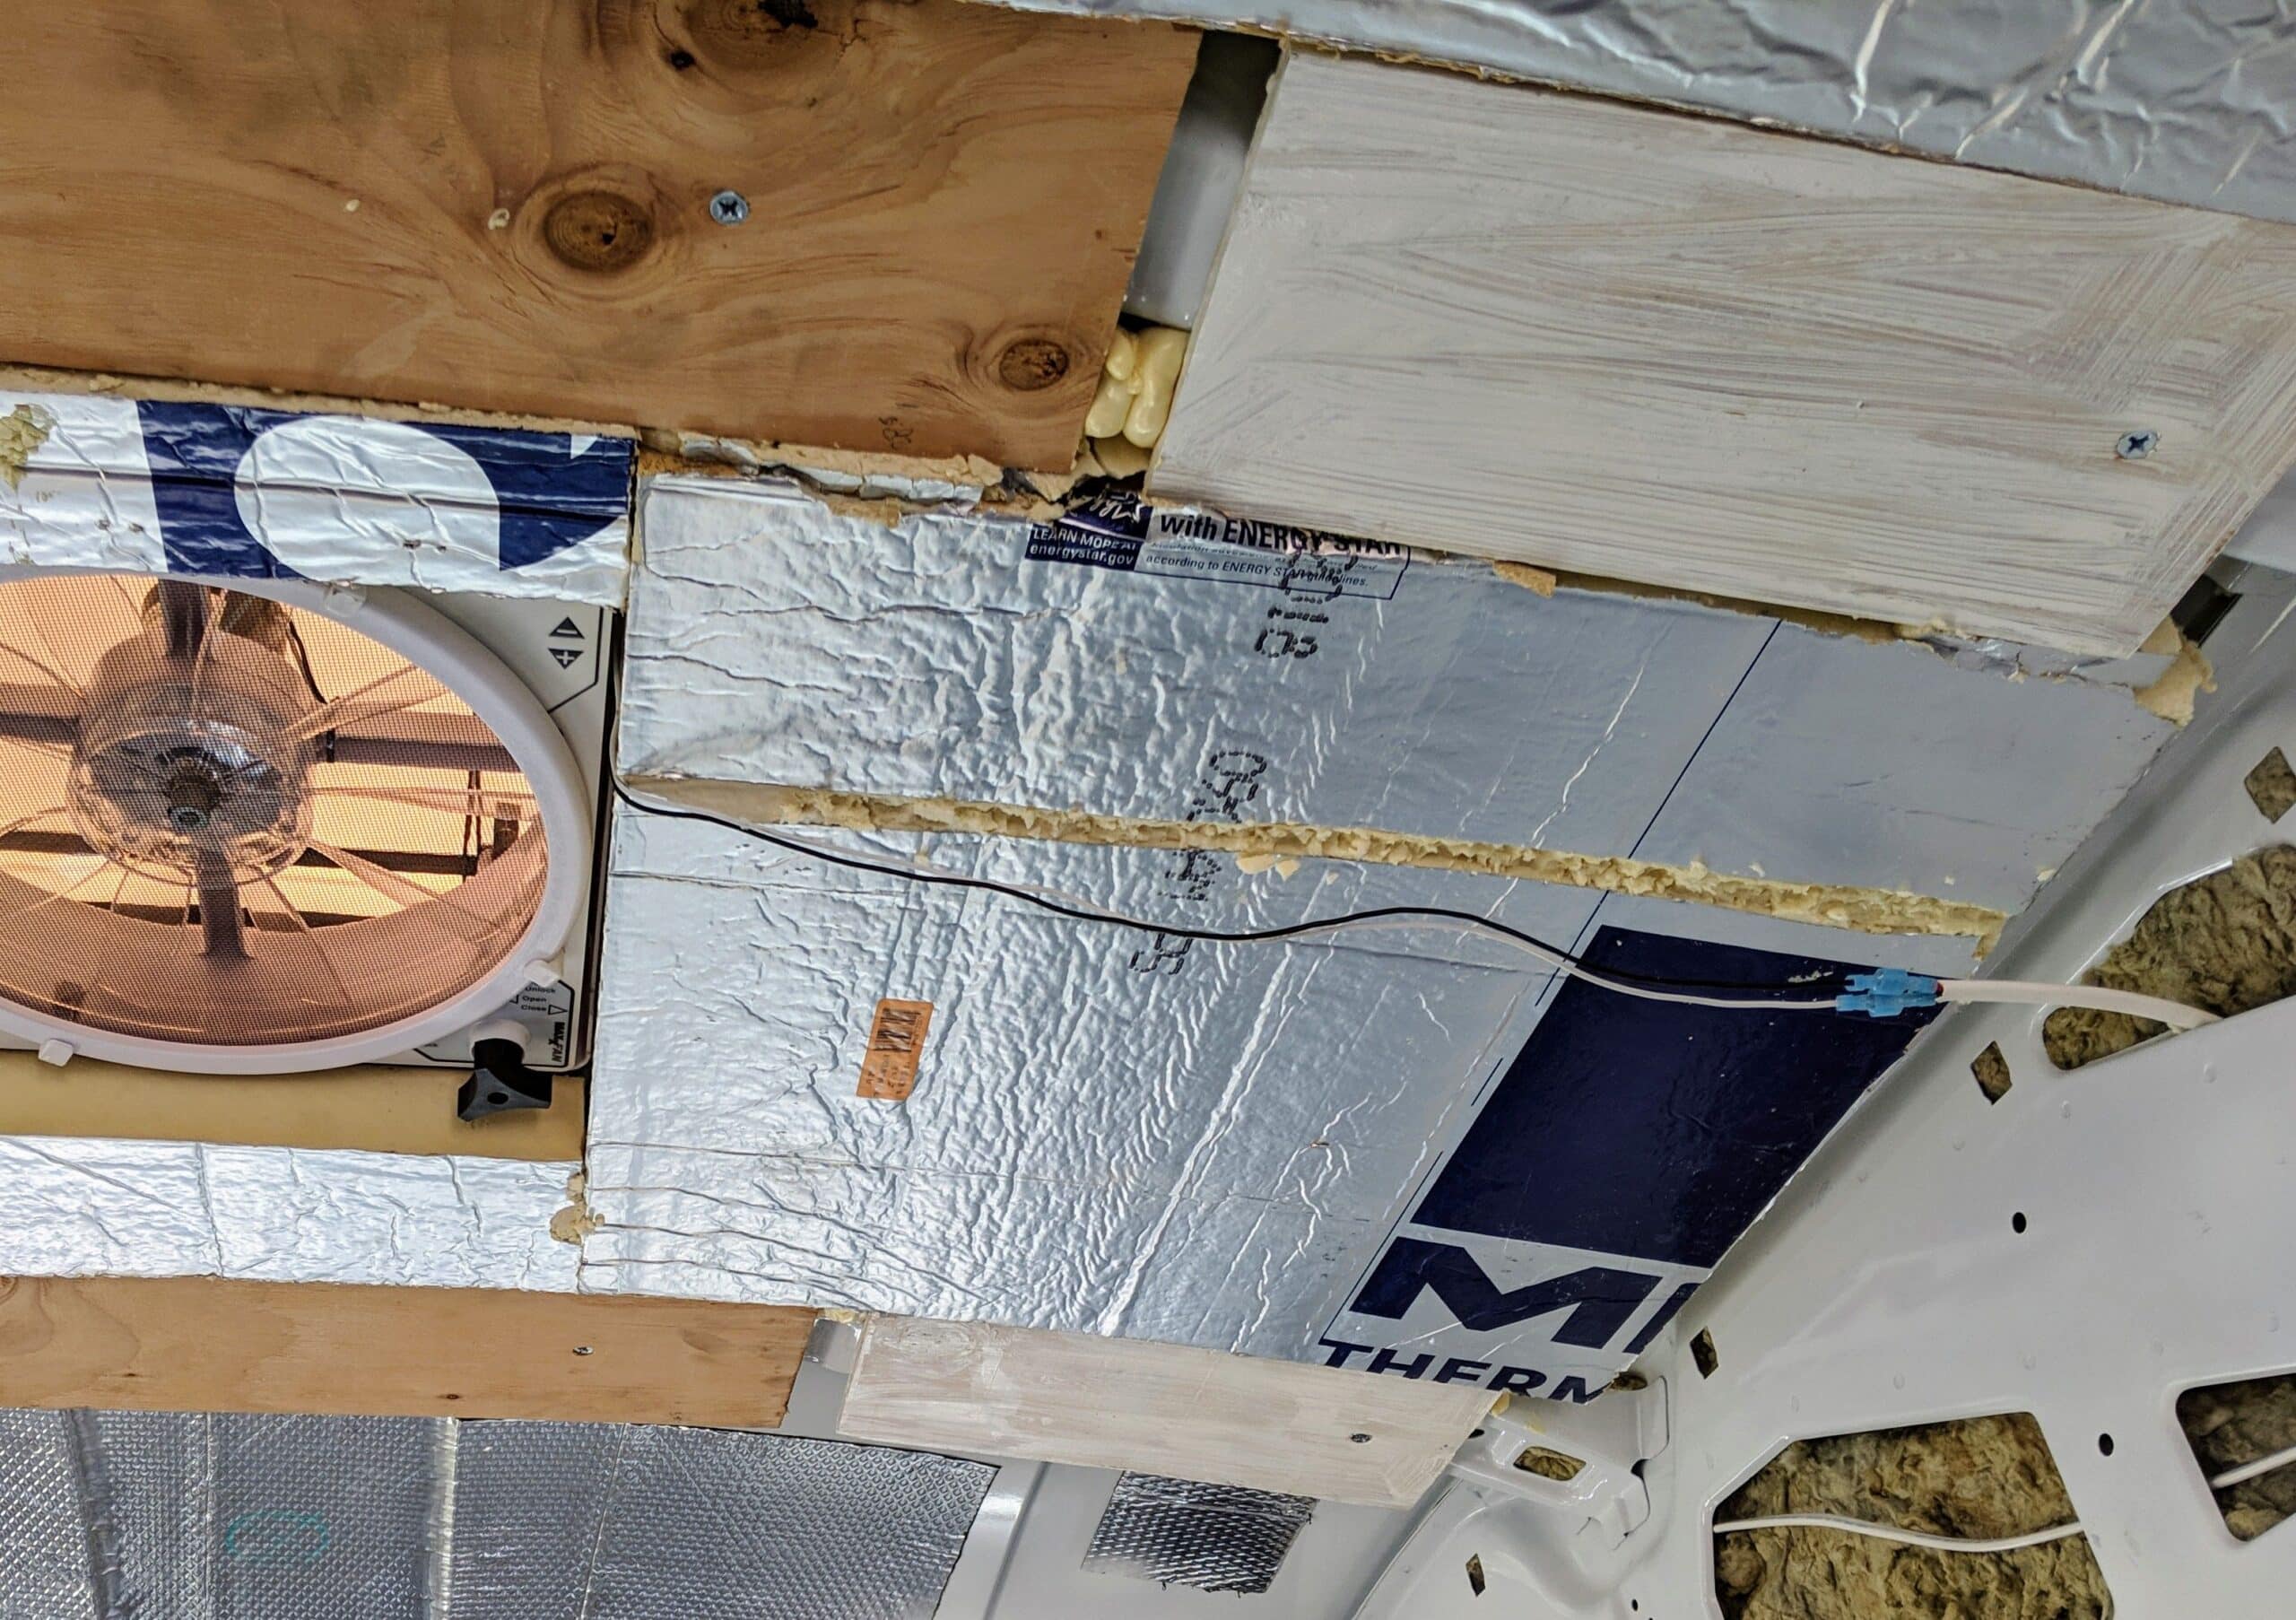
We also cut the ceiling panel where our ceiling fan is installed. This was as simple as measuring from the wall to the fan, and from the front of one of the furring strips to the fan, and transferring those dimensions to the ceiling panel. These are fixed points in comparison to the plywood panel.The square for the trim ring measures 13.75” x 13.75”, but we cut 14” x 14” as there is a big flange on the fan trim ring that covers the cut.
We drilled pilot holes in the four corners of the plywood panel, then cut with a jigsaw. To check the cut, we test fit the panel and the trim ring into the ceiling before attaching the panel.
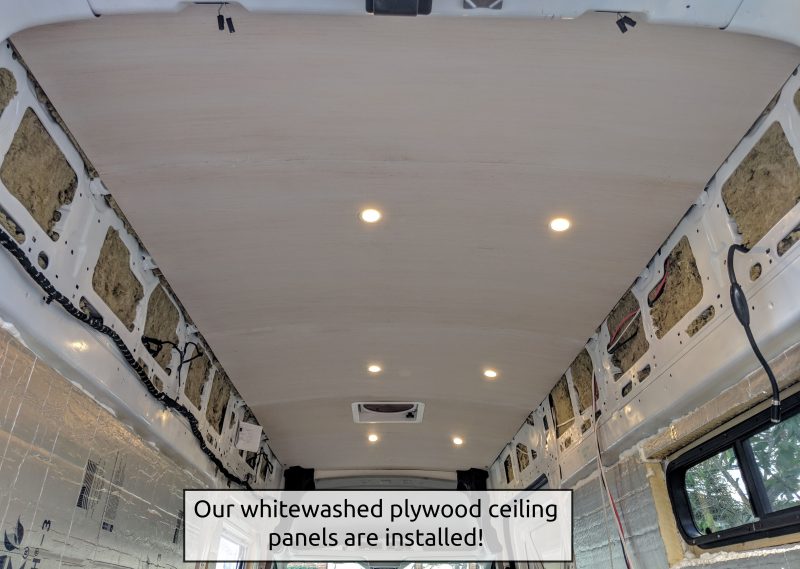
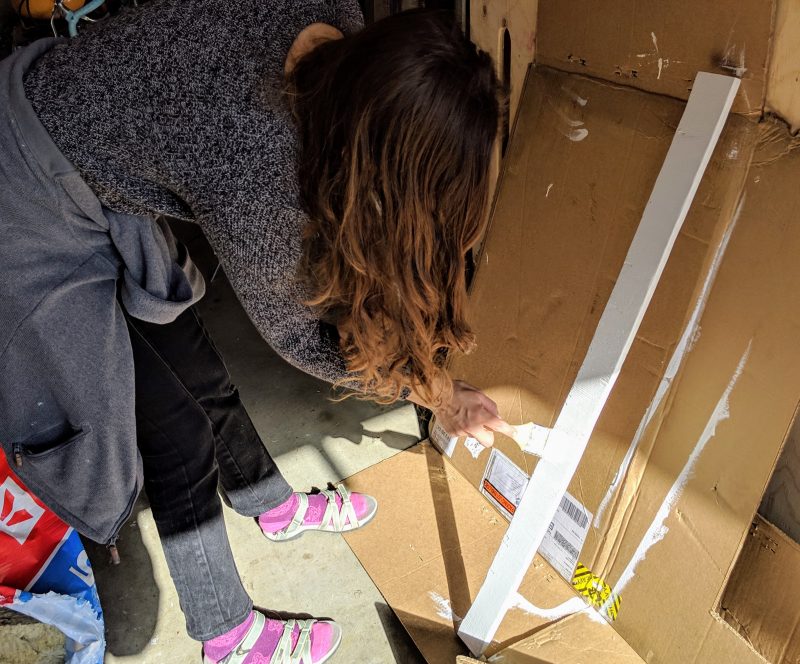
Whitewash Finishing the Plywood Panels
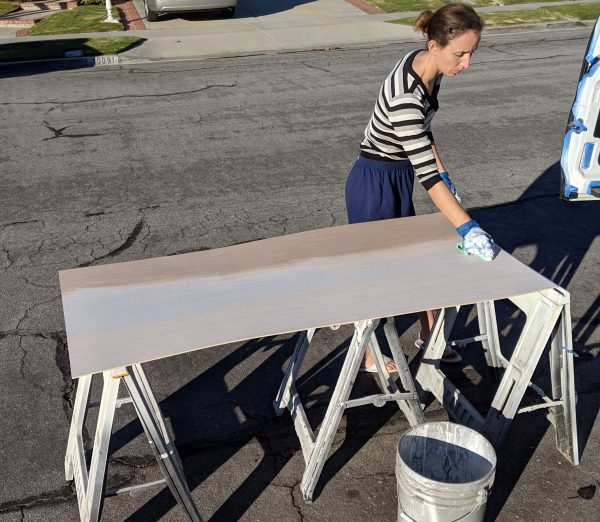 We couldn’t decide if we wanted a wood ceiling or white ceiling, so we split the difference by whitewashing! To whitewash, Nadia diluted white paint (normally one would use “flat” paint for a ceiling, but we used “eggshell” we had on hand) with water at a 1-to-1 ratio. We are really happy with the finish. The look is modern and clean, but still feels natural and not blindingly white.
The plywood panels we used were primed on one side and the plywood label said it can work as a moisture barrier. We whitewashed the other side. The priming is already a sealer, so we didn’t need to do anything to this side that would not be visible.
Instead of brushing, paint is applied with the wood grain with a lint free cloth, and wiped to the consistency and thickness that looks good. Nadia practiced on a scrap piece of the same plywood before touching our panels.
The paint coat is quite light, and still very “smudgeable.” Our hands weren’t always dirt free when handling the plywood, so some of the panels had smudges after being installed in the van. These were wiped off with a Magic Eraser cleaning product (it’s seriously magic)
Running Wiring for Lights
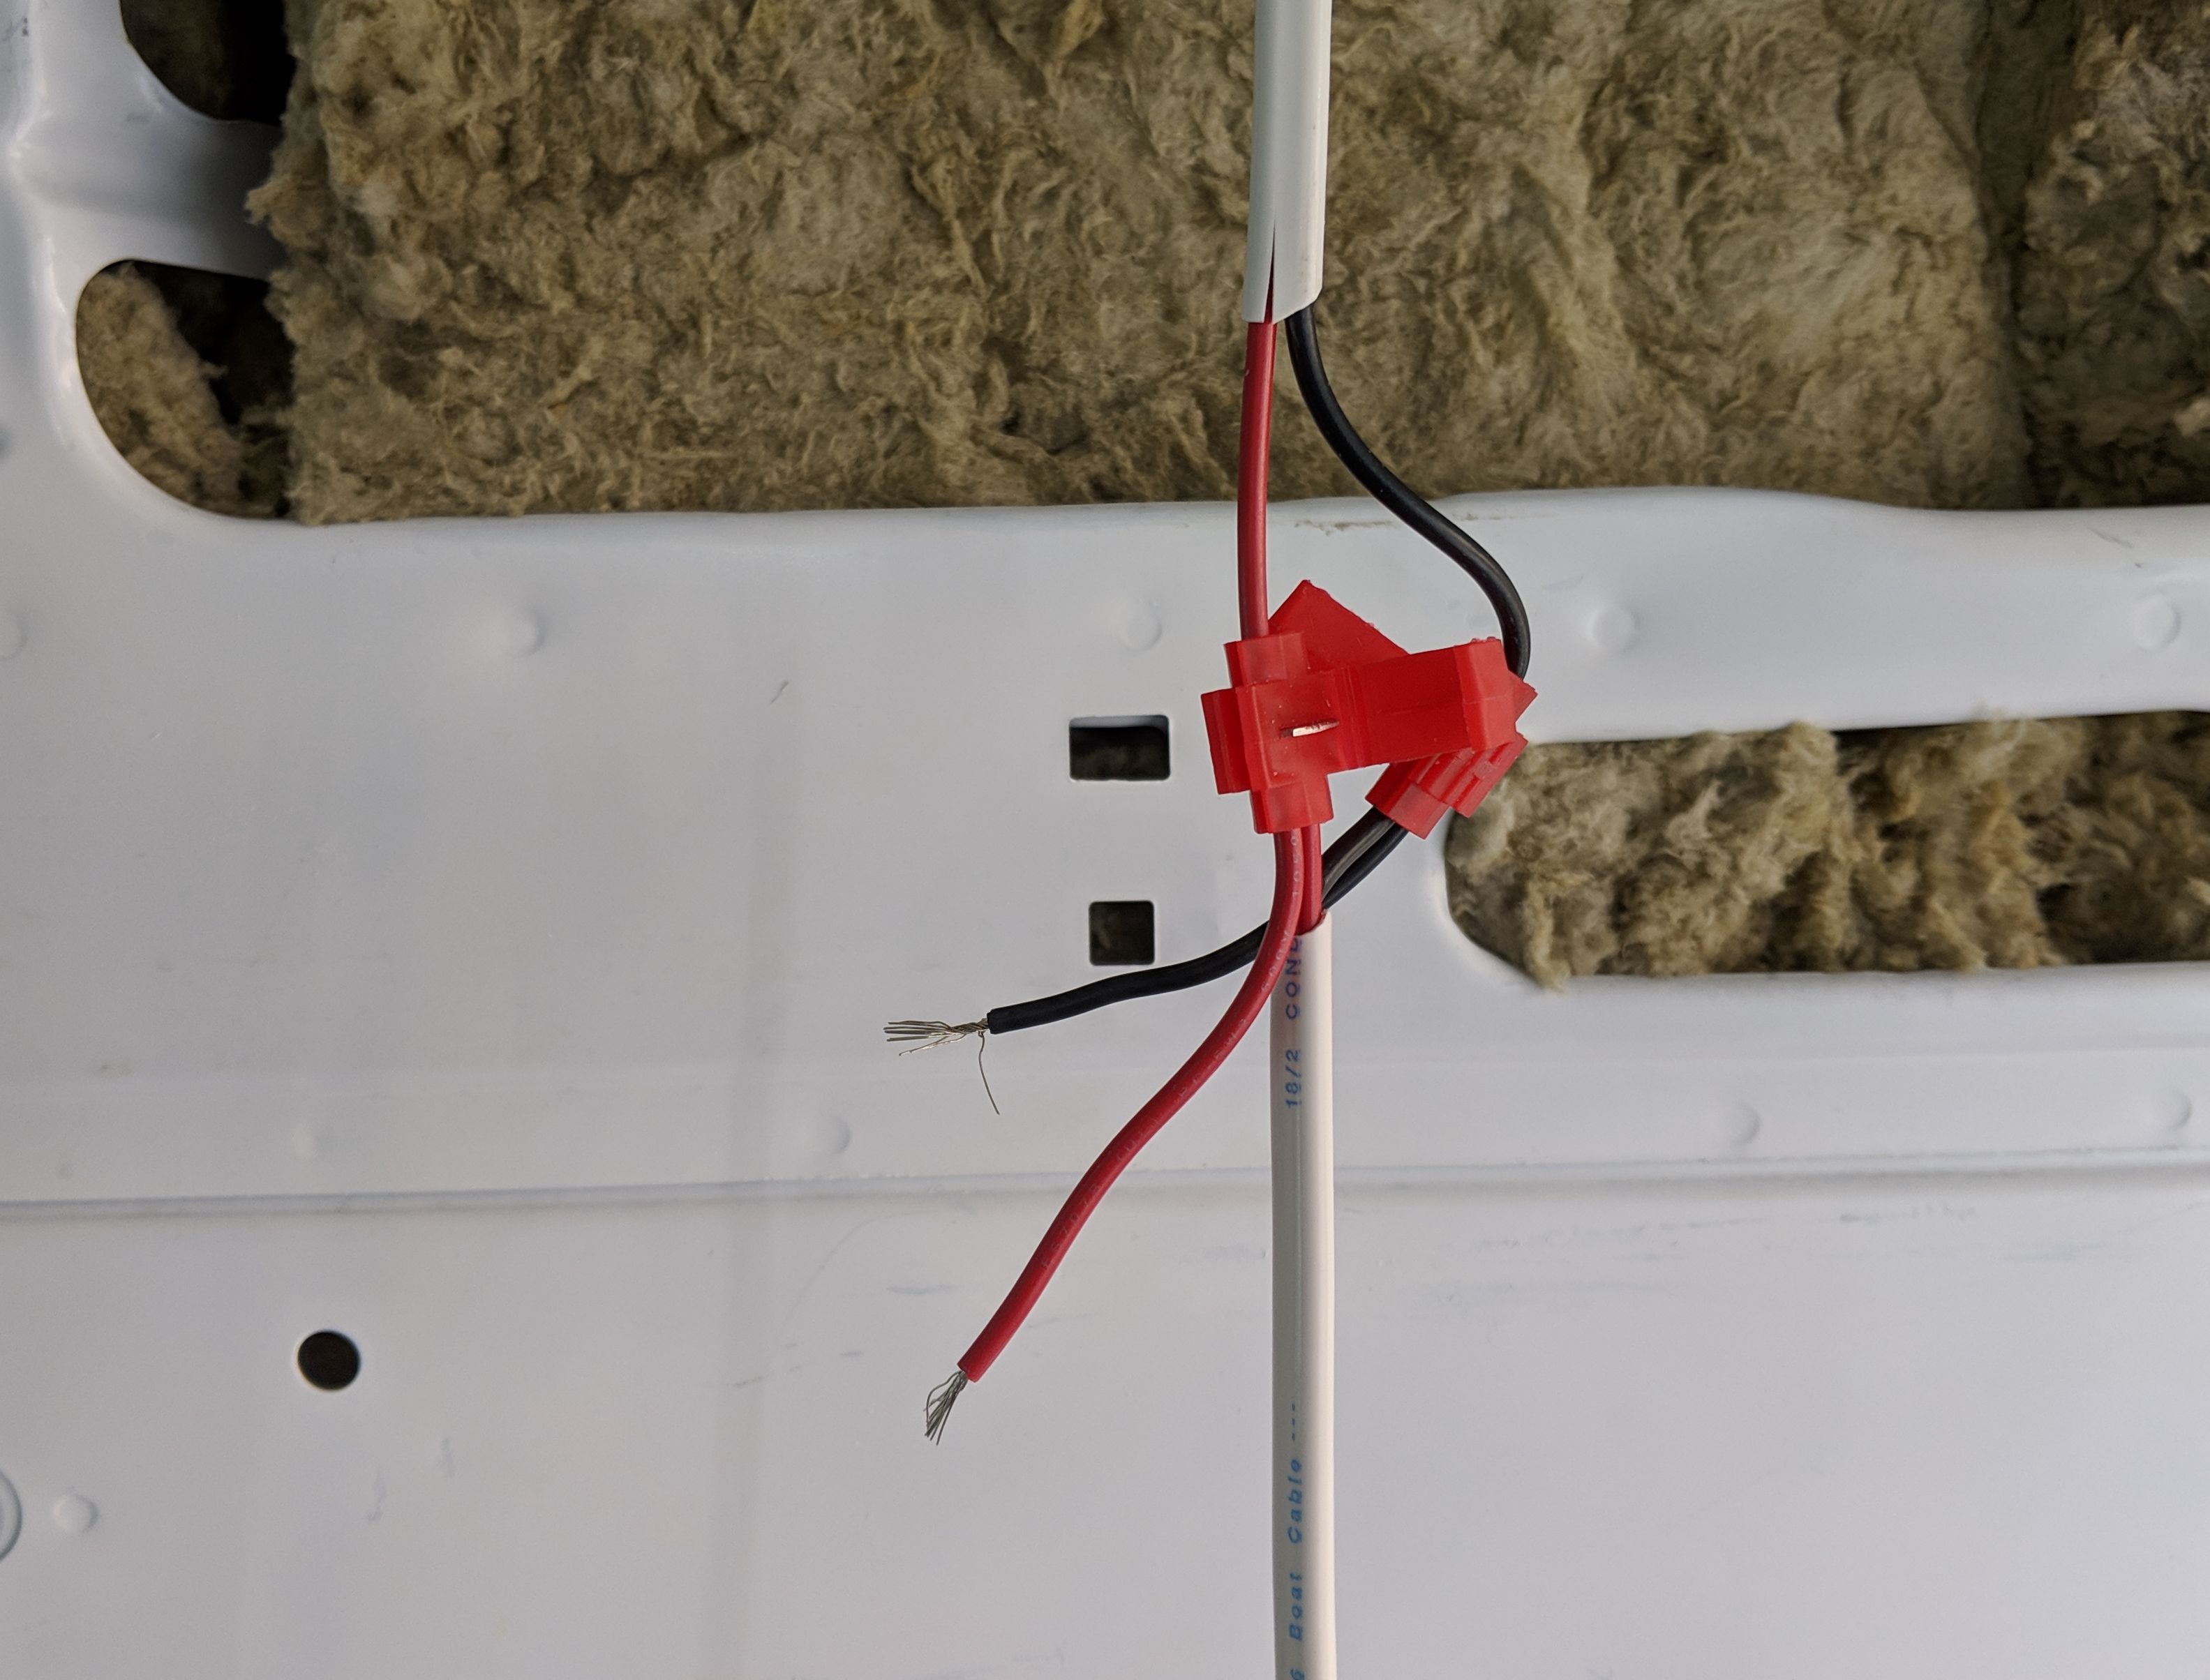
We wanted the insulation and wiring totally ready for recessed lights before installing the panels. The lights are 3 watts and we used 18 gauge duplex wiring.
Wires are connected with quick splice wire connectors. Although we weren’t familiar with these products before this project, we definitely think they are easier to work with and more secure (made to withstand the vibration of an automobile) compared to standard wire nuts. How to connect quick splice wire connectors:
The wires were nestled into the rigid insulation by simply notching small lines, fitting the wires, then covering with aluminum tape.

The lights that we want on the same switch are connected in parallel. This diagram is the best visual example of parallel wiring. It took us some time to conceptualize this wiring, but once we were working in the van and working with the actual wires, it came together.
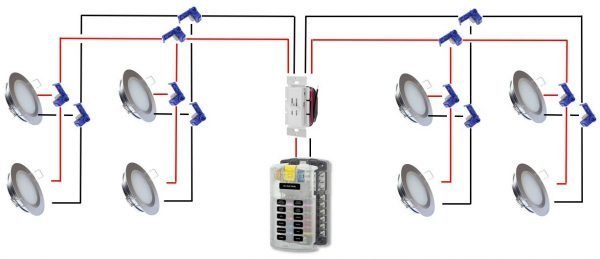
Credit to Faroutride.com for the image
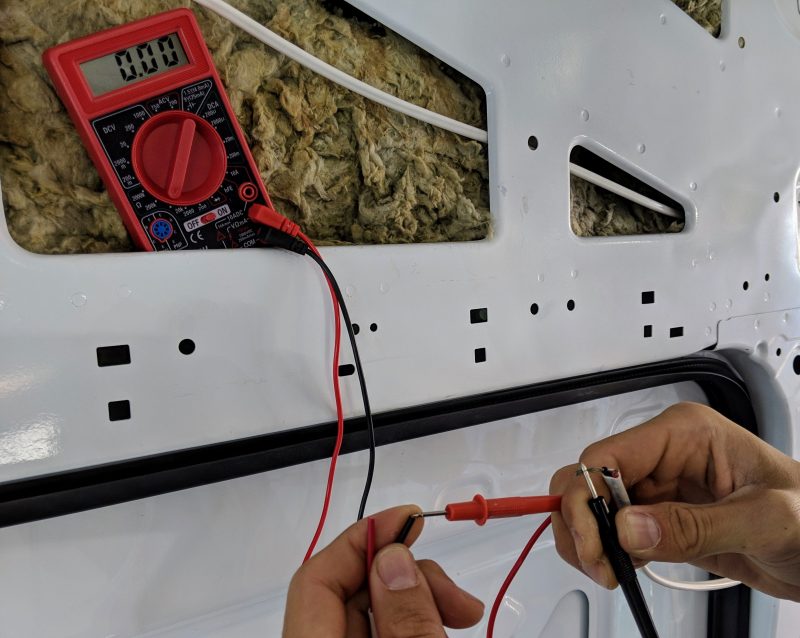
Before covering up the wires, we wanted to make sure our wire connections were correct and the lights would work! We checked continuity between each separate wire using a multimeter. On the ohm (Ω) setting of the multimeter, we touch the prongs on the same colors wire at the beginning and end of the line. A reading close to 0 indicates low resistance and therefore electricity is flowing (without resistance) between the two prongs.
Installing Ceiling Panels
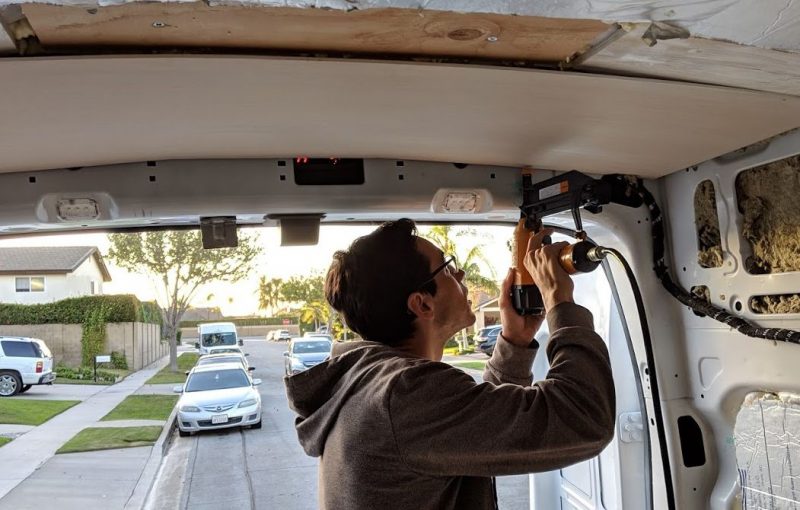
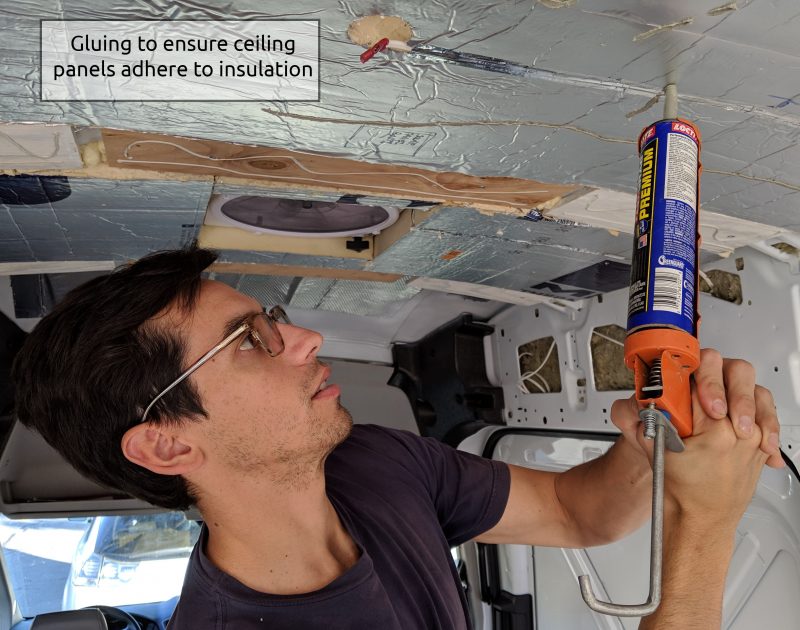
Now comes the fun part! Cutting and finishing the panels was the tedious work; actually nailing them is pretty quick. We installed panels from back to front. We also added Liquid Nails adhesive (as opposed to wood glue, since it’s easier to apply in this instance out of a caulk gun) on the furring strips right about where we are nailing.
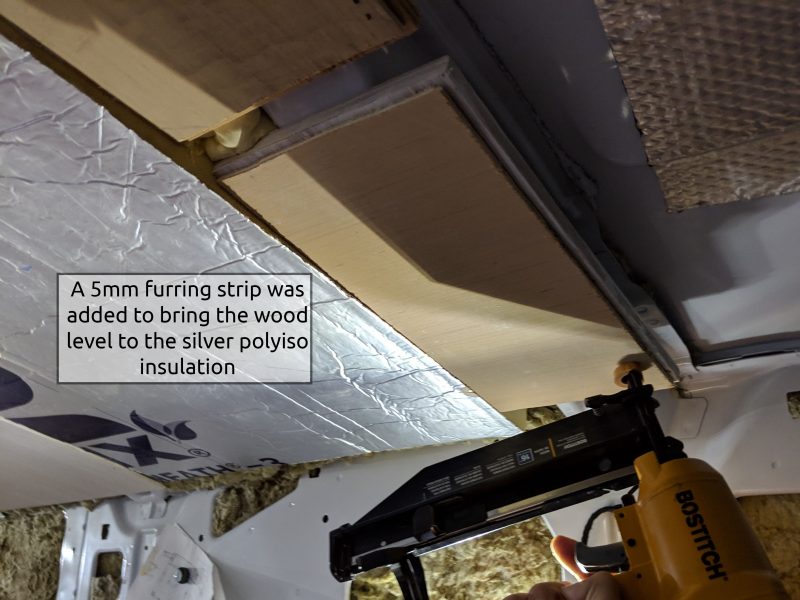
The depth of 2” polyiso insulation on the van metal roof was horizontally flush with the depth of 1/2 inch plywood attached to the ceiling ribs. Except for one! For one of the furring strips, the polyiso was installed slightly off-kilter and the polyiso was sitting below the furring strip. The ceiling panel would not sit evenly on the furring strip. Therefore, we furred out the furring strip (increased its thickness) by attaching a scrap piece of 5mm plywood. This brought the furring strip flush (enough) with the polyiso.
For the panels we used a nail gun and 1 inch 18 gauge brad nails. 18 gauge is thin for ceiling panels constantly fighting gravity, which is why we added the Liquid Nails. We wanted short nails to ensure the nail would not go through the van roof! Because the 5mm ply is so thin, we highly recommend practicing the nail gun on a scrap piece of the same plywood. If there is too much pressure, the nail could just go through the plywood. We found the right air compressor setting at 100 psi.
In lieu of a nail gun, one could use pan head screws, or simply hammered finishing nails. The screws need to be pan head so that they compress the plywood into the furring strips, as the plywood is too thin for screws to countersink.
We had concerns that, given how flexible the plywood is, and up to about 32” spacing between furring strips where the plywood is attached, the panels might flex or bounce in the middles while driving. Fortunately, this is not the case! For safety’s sake, where there was a large span between furring strips, we also added Premium glue on the Polyiso insulation panels (stronger glue since Liquid Nails wouldn’t adhere to the aluminum face of the insulation).
For the bigger pieces we needed two people to hold up the ceiling panel while a third nailed (or we could have bought this fancy 3rd Hand Tool). Before nailing, we fished the lighting wires down through the precut hole so that we could easily attach the lights after nailing.
The Front Ceiling Panel
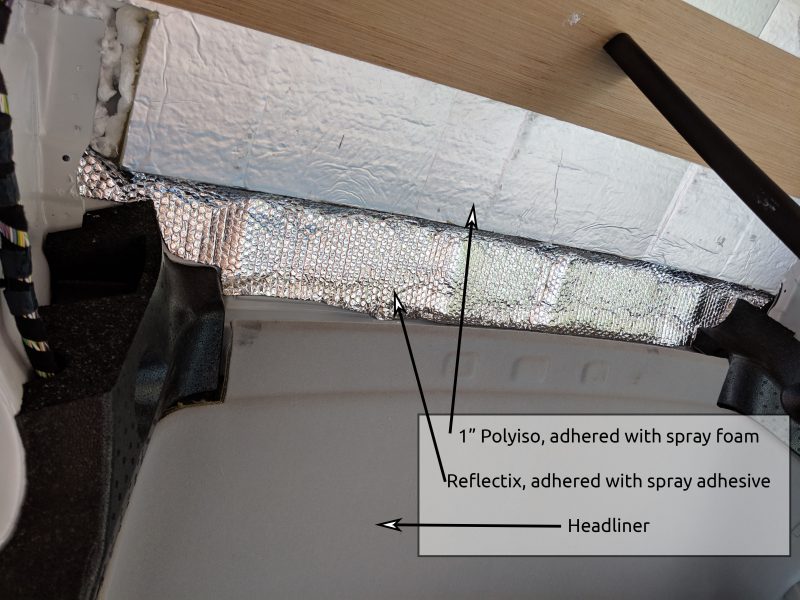
Ceiling insulation – The metal roof slopes downwards pretty sharply towards the front and we wanted to minimize the lost headroom. We did not use thick insulation here. We used 1” polyiso insulation for most of the area, then a layer of Reflectix glued to the metal for the last 6 inches until it met the ceiling rib. We need a vapor barrier on the ceiling (as much as we can), and both of these aluminum faced products are vapor barriers.
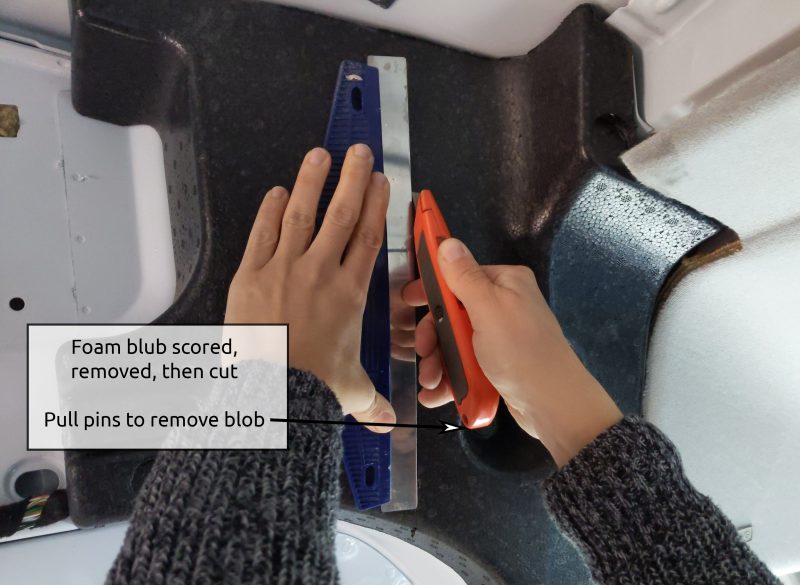
We then trimmed the black foam blobs, scoring with an exacto knife in site, then removing the foam and using a Japanese-style hand saw to finish the job.
We made a template using cardboard of the front panel cutout. This was time consuming as the panel needed to be cut around the foam blobs. Additionally, the ceiling narrows by about three inches as it gets closer to the front, and curves down. At first, the seam between the two panels just wasn’t lining up. After trial and error, we needed to do a curved cut at the seam here, which we shaved down slowly with a jigsaw and sanding tool.
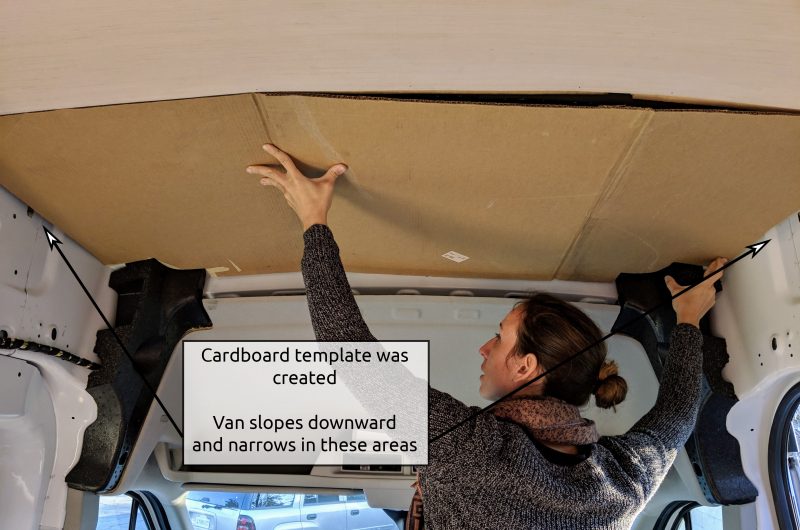
Once we were happy with the fit of the cardboard template, we traced the outline onto our ceiling panel. The panel was cut with a jigsaw and sanded using an oscillating multi-tool.
Attaching the Front Ceiling Panel
The back of the panel was nail gunned to the furring strips as normal. The front of the panel is supported by a trimmed piece of ½” plywood that is simply resting on the headliner.
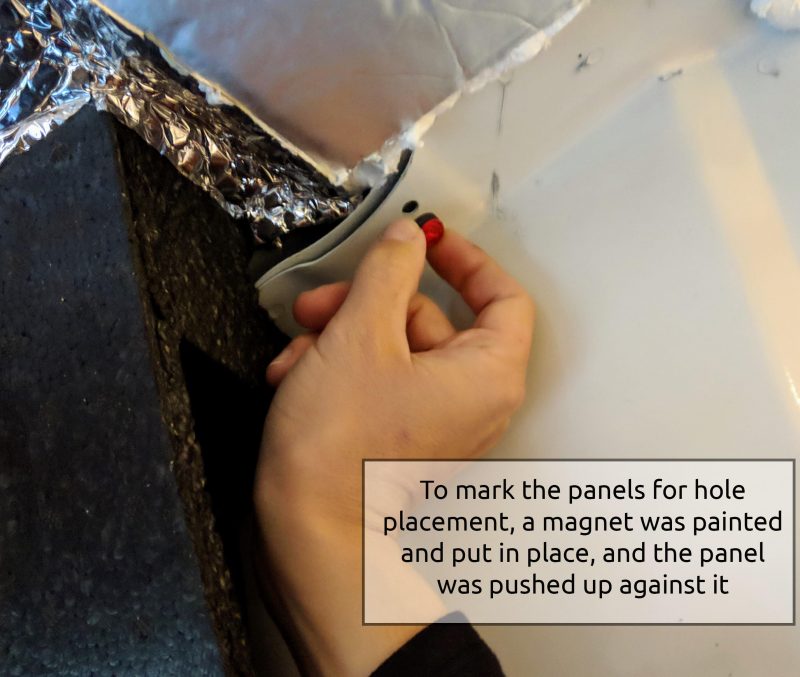
Lastly, we also secured the middle of the panel to the van using two of Ford’s black plastic anchor plugs that were left over from removing part of the foam blobs.
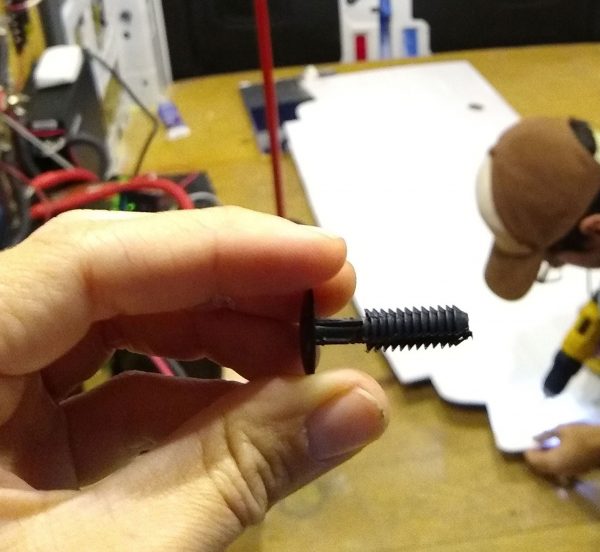
In order to locate where these holes would fall on the ceiling panels, we painted the face of a magnet, stuck it on the hole with the paint facing down, and pressed the panel up. We drilled out a ¼” hole for the plugs.
Finishing the Ceiling Panels
We used spackling paste to fill all of the nail holes. Spackle dries white and blended in adequately to the whitewash finish. Spackle is great because it does not shrink or crack as it dries, so one application and it’s done. About 15 minutes of dry time later, we used a Magic Eraser to clean any excess spackle.
Finally, we applied a coat of polyurethane to seal the wood from moisture and protect the finish.
Once we installed the walls, we used carpet lining to cover the exposed metal at the rear door and the wiring harness.
Ready for more info?
Visit the Van Conversion Build GuideWe sincerely hope this information is helpful on your build journey!
This post contains affiliate links that may earn us a commission if a product is purchased. But, we always strive for the reuse and repurpose of materials – so we encourage searching for a local used option before buying from our links.

Thanking you for sharing this write up.
Good to know we are doing exactly as you both did.
What I learned, and thank you, was using cardboard to template the front section where the driver cab lining meets the van ceiling build.
Wishing you both well.
Thanks. The step-by-step instructions and helpful tips make the process seem approachable, even for those with limited DIY experience. This seems like a useful resource for anyone looking to tackle a ceiling panel installation project in a camper van conversion.