
We're an affiliate
We hope you love the products we recommend! Just so you know, we may collect a share of sales or other compensation from the links on this page. Thank you if you use our links, we really appreciate it!
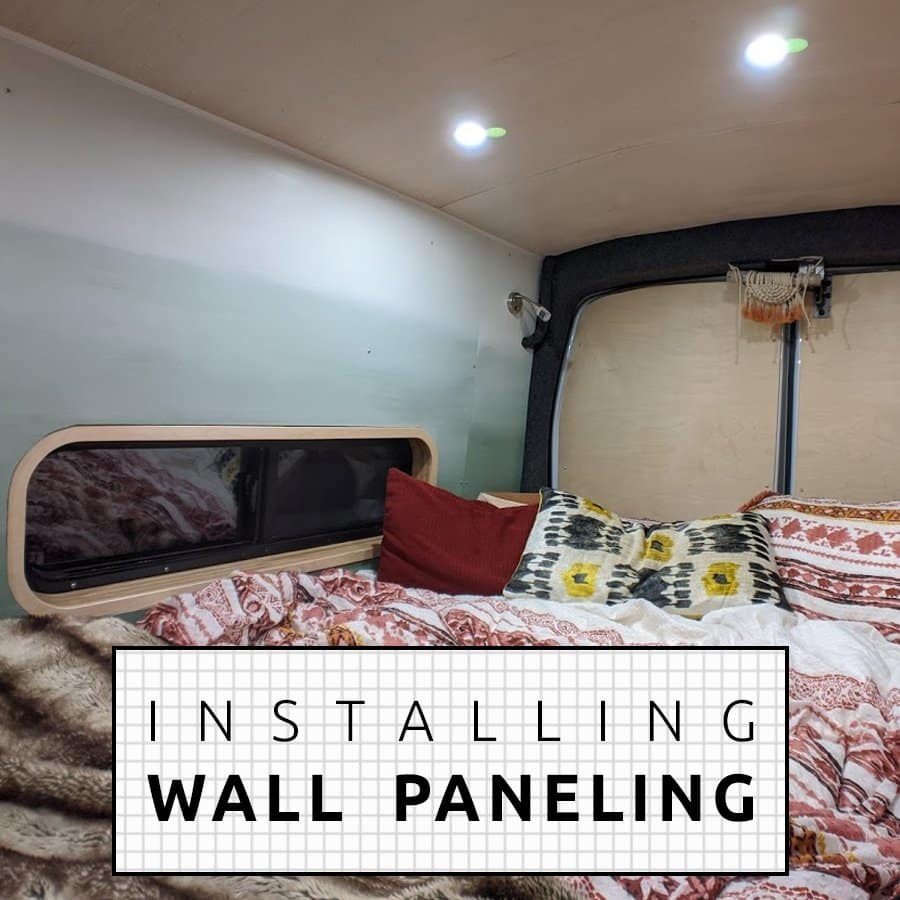
Upper cabinets are a great way to add additional storage in your camper van conversion. In our case, our upper cabinets serve primarily as storage for food and baking ingredients. They consist of two separate flip up cabinet doors, and are conveniently located above our sink cabinet.
“Uppers” are efficient but installing them up-and-down the entire length of your build will create a claustrophobic feeling – that’s why we installed them on just the driver side.

Designing the Van’s Upper Cabinets
These are the design ideas and goals:
- Thoughtful dimensions so as not to create a head-bumping hazard.
- Interior partitions and shelving for additional organization.
- Flip up doors that stay up when open, with the help of gas struts.
- Lightweight design.
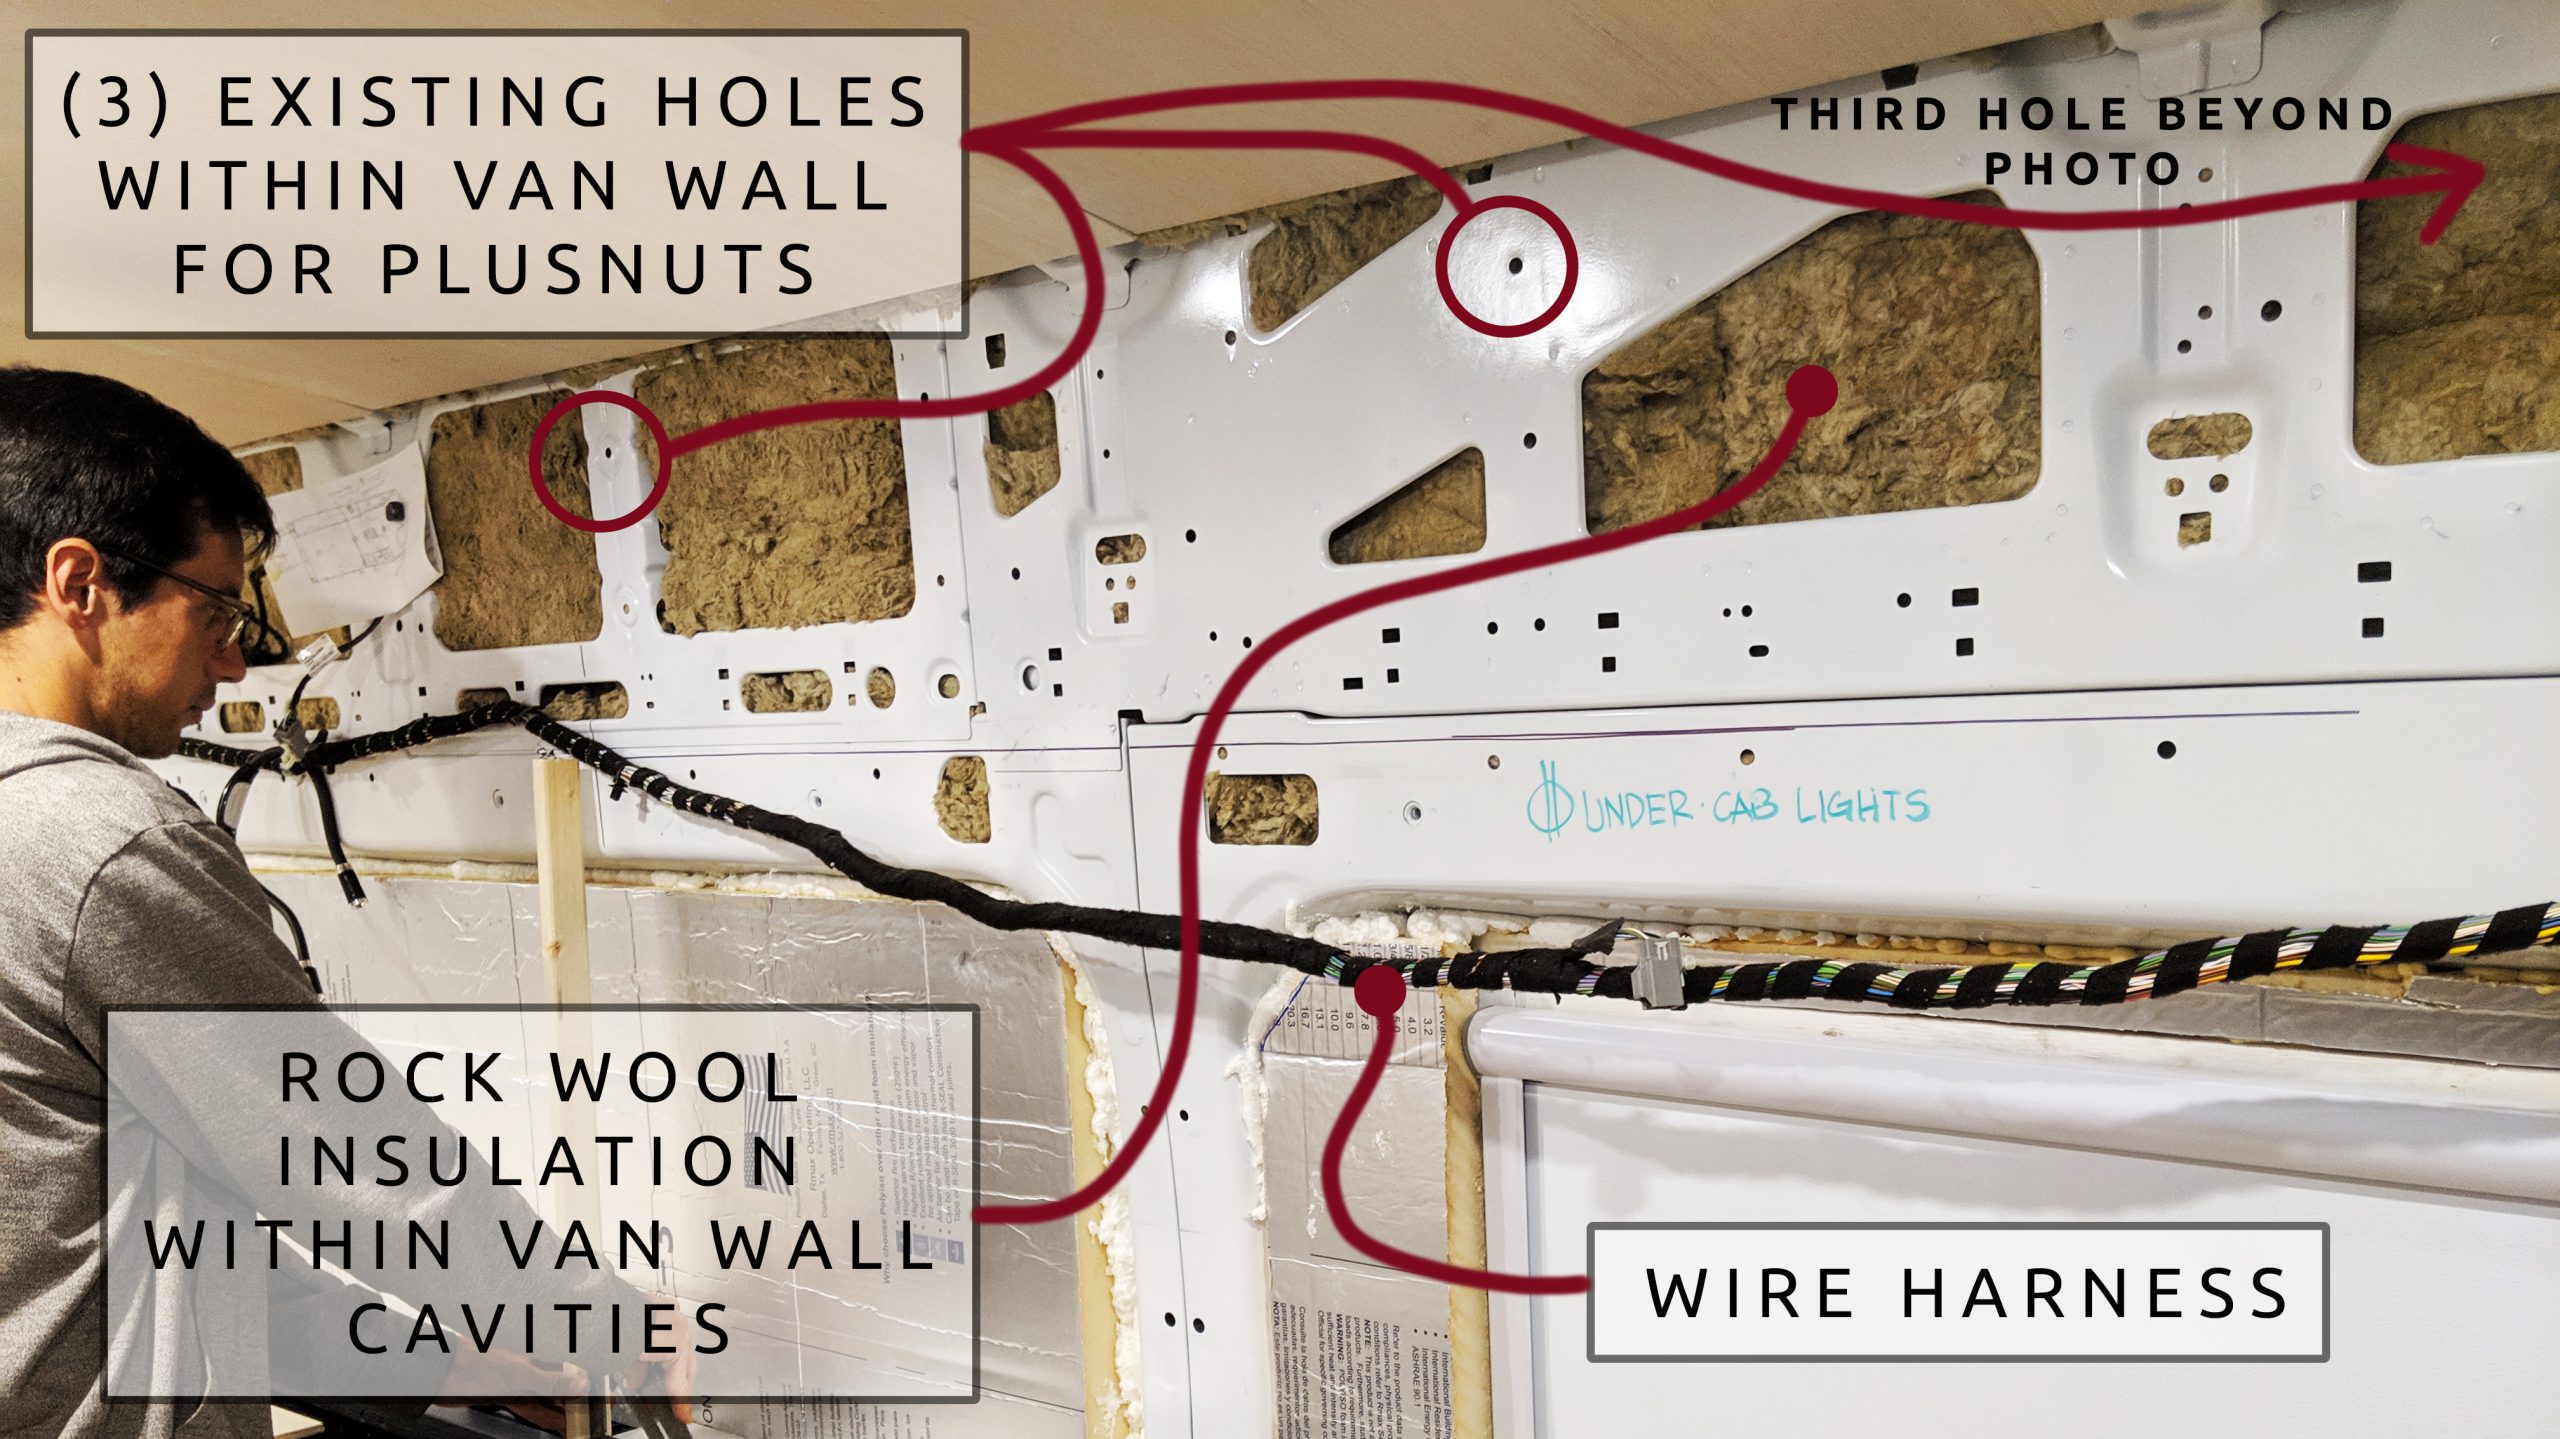
- Use of existing holes in the van with plusnuts for attachment to the wall.
- Routed edge finger pulls to eliminate the need for separate cabinet pull hardware.
In designing our upper cabinet, we measured out a height and depth that we felt would not be obtrusive. We would hate to create a head bumping hazard in our space, especially since the cabinets run over our bench seating. It’s always helpful to do a cardboard mockup if you have any hesitation on dimensions.
How did we actually attach our cabinets to the van? With plusnuts of course!

Heard of plusnuts? They provide a very strong fastening point in existing holes in the van, minimizing the need to drill holes and risk rust. Read More >
Cabinet Hardware (hinges, struts, etc)
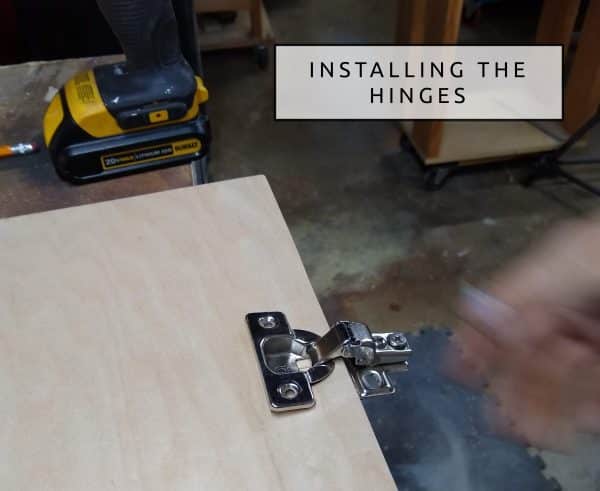
We were a bit intimidated at first by the all the hinge choices. Hinges for a flip up door can be a little different, because we want the door to stay up when we open it. There are hinges on the market with the “stay” functionality built in, but these are trickier to install and less reliable. We elected to use two separate components: a standard hinge, and a gas strut.
Hinges
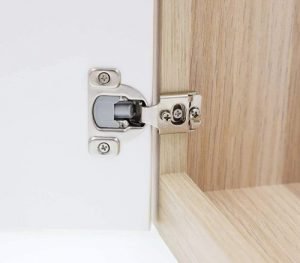
We used fairly standard soft close cabinet hinges. Two major things to know when selecting hinges:
- Cabinets face frame or frameless? – Here’s a tutorial. Our cabinets are face frame because they are “stick built.” We have a recommendation for face frame hinges and frameless hinges.
- Thickness of wood used in your cabinet door – You know us, we use the thinnest and lightest weight plywood we can. However, for cabinet doors, the hinges require a hole to be bored into the door to inset the hinge. This hole is usually about 7/16″. Therefore, we really have to use 3/4″ plywood for all the cabinet doors.
Gas Struts
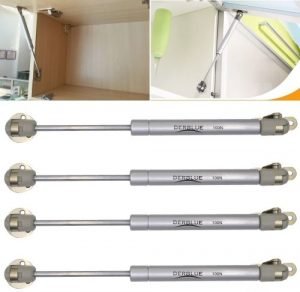
One gas strut per door. Gas struts have two characteristics to be aware of:
- Length of the strut – choose a strut that’s not too long for your door. For example, our struts are 7″ closed and extend to 10.6″ with the door opened
- Weight/Force per strut – The larger your door, the stronger the strut needs to be. 100N (N = newton) struts can exert 22.5 pounds of pressure. Due to leverage, your door will exert more weight than it would weight on a scale. Our advice? Buy a 100N strut, because there’s no significant price difference to 50N strut.
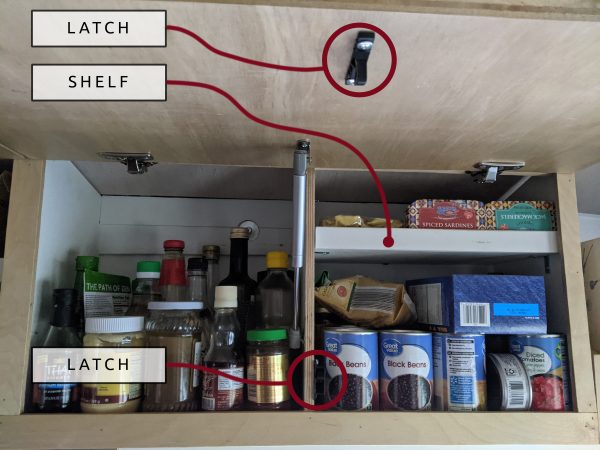
Latches
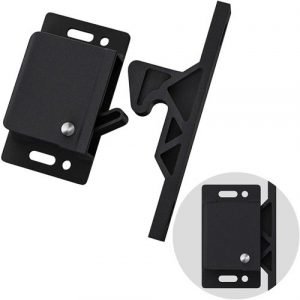
We are really happy with these latches. Trust us.. you don’t want your cabinet doors flying open when you’re driving! These latches have kept our doors closed through the bumpiest of driving conditions.
We thought we could skip latches on the upper cabinets. But the bottle of soy sauce that exploded on the floor on a bumpy dirt road said otherwise!
Corner Braces
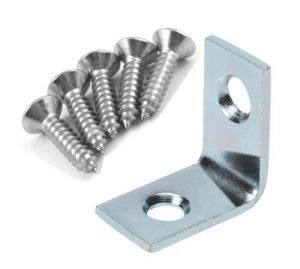
The corner braces support the two shelves we installed inside the upper cabinets. They are simple to install and allow us to easily reposition or remove the shelves.
Building and Installing the Van’s Upper Cabinets
Step 1
Our first step was to locate existing holes in the van wall that could accept plusnuts, to ensure we had enough points of connection.
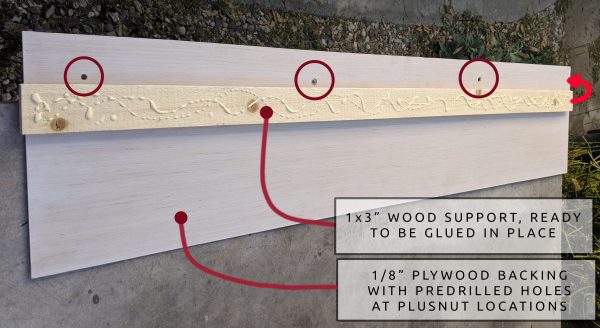
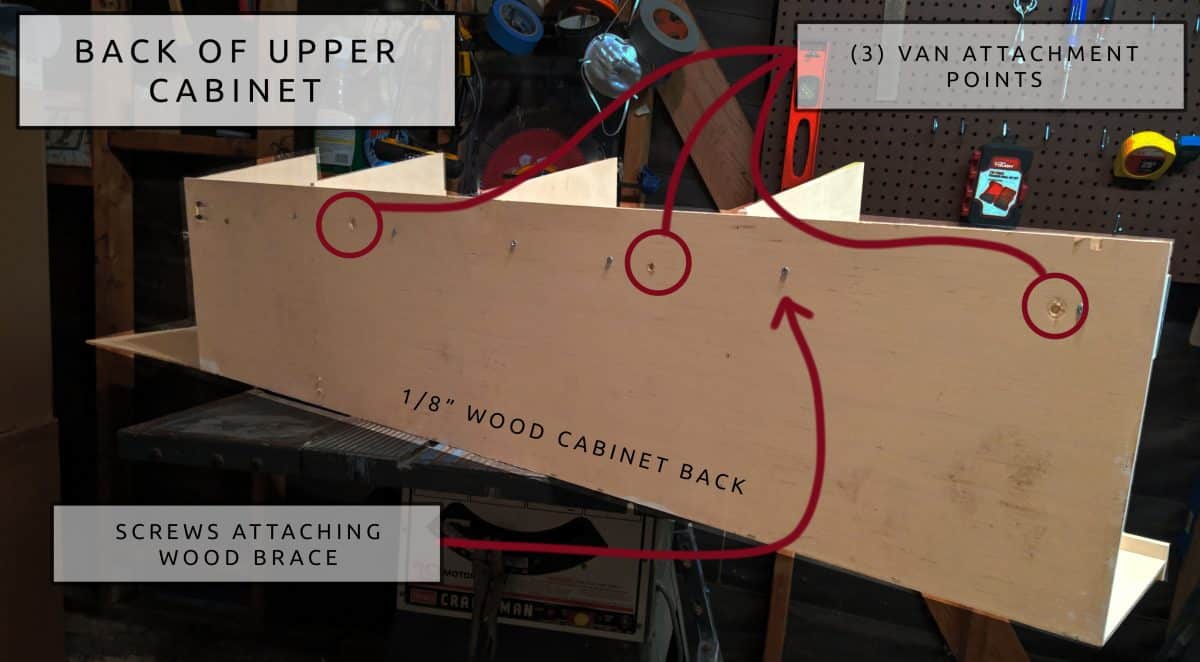
Next we cut the back panel to size, and located where the holes would go for the plusnut attachments. For the back panel, we used 1/8” plywood. We used the thinnest plywood because it’s basically decorative, as we add a 1”x4” piece of lumber a bit later.
Step 2
We attached the back ⅛” panel and kept it in place in order to create the templates for the interior dividing panels. The templates were made of cardboard.

A 1×4 piece of lumber on the back panel is the main structural support. It is bolted to the wall, and is what we attached our divider panels to. We attached the 1×4 to the back panel with wood glue, and with screws from the back.
Step 3
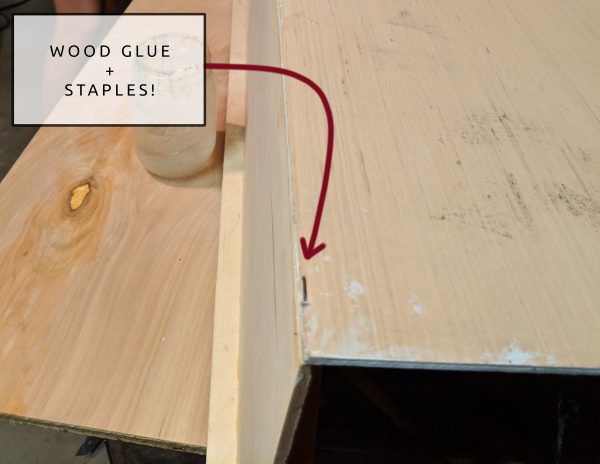
Next we created the bottom of the cabinet, this time using a thicker 1/4” plywood material. We created a lip as well, anticipating the bumpy roads we would be on. After several months on the road we can say we’re glad we included this lip! To attach the lip we simply used wood glue and 18-gauge finishing nails.
Similar to how we created the drawers for our lower cabinets, we attached the bottom to the back panel using wood glue and staples! This is a method that requires a little bit of precision with the stapler… there were a couple that we had to redo because they missed their mark!
In the end, this attachment is just for assembly – the main structural support for the bottom panel is its attachment to the four divider panels via nails and screws from the bottom.

Step 4
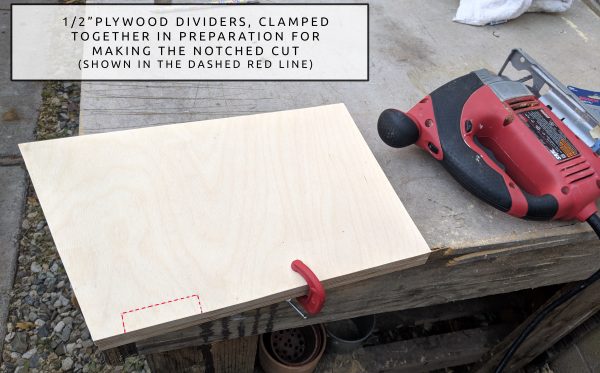
Once dry, we cut out a total of four 1/2” plywood divider panels, and created a notched cut where the 1×4 board runs through them.
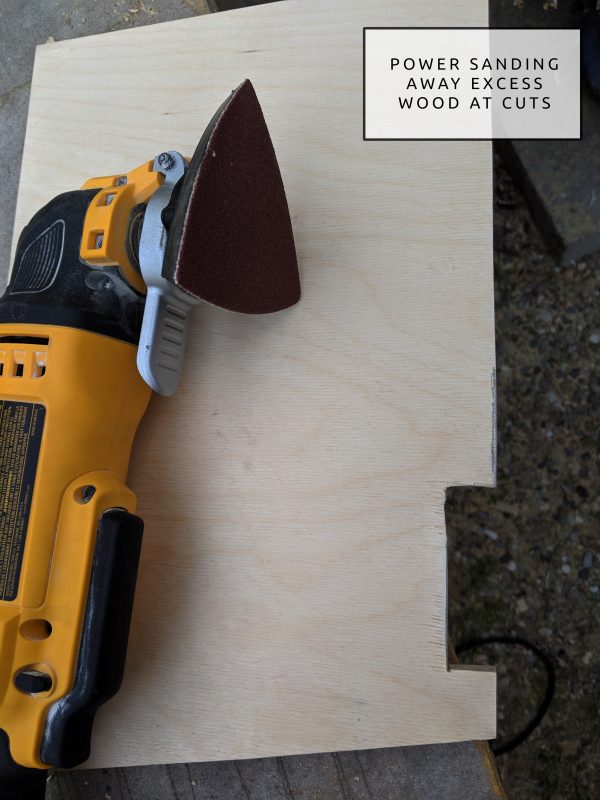
We staged the upper cabinet in the van and dry fitted the divider panels. We made adjustments as needed (each divider panel was a different height due to the curvature of the van roof). The adjustments were minor, and achieved mostly with a multi tool power sander to shave away areas where the dividers were conflicting with the curved roof of the van.
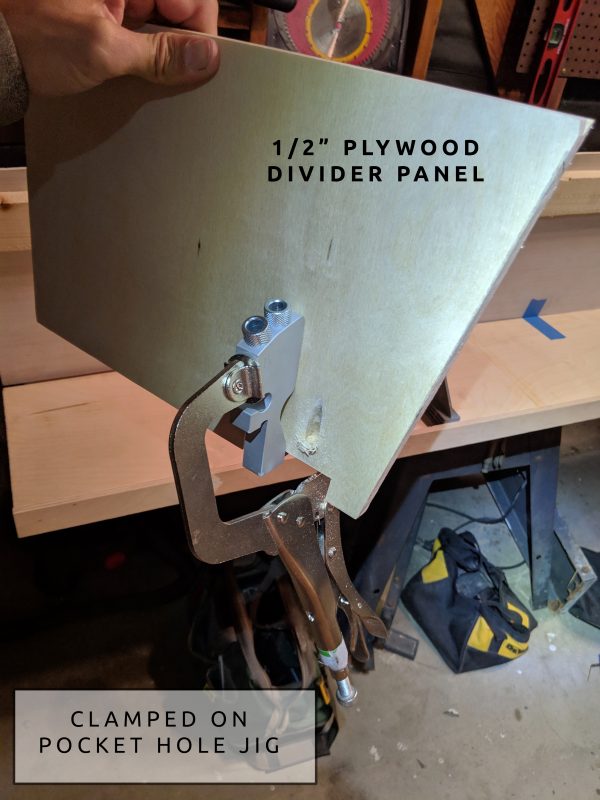
Next, We whipped out our trusty pocket hole jig and added two pocket holes to each panel, right where the 1×4 support would go.
Because of the thin ½” plywood and awkward spacing of the pocket hole, we used the small “portable” version of the pocket hole jig. We used our C clamp (a necessary accessory) to hold the jig in place while screwing the holes.
Step 5
We took our time to attach the divider panels to the back panel using screws in the pocket holes, and glue on both the back and bottom edges. We used a square to ensure we were staying square (straight). Squareness here was really important, because the gas struts are going to be installed on these divider panels.
Order of operations for installing the dividers:
- Put glue on the bottom and back of the divider and put in place
- Firmly hold the divider while screwing in one pocket hole screw to the back panel
- Immediately flip up the cabinet and add two 18-gauge through the bottom ¼” panel of the cabinet, up into the divider panel. Aim well! This clamps the divider to the bottom panel of the cabinet while the glue dries.
- Double check the divider is square to the bottom panel, then fasten the second pocket hole screw
For good measure, we also added small pan head screws that go from the bottom, up into the dividers. These were small #4 screws because they were screwing into the end grain of ½” baltic birch plywood, but we went for 1-¼” length. These are visible from the outside, but we kept them close to the front, so you don’t really see them while you’re standing in the van.

Once dry, we went ahead and staged the upper cabinet in its current state to ensure we had done a good job so far. In our case, we noticed there was a very slight downward tilt, but we found it acceptable. Otherwise, we could have added a furring strip to the bottom of the back of the cabinets.

Step 6
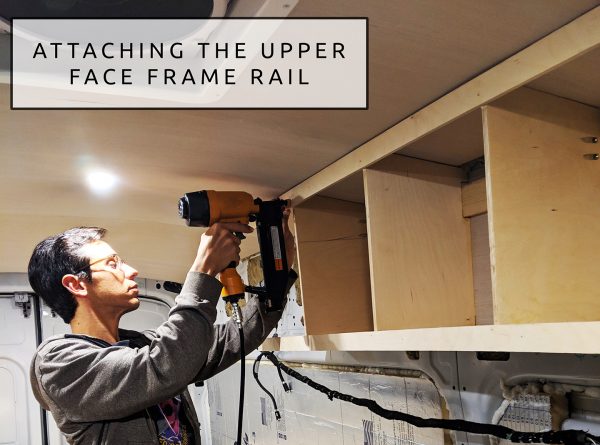
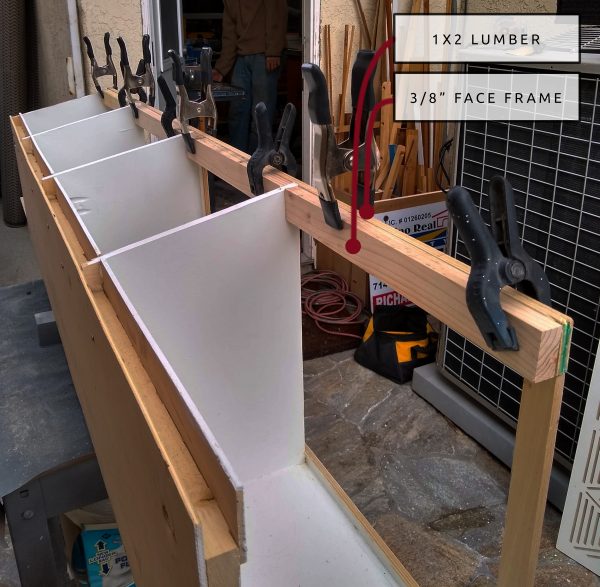
The last step for the cabinet “carcass” was adding the face frame pieces, from ⅜” plywood. These all need to be the same plywood thickness because the face frame is a flat surface that the door sits on. The horizontal and vertical face frame pieces are on the perimeter of the carcass, plus a vertical piece in the middle where the two doors will meet.
The face frame was attached to the dividers with glue then 18-gauge finishing nails.
These face frame pieces also provide side-to-side lateral support for the cabinet structure. They attach to all the dividers and tie them together.
Step 7
Lastly, we needed some lumber for the hinges to attach to. We used 1×2” lumber in between the dividers, attached using pocket screws to the dividers. It was also glued to the ⅜” face frame rail. We used lots of clamps while the glue dried because any gaps would create problems for the hinges.
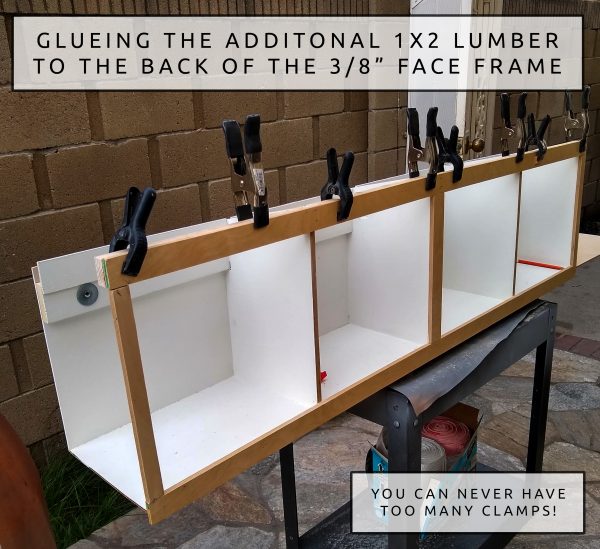
We painted the inside of the cabinets with a semi gloss white paint (Sherwin Williams – Alabaster), and finished the outside wood tone rails with a couple coats of Polyurethane.
It’s worth pointing out that we did not have an end panel on the far left of our upper cabinet at this point. The reason for this is that the upper would butt up to our cubby storage. We held off further progress until we had that in place, so our pictures will show the open cubbies going forward!
Making the Doors
The flip up doors were a fun piece to design and make. We ended up using a thicker 3/4” plywood here. This was done in order to accommodate our recessed hinges. We have access to a CNC machine, and this was a fun opportunity to make use of this resource. We painted our doors with white semi-gloss paint, and then let the CNC carve away to reveal the wood below. It was so cool to see the robot in action, slowly revealing our diamond pattern.


Once the CNC Machine had done its job, we gently sanded away any residual wood splinters, and applied a coat of polyurethane.
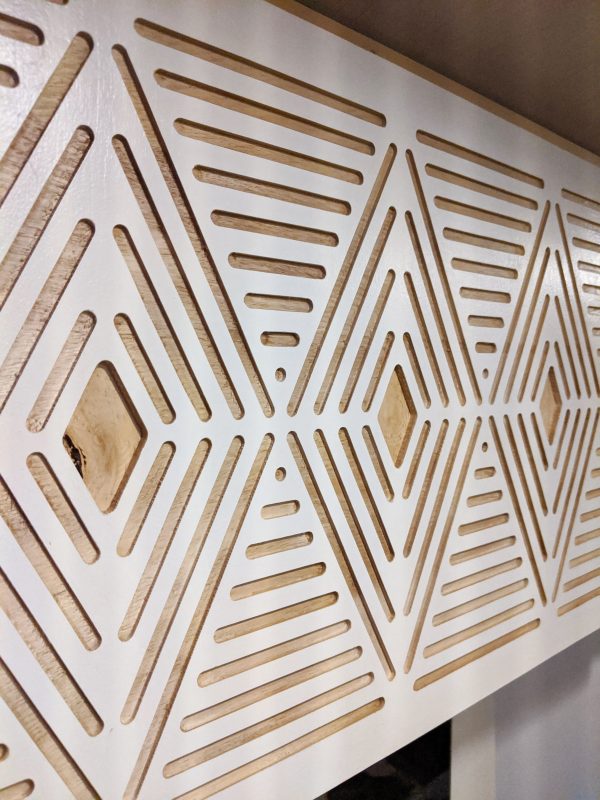
Next, it was time to route out our linear finger pull edge, which is how we open our cabinet door. We used a router table and cove box router bit for this. It could be feasible to use a hand held router, as long as you have a guide to keep you on course! We approved a test run on a scrap before fully running the bottom edge of both our doors along the machine. It’s important for the edge to feel substantial enough to provide an edge to pull up on.

Cabinet Hinges, Struts, and Latches
We installed the door hinges per the manufacturer’s instruction.
One of the most exciting parts of this upper cabinet build was adding the gas struts. We had some trouble figuring out how to take these apart at first, but once we had that understanding, the installation was pretty straight forward. We’re SO glad we added these, because they make these cabinets extremely user friendly. We highly recommend including gas struts.
Gas struts have two characteristics to be aware of:
- Length of the strut – choose a strut that’s not too long for your door. For example, our struts are 7″ closed and extend to 10.6″ with the door opened
- Weight/Force per strut – The larger your door, the stronger the strut needs to be. 100N (N = newton) struts can exert 22.5 pounds of pressure. Due to leverage, your door will exert more weight than it would weight on a scale. Our advice? Buy a 100N strut, because there’s no significant price difference to 50N strut.


Another vital addition were latches to keep the cabinets closed on bumpy roads. At first we thought the strength of the hinges and gas struts would be enough to fight the forces of the road. But then the “soy sauce incident” happened, and we realized we needed more insurance for dirt road adventures. These latches have done the trick and don’t add a significant amount of force for opening. We’re very happy with them!
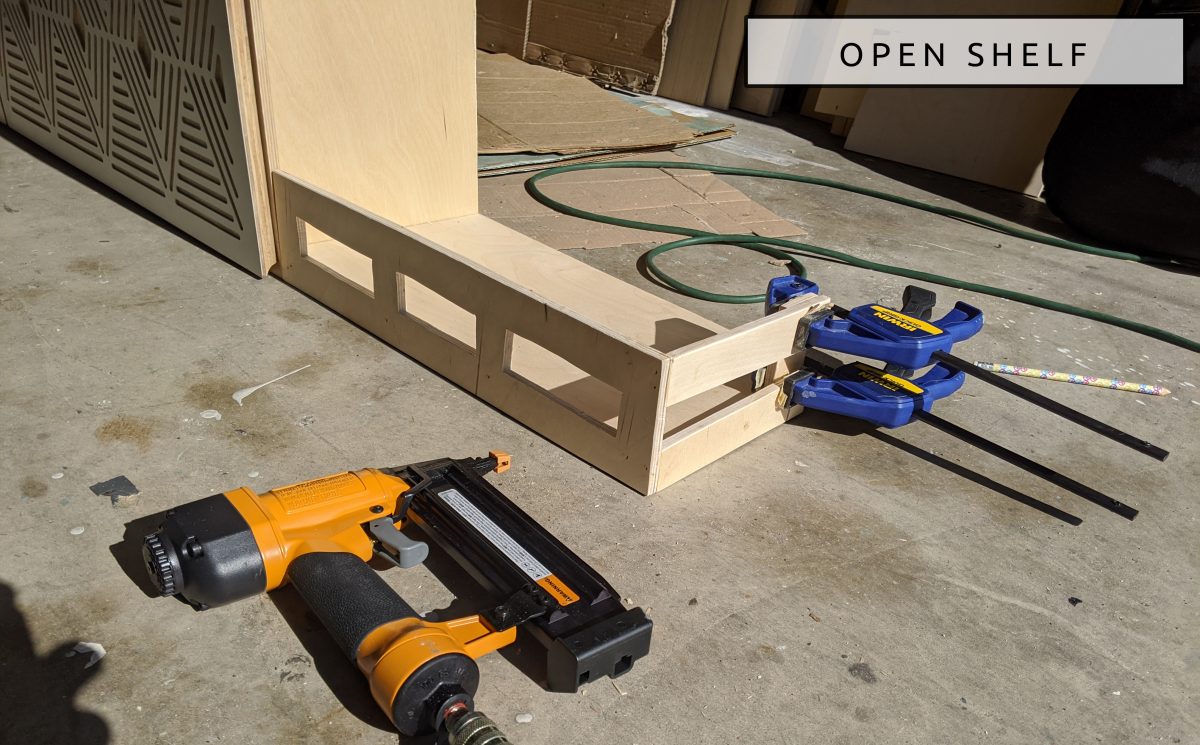
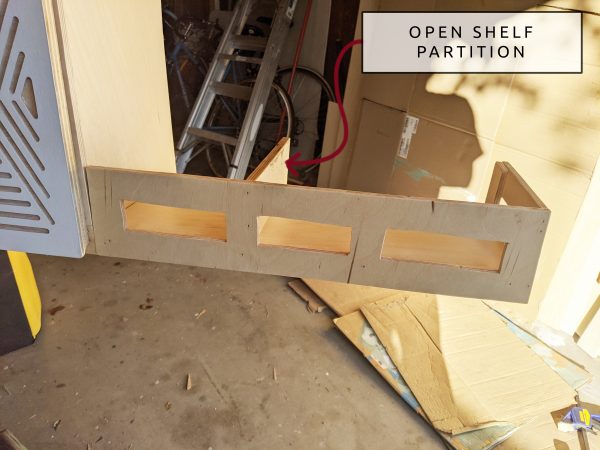
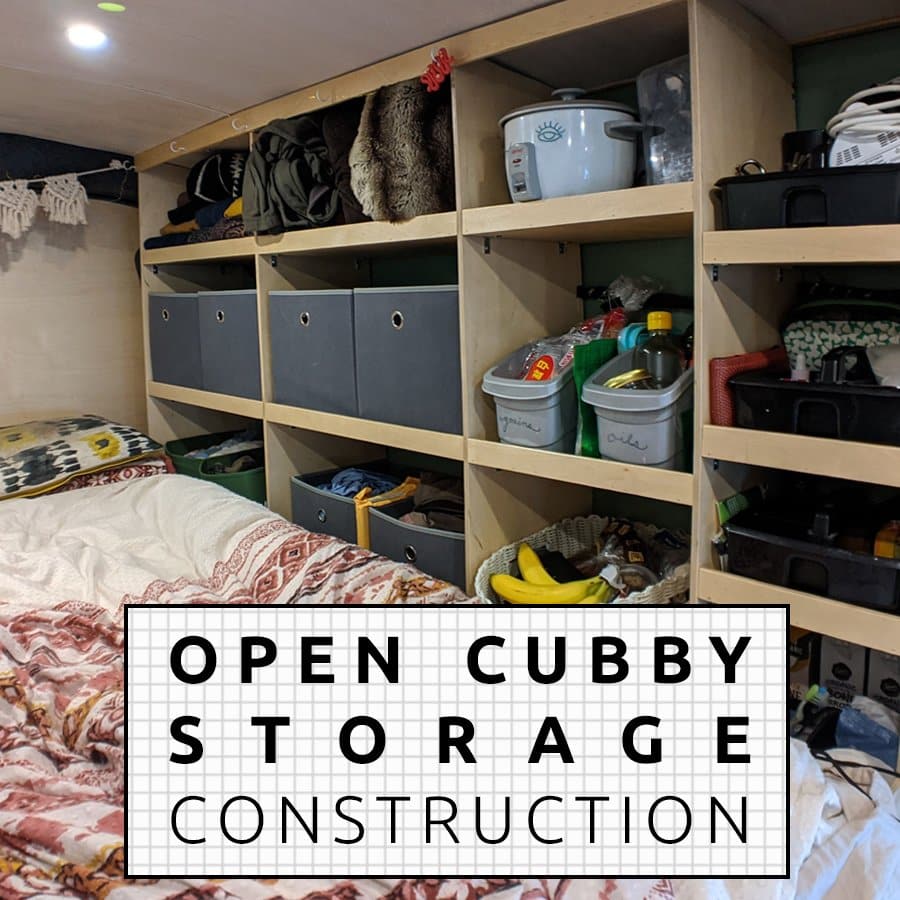
Functional Cabinet Shelving in the Van
With the doors in place, we could focus our attention on the little shelf adjacent to the cabinets. You may have noticed the additional length of base panel that continued beyond our cabinets. This was planned from the beginning as a shelf space, where we like to keep our climbing books, plants, and snacks.
There is a reason we made this an open shelf rather than a door. The van’s curvature is so severe towards the front that it was not feasible for this to be a closed cabinet with a door.
Kevin took the reins on building our cute little shelf. He made sure to add a partition within, which has been a great way to keep things from moving around too much during travel.
Shelving in the Cabinets
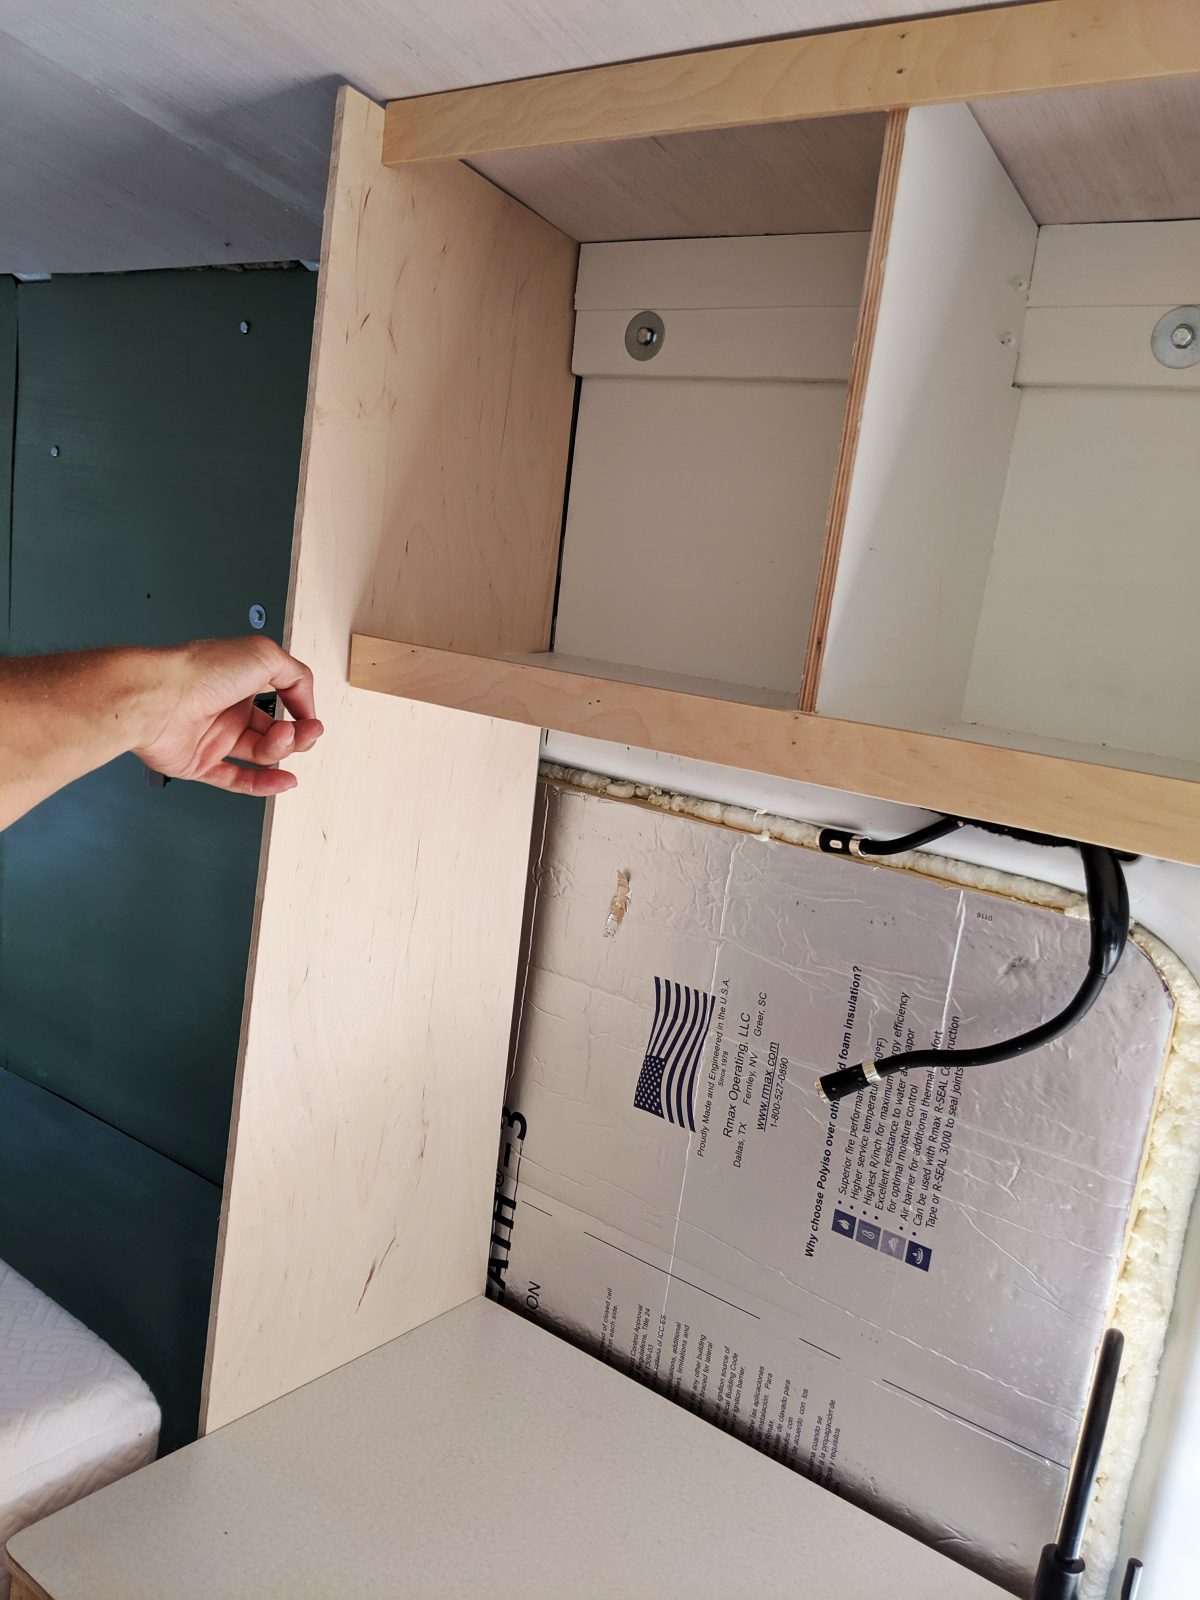
Speaking of shelving, the addition of interior shelving in our upper cabinets was something we added about a month into van living. We did this on purpose so that we could assess how best to accommodate our needs. We made the shelves with 1/2” plywood, and designed them to have a lip to stop anything from falling down when we opened the cabinet doors. We painted the shelves and attached them using simple corner braces.
The shelves are at a height that we can store specific foods (like cans, etc). The corner braces are easy to move around, so we can move/remove the shelves if we want.
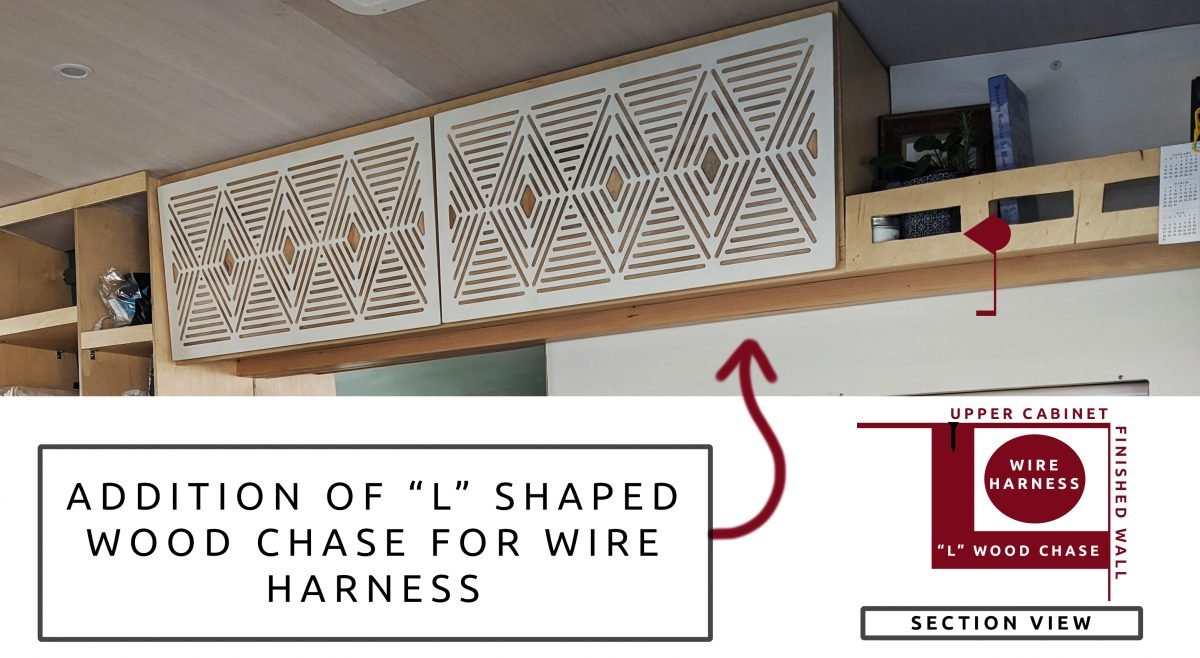
Funky Van Spot – The Wiring Harness
If you have a Ford Transit, you may also have asked yourself how best to conceal the wire harness running along the driver side of the van. Our solution was to create a wood cove under our upper cabinets that the wire harness runs through. This is made out of two (2) pieces of 1”x2” lumber, which is easily big enough to fit the wire harness. These are nailed together in an “L” shape, and then screwed to the upper cabinet from inside / above. Another option is to run the harness within the cabinet, but we didn’t want to take up any space inside the actual cabinets.
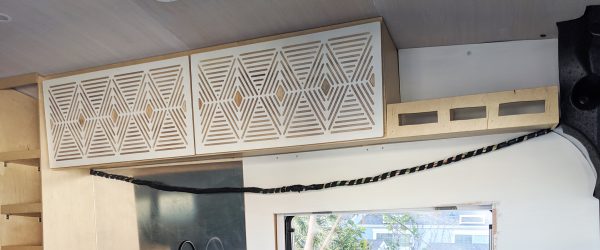
Bonus – this “L” piece for the harness adds additional structural support to the bottom panel of the cabinet.
Ready for more info?
Visit the Van Conversion Build GuideWe sincerely hope this information is helpful on your build journey!
This post contains affiliate links that may earn us a commission if a product is purchased. But, we always strive for the reuse and repurpose of materials – so we encourage searching for a local used option before buying from our links.


Ilove your build.
I wish i could meet u guys one day.