
We're an affiliate
We hope you love the products we recommend! Just so you know, we may collect a share of sales or other compensation from the links on this page. Thank you if you use our links, we really appreciate it!
A heater was an absolute must for our van! We are chasing good climbing temps which means plenty of nights below freezing. In this article, we will go into why we chose the Propex HS2000 heater, how we decided on the placement, and the step by step install process.
- Propane powered, consuming about 1/3 pound per hour (about $0.40). Our 20 pound propane tank (standard BBQ size tank) gives us a 60 hour run-time
- Controlled by a thermostat. Set it and it cycles on and off when desired temperature is sensed by the thermostat
- 1.6 Amp electrical draw (more efficient than any other heater, or “frugal” as the distributor describes it)
- Externally vented, so all moisture and carbon monoxide goes OUT the van (unlike the Mr. Buddy heater). You don’t want condensation, or carbon monoxide, in your vehicle
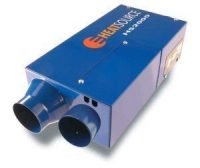
Why We Chose the Propex Propane Heater
Some people try to avoid propane in their van. In the end, we realized propane has been a standard in van and RVs for a reason:
- Propane is a very efficient fuel source
- Propane is readily available. We can trade out our standard 20 gallon propane tank basically anywhere
- We have a propane & carbon monoxide detector.
- We believe propane can be installed safely. All fittings were tested for leaks with soap and water
- Our propane tank is stored in an air tight box with a 1″ vent hole drilled through the van floor
We decided early on in our build process that we were going to be using a propane stove and oven. We didn’t want to be hampered by the electricity requirements of an induction cooktop, and we liked the idea of having an oven.
Since we had the propane tank already, the Propex was a pretty easy choice over a Webasto Gas or Webasto Diesel Heater, or Espar Diesel heater.
- Propex doesn’t need to be cleaned regularly
- Cheaper
- We already were going to have Propane on deck for cooking
- Easier to install
- Propex is quieter and draws less electricity

Link to the 3D printer file for vent cover.

RESOURCES AND DOCUMENTS
How Does a Heater Work?
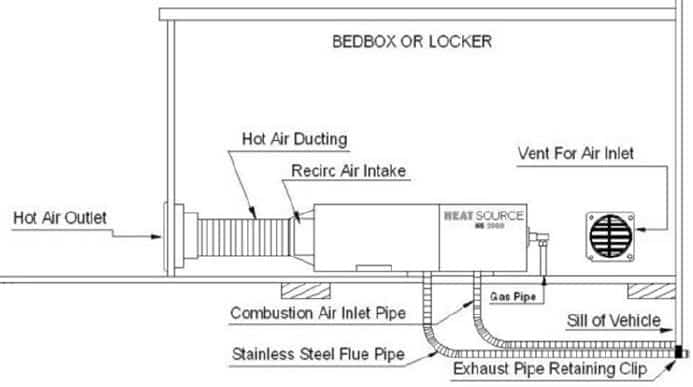
All heater options require:
- Fuel source – propane
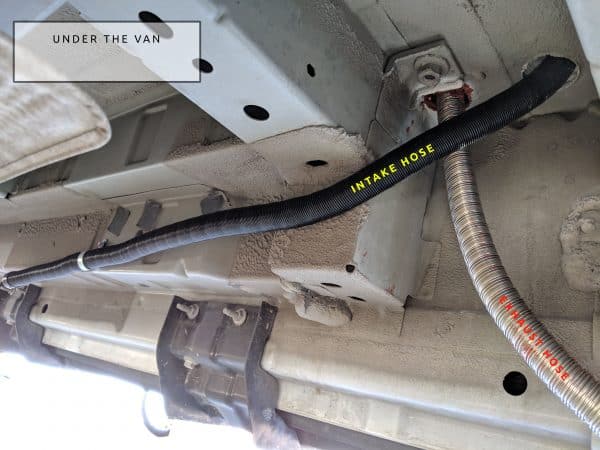
- Air intake (where fresh air enters the heater) – this hose passes through the floor and under the van
- Air output – hot air from the heater is fed through and duct and vented into the van
- Exhaust vent – this hose passes through the floor and under the van. Moisture and carbon monoxide is vented
Heater Placement in the Camper Van
One great heater placement option that makes use of what is possibly an otherwise unused space is under your passenger seat. However, the install is more troublesome than in the main area of the van. Depending on your layout, propane and/or electrical lines may need to run under the van.
Our Propex placement on our van’s passenger side is under the stove. This directs air to our feet when sitting on our bench. It’s easy for us to give up this small amount of space under the oven.
The heater and stove on the same side of the van means we can place our tank on that same side to simplify propane line runs.
Wanted to keep the distance the heat has to travel minimal, and so located the heater near to where we wanted the exhaust vent to be
We need to create holes in the van floor for the heater intake and exhaust. We accounted for the van frame under the van before creating these holes to prevent any conflicts.
Location that would be easy to access should we need to do any troubleshooting in the future
Heater Installation Tips and Warnings
- The combustion intake and exhaust lines (flexible metal hose) for the Propex unit need to be routed outside the vehicle. DO NOT CUT OR MODIFY THE LENGTH OF THESE LINES. They must be run under the vehicle at the length they come out of the box. These metal hoses must stay tucked safely up into the vehicle underside, so they do not snag or catch on anything foreign. At its connection to the heater, seal the exiting point of the exhaust line with high-temp RTV silicone.
- After our installation we were getting a “Combustion Air Fault.” Our exhaust air hose (the stainless steel one under the van) was installed with what we thought was a slight curve, but apparently the bend was too sharp. We minimized the bends in that hose and no more errors.
- You must use a two-stage propane regulator, which will supply propane at the correct constant 11 water-column (WC) pressure for the unit
- Do not connect power until the thermostat cable is connected to the heater! Failure to connect power last may blow the surge fuse on the circuit board, rendering the heater inoperative.
- The exhaust line needs to end and vent out from the edge of the vehicle. If not vented away from the edge, carbon monoxide will sink and collect under the vehicle.
How to Install the Propex Heater in a Camper Van Conversion
Step 1 – Locating the Heater
Your heater’s ideal location will vary by your layout. The Propex would have difficulty heating the entirety of the our extended length Transit (22ft total length). Our air vent shoots directly in the center of our living/hanging out area. While the heater is on, this living area is noticeably warmer than the bed area. The provided duct is a few feet long, so the Propex should be close to where you want the hot air vent to be.
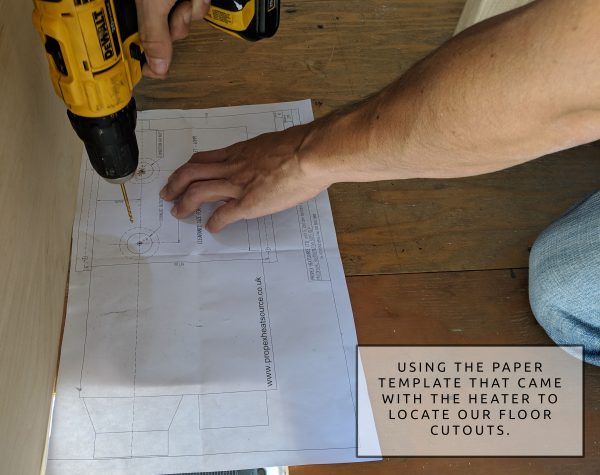
Your selected location needs to allow for 40mm (1-⅝”) holes for the exhaust and combustion air hoses. We spent a lot of time manually measuring the frame members underneath the van and trying to correspond those measurements to placement in the van.
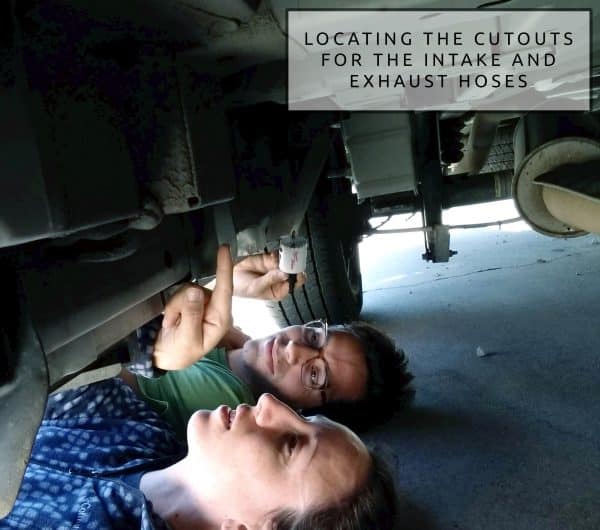
We drilled a small 1/8” test hole from the underside of the van in the necessary location. The 1-⅝” hole saw was used from the top for the full cut.
Step 2 – Installing the Combustion and Inlet Hoses
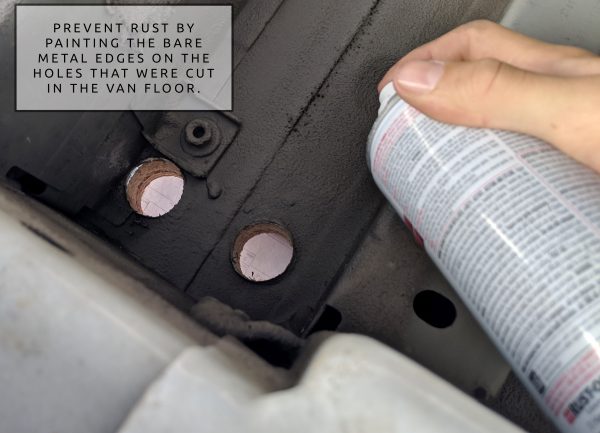
Before moving on, prevent rust by painting the bare metal edges on the holes in the van floor you just drilled.
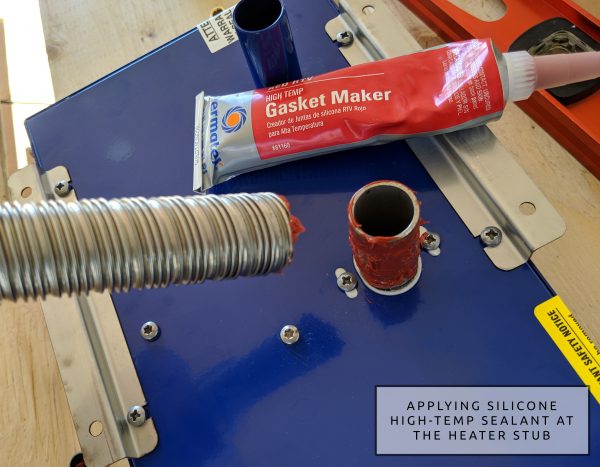
Once the holes are drilled it’s time to place the heater and attach the hoses. The heater comes with a blue silicon tube that acts as a coupling. However, per Westy Ventures (US Propex distributor until 2020), the coupling isn’t necessary: “you may use either the supplied blue silicone joiner or attach the pipes directly to the heater stubs. If the latter method, apply a bead of silicone high-temp sealant around the heater stub before installing the flex pipe.”
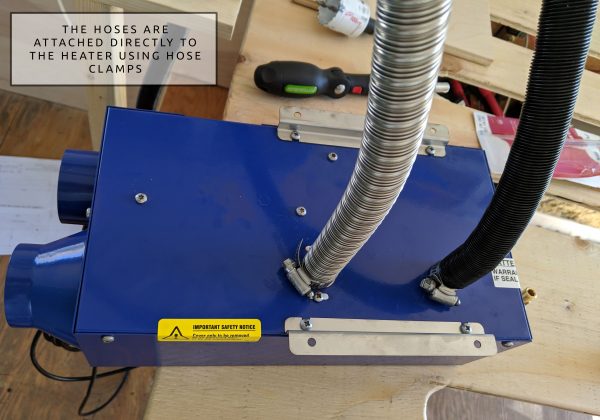
The hoses are attached directly to the heater with included hose clamps. DO NOT SHORTEN the inlet or exhaust flex pipes, as this may cause the sensing system to not work properly.
The hoses were routed to the underside of the vehicle and attached to the van frame with self-drilling screws and galvanized hanger straps.
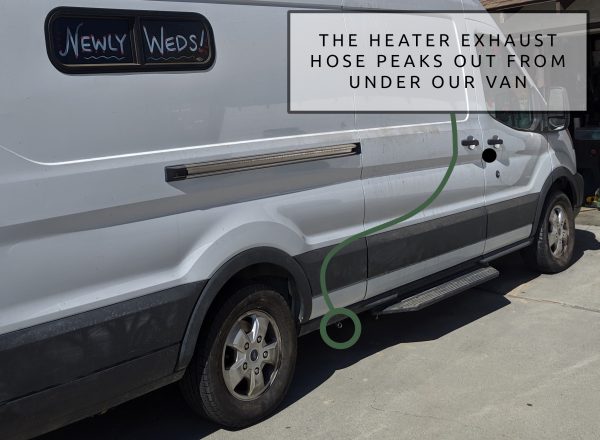
Limit bends to a smooth radius – tight bends will restrict flow. Reminder: the exhaust line (stainless steel hose) needs to end and vent out from the edge of the vehicle. If not vented away from the edge, carbon monoxide will sink and collect under the vehicle
After our installation we were getting a “Combustion Air Fault” (heater fails and the thermostat flashes four times). Our exhaust air hose (the stainless steel one under the van) was installed with what we thought was a slight curve, but apparently the bend was too sharp. We minimized the bends in that hose and no more errors.
Step 3 – Connecting the Propane Line
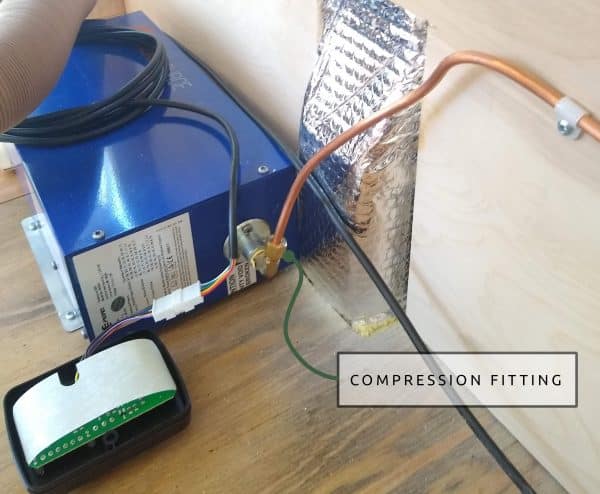
The Propex requires a 2-stage WC 11 propane regulator and ¼” OD flexible copper supply line.
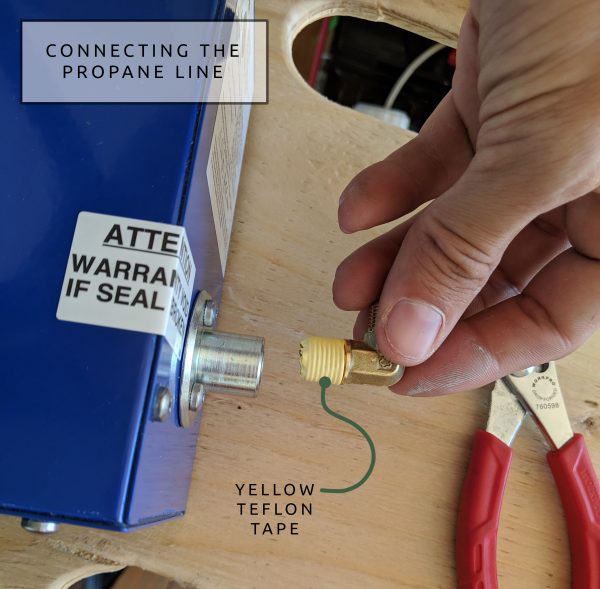
The heater includes the elbow and a compression fitting for your ¼” copper line to the elbow. Use yellow teflon tape (which is designed for gas) for the threaded connection on the elbow. DO NOT use sealant or tape on the brass compression ferrule inside the gas fitting supplied; this sleeve compresses to form the seal.
Please test your gas fittings with soap and water (https://www.youtube.com/watch?v=7UPQhuvdeL8) to check for dangerous leaks!
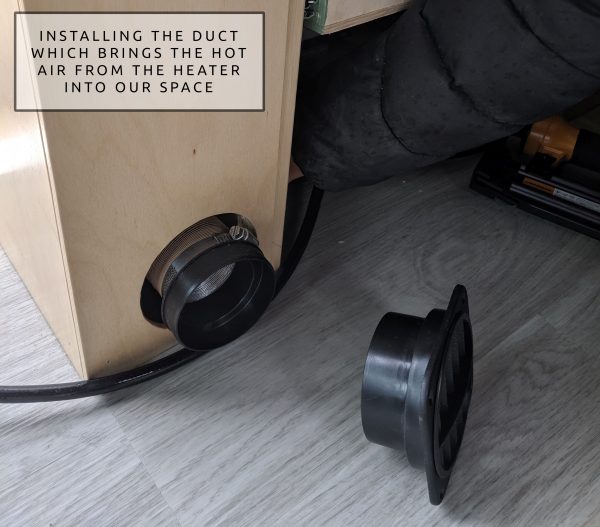
Step 4 – Attaching Ducting
This part is pretty simple. There are air intake and exhaust outlets. No duct is necessary on the air intake hole. If there is inadequate air flow in the cabinet, you’ll need to add a vent to the cabinet. No ducting is necessary on this intake connection on the heater.
A duct is attached to the exhaust outlet with supplied hose clamps. Cut this duct to length based on the location of the vent. Your black air vent needs a 95mm/3.75inch hole which can be cut with a big hole saw, or we did it manually with a jig saw.
Step 5 – Electrical Connection
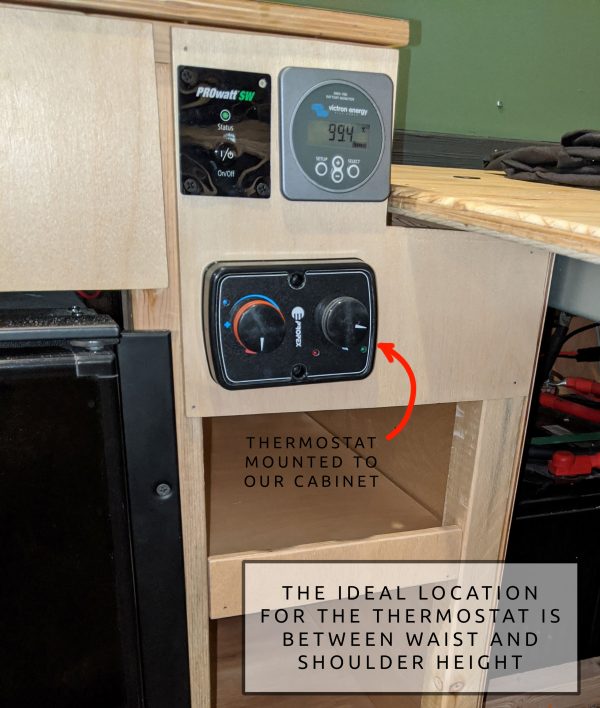
Find a suitable location for the thermostat between waist and shoulder height. Make sure that it is not mounted in an area with poor air circulation or in an area with above average heat, such as above a cooker, refrigerator or in direct sunlight. The thermostat requires a hole of sufficient size must be cut behind the thermostat to fit the plug through.
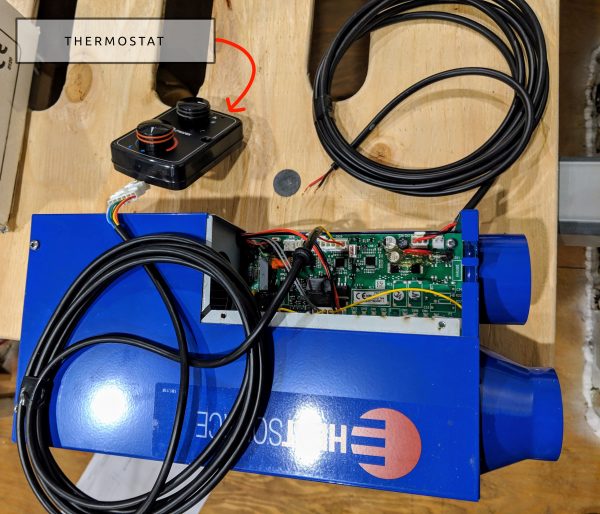
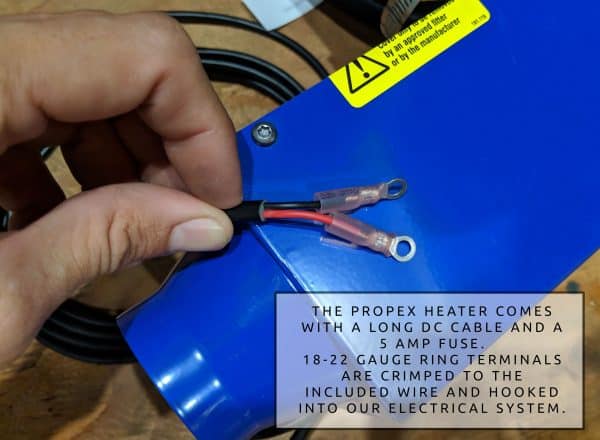
The Propex heater comes with a long DC cable and 5 amp fuse. 18-22 gauge ring terminals are crimped to the included wire, and hooked into our electrical system.
Using the Propex Heater in the Van

The thermostat has a range of 40 degrees on the freeze setting (snowflake), then 55-80 degrees. It’s very easy to use and we appreciate the automation of a thermostat.
NOISE
The thermostat cycles the heater on and off. The Propex’s fan sound is noticeable but not overbearing. It is rated at 60 decibels. We don’t generally leave the Propex on when we go to sleep. The cycling is just loud enough to be a bit disturbing when sleeping.
From outside the van, the Propex is audible but not noticeable unless close to the vehicle.
ERRORS
You may get an error/fault, ranging from poor gas or electricity supply to internal heater malfunctions. In the event of a failure the red light on the thermostat will flash a certain amount of times, pause, and repeat until switched off. Count the amount of flashes and refer to the table in the manual.
As mentioned we got a “combustion air fault” which is related to poor air flow from the air inlet or exhaust flues under the van. We slightly rearranged the exhaust flue (stainless steel hose) to totally minimize any bends, and no more error.
The lockout must be cleared by turning the ‘Fan Only’ setting on the control panel, ‘on’, ‘off’ and ‘on’ again within 2.5 seconds. If the first lockout reset attempt is unsuccessful, you can retry an additional 4 times. If the lockout still will not clear (identified by a solid LED), turn off the heater, check the heater for faults, power up the heater and then further lockout reset attempts can be made.
Ready for more info?
Visit the Van Conversion Build GuideWe sincerely hope this information is helpful on your build journey!
This post contains affiliate links that may earn us a commission if a product is purchased. But, we always strive for the reuse and repurpose of materials – so we encourage searching for a local used option before buying from our links.


Thanks for sharing! How much space did you account for the box within the build?
The box the propane tank is stored in is about 13.75″ x 13.75″ and 19″ tall. The tank fits snugly
As an update (after 6 months with the propane box as described in our previous comment), we recently decided to rebuild the box to be larger. It was not possible previously to take the propane tank out of the box without first disconnecting the propane valve. The tank was essentially trapped by the connection. We didn’t want to fuss with the location of the propane connection, and so making the box bigger seemed to be the best solution. I plan to update this write-up to include photos and details showing this revision.
Thanks for the helpful article. Do you by any chance have a link to the propane vent cover that goes in the bottom of the box?
We actually 3D printed that vent cover (helps to have a 3d printing master in the family!)
This is the link to the 3d printed file. Obviously will need to either have a 3d printer or a friend with one to make it…
https://www.myminifactory.com/object/3d-print-gas-drop-out-floor-vent-for-vans-campers-motorhomes-124427
Nice write up! Would it be possible for you to share the color mapping of the wires for the control panel?
I started my installation and “assumed” that when I unpinned the connectors wires that I could just re-pin the connectors to match wiring colors. So I didn’t take any pictures. Since the colors don’t match up, I have been looking for this info in the instructions, but the provided tables doesn’t align.
Would you be able to help?
I’m getting the Propex heater fitted in a already converted Vw T5 and was wondering,
we already have propane gas hob and cabinet with the gas bottle in so can the heater run off that bottle as well ?
I’m guessing you have a large propane bottle 5gal or 20gal, not the small 1gal disposable bottles. It should run fine as long as there is a two stage propane regulator