
We're an affiliate
We hope you love the products we recommend! Just so you know, we may collect a share of sales or other compensation from the links on this page. Thank you if you use our links, we really appreciate it!
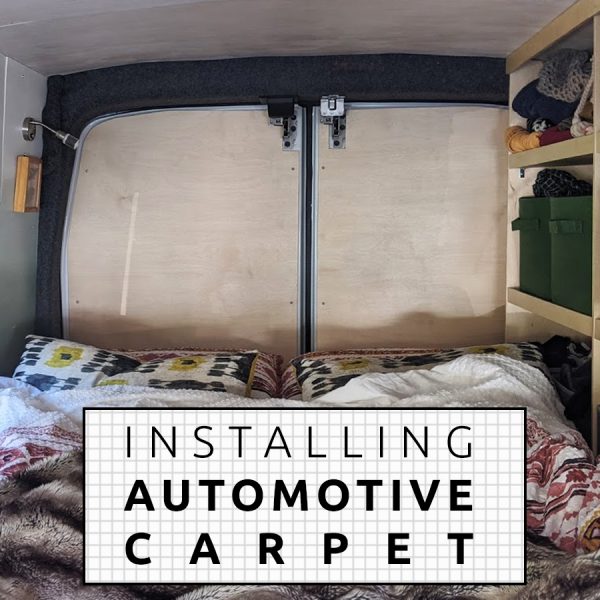
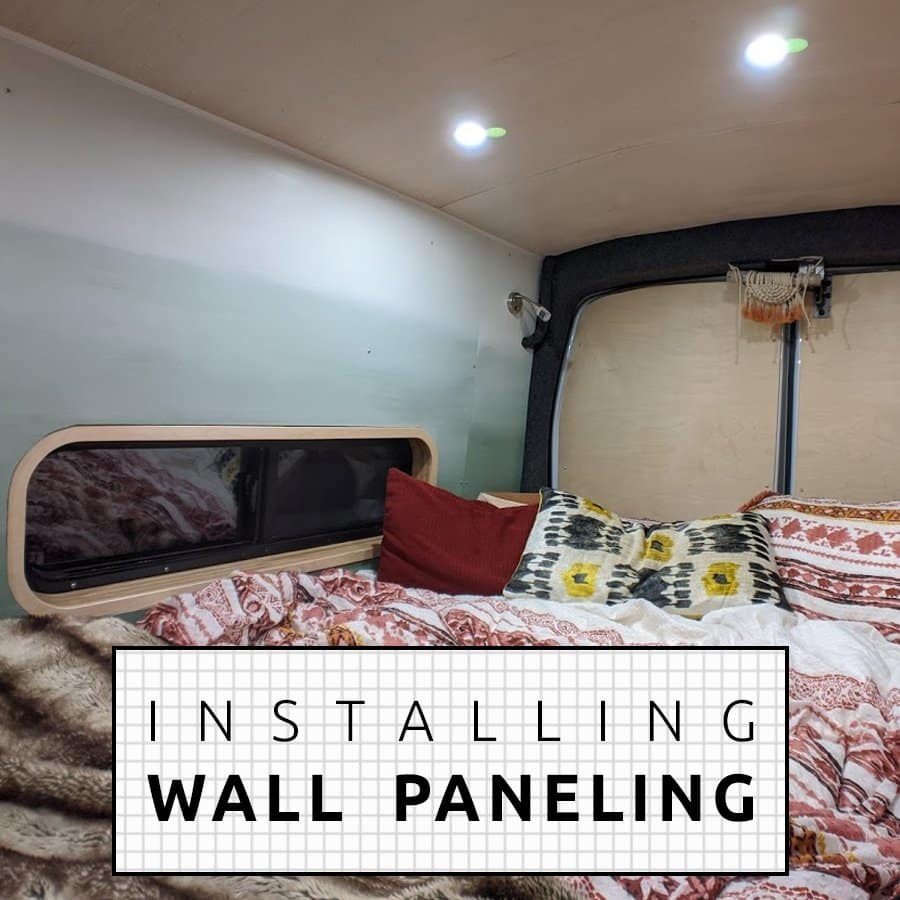
One small upgrade we are really happy about is the addition of automotive carpet on the back “wall” of our van. It frames the rear doors, and eliminates the bare metal that is right next to our heads when we lay in bed. Warm, fuzzy carpet is definitely more cozy than cold, hard metal!
On that note, this adds a small insulative property as well. The carpet is a thermal break from the cold metal. Well, even if the added R-Value may be negligible, the carpet certainly warms our hearts.
By the way, we were already living in our van full-time when we installed the carpet lining. Our removable bed frame made this project a lot easier because we had comfortable access to the back door area.
Preparing the Van Metal for Automotive Carpet
As you can see, the bare metal has lots of perforations and holes which we were fine with covering right up. We didn’t make an effort to close these up prior to putting the carpet on. Who knows, maybe we will want to access one of them later. Plus, as you’ll see, the carpet did a pretty good job of covering up the perforations without their presence being too noticeable.
If we were to do this again, we would use closed celled foam on the van metal first. This creates a smooth surface for the carpet lining, and adds an additional thermal break. If you try this out, leave us a comment and let us know how it went for you, and whether you recommend it to other’s taking on this task!
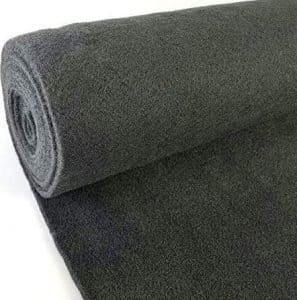
We selected a grey automotive carpet for our wall covering. It was easy to cut and fold, looks clean and professional, and adhered as intended with spray adhesive. We’re happy to recommend it!
If we were to do this project again we would layer this closed cell foam on the van metal first. Carpet would go on top of the foam. This provides a much better thermal break, some sound deadening, and smooths out the fluctuations in the van metal.
We’ll start by saying this little job would have been loads easier had we decided to tackle it prior to doing our wall and ceiling install. It was still manageable, but in case you’re early enough in your build with this project in mind, we recommend prioritizing it to make your life a little easier.
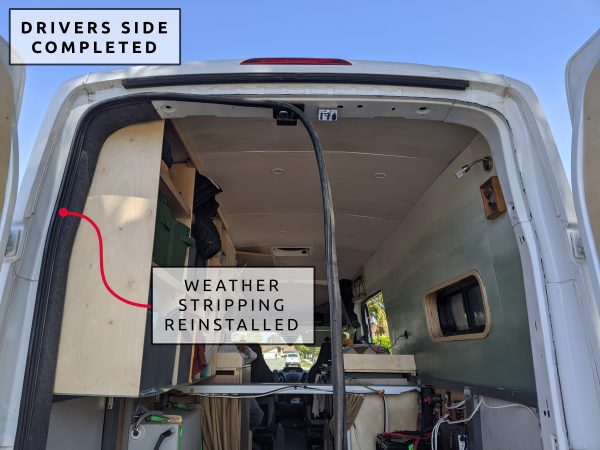
Tip: We started off with the driver side, knowing this would be the less noticeable side because of our cabinets. We’ve learned through the process of our build that it’s best to test a new method in the less visible places.
Installing the Van’s Automotive Carpet Lining
Step 1
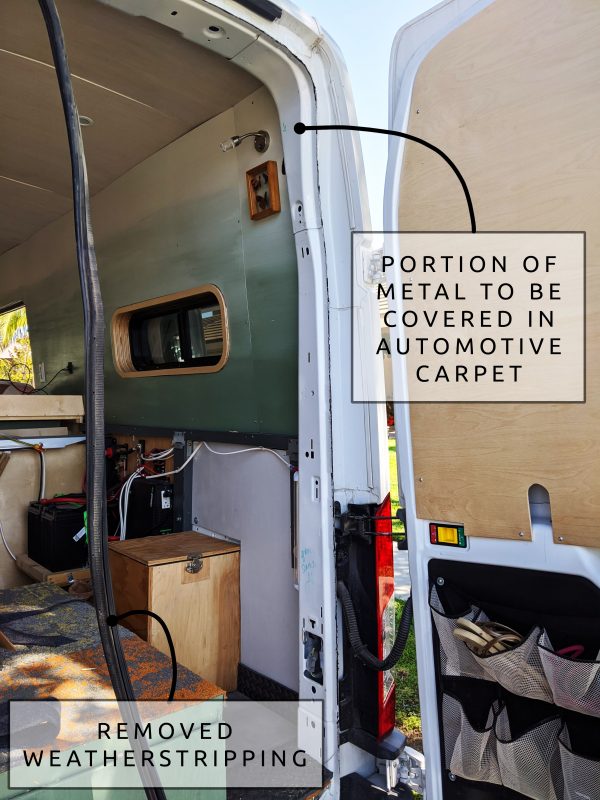
We began the job by taking off the black weather stripping that runs along the edge of the opening. This would allow us to trim the upholstery to size in place, and not worry too much about how that cut looks. After all, the weather stripping will conceal that transition if done right.
Step 1.5
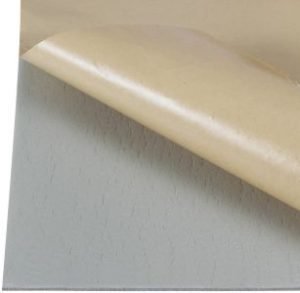
We’re calling this step 1.5, because it’s not a step that we took, and could be considered optional. If you are concerned about the perforations in your van metal showing through the carpet, and would like to add some insulative properties, this is a step you will want to take.
We have seen other builders use closed cell foam on their van metal as a substrate for the automotive carpet. This product is more rigid than automotive carpet, and essentially closes off all those openings, creating a smooth base for the automotive carpet. The closed cell foam we recommend is peel and stick. The idea is to cover the entire surface with this product, cutting it to size.
Step 2
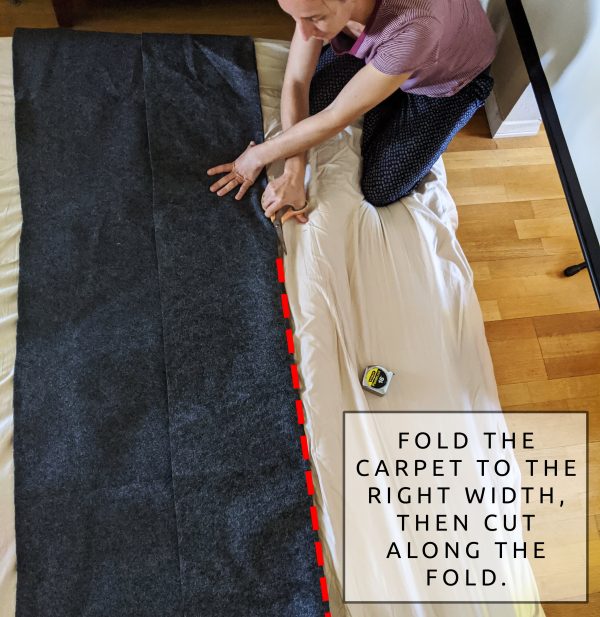
We laid the automotive carpet out on the floor to measure and cut with scissors. We cut a 12” wide x 6’ tall strip for the left side, and a 12” wide x 10’ tall strip for the right side and top. This measurement is for our high-roof Transit.
This ended up being much too wide for most instances, especially since the interior cabinets butt up directly to the metal wall on the left side. No worries, we have plenty of carpet and better too wide than too narrow! Just a bit more to trim.
Step 3
Spray adhesive onto the metal surface, doing your best to block any over spray from hitting your finished surfaces (if applicable). We used both scraps of the carpet and pieces of cardboard as a shield.
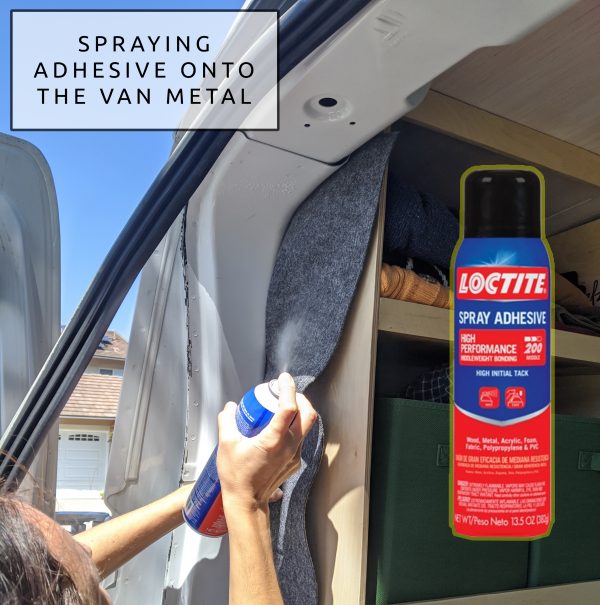
Step 4
Spray adhesive on the back of the automotive carpet. The back is the smooth, less fuzzy side. As the carpet is porous, our adhesive instructs that you can apply the surface immediately. Of course follow the instructions for your adhesive of choice.
Apply the upholstery carpet, starting with one side (we chose the inside) and smoothing down to avoid any bubbling or wrinkles. It helps to keep the upholstery relatively taught. In other words, it helps to have a helper! Luckily, the carpet does offer some forgiveness. We were able to stretch or smoosh it in places as needed to get the smooth coverage we desired. For example, where the two pieces meet, our cut was not perfect by about 1/16”. We used this stretch and smoosh technique to get the seam to work and it is now unnoticeable.
Tip: We did a “light smooth down” at first, and then applied more pressure once all sides were wrapped. This allowed us to make minor adjustments as needed if we realized twisting or wrinkling was occurring.
Step 5
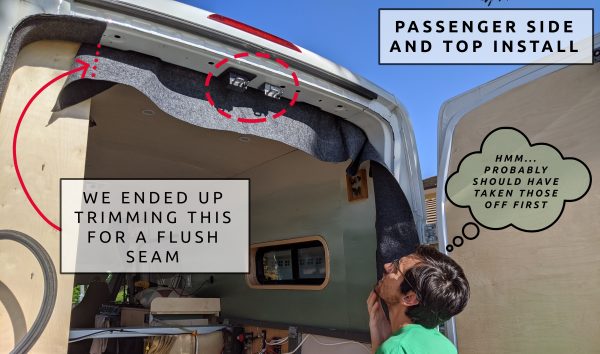
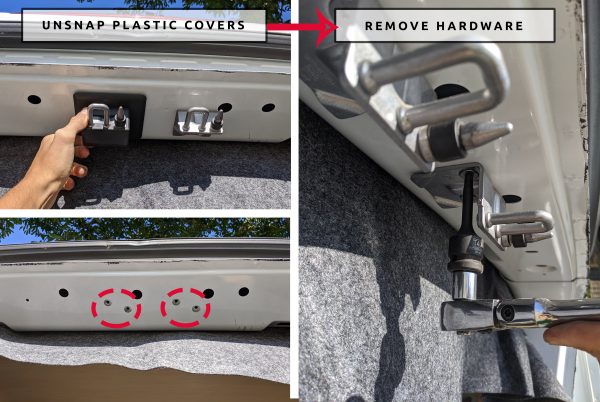
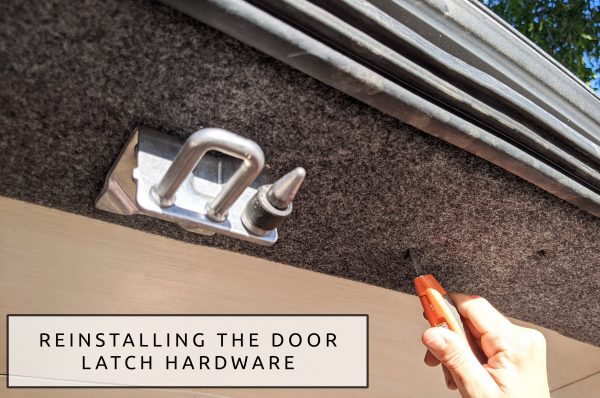
Well, this should actually be up there with Step 1, but we didn’t catch it until we were already applying the carpet! Remove the door latches. This is easier than trying to cut away and work around them, and they are easy enough to remove and reinstall. In the case of the Ford Transit, there may be a plastic cover, which just snaps off with some pulling. The actual metal latches required a T40 Torx bit.
Step 6
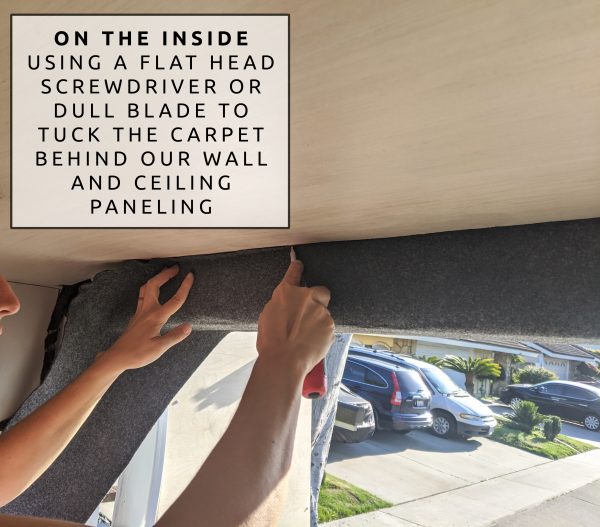
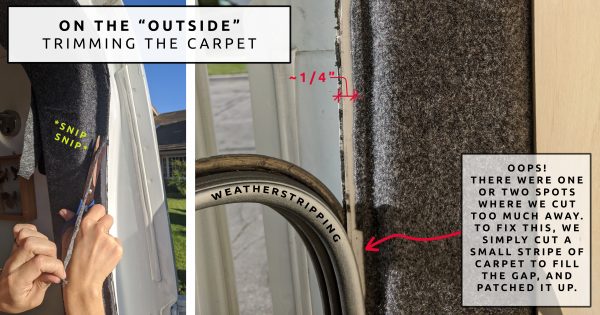
Use a flat object (screwdriver, scissor, dull blade) to tuck any upholstery behind cabinets, wall panels, or ceiling panels on the interior. We did most of our “lining up” on the inside, leaving only ⅛” or so of excess to tuck away for a finished look. As for the portion that meets the weatherstripping, we trimmed away any excess material, making sure not to trim too much away! If you trim too much away, there are ways to patch, which we did when we overcut in some places.
Tip: For the weather stripping portion, you may want to test the right amount of clearance needed to avoid conflict. If there is too much carpet in the way, it will push the carpet up. We found about ¼” exposed metal led to no conflict with the carpet, and no exposed white metal once the weatherstripping was reinstalled.
Step 7
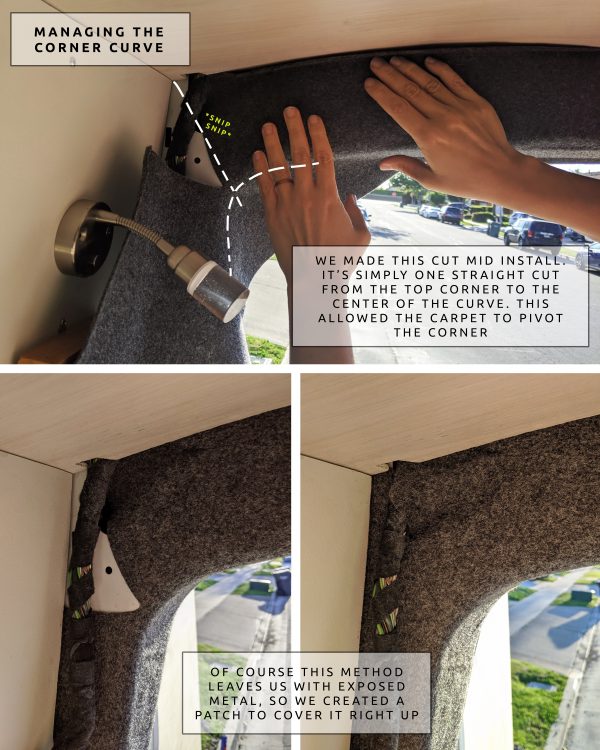
The inside curve was something that we knew would require extra thought. In the end, we decided the simplest solution would be to cut a slit at the radius that allowed for the fabric to pivot at the curve. The resulting exposed metal could then be filled in with a patch of the same carpet, which does hide seams quite well. In order to get the shape just right, we used transparent trace paper to trace the shape out, and simply used this as a template.
Note: The Ford Transit has this cable running all along the drivers side wall and down the back of the passenger side wall. It’s already more camouflaged now with the carpet than it was against the white metal, and we will wrap it in the same automotive carpet to hide it even more.
Step 8
Reinstall the door latch hardware, but don’t do what we did and just assume the first hole you feel through the carpet is the correct hole! We now have a little dimple that was quite unnecessary. One way to correctly locate the holes is to close the doors and get a general sense of where the hardware belongs. Then just feel around through the fabric for the correct holes. We used a box cutter to puncture the upholstery with an “X” at those hole locations. Reinstalling was simple once we had found these holes.
Ready for more info?
Visit the Van Conversion Build GuideWe sincerely hope this information is helpful on your build journey!
This post contains affiliate links that may earn us a commission if a product is purchased. But, we always strive for the reuse and repurpose of materials – so we encourage searching for a local used option before buying from our links.


Hey guys, I’m working my way through my Transit build right now. Just wondering if you did anything with the foam covers towards the front of the cargo area over the seats. Did you cover them with carpet or just leave them? Or do something else? I’m trying to figure out a way to hide them. Also this page has been super helpful for me in having a solution to some of the tough curves and areas of the van. Thanks!!!
Hey Mike – we removed the foam blobs (used pliers to remove the plastic pins holding them in), cut them in half vertically, and reinstalled.
Hi. I appreciate your information! Wondering if you would recommend a source for the carpet. I have a small van conversion in process and am finding lots of 4-way carpet in UK Amazon, but none locally in USA.
I’m not sure about a brick and mortar store – but we used this carpet: https://www.amazon.com/dp/B0058P70PU/?tag=vanconvertscom-20