
We're an affiliate
We hope you love the products we recommend! Just so you know, we may collect a share of sales or other compensation from the links on this page. Thank you if you use our links, we really appreciate it!
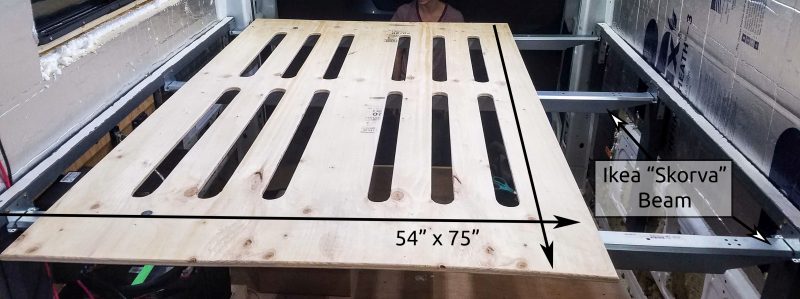
The bed in our camper van conversion is fixed but the platform is de-mountable. Why? When we temporarily remove the bed we can haul large cargo. Yes, we can help you move!
The bed’s legs are bolted to plusnuts in the van wall (what’s a plusnut? Read about plusnut’s strength in a van build). We researched a lot of designs, and we love how simple this bed design was to build!
The cross beams are the Ikea Skorva product. It’s extendable to accommodate different bed widths (this is super helpful) and latches onto brackets. We can just lift the Ikea beams off the brackets, which means the bed is easily removable. A 5/8 inch plywood sheet with slats cut for ventilation is attached to the brackets and serves as the bed platform.
We gave a lot of thought to building the front-to-back versus side-to-side. Kevin is 6’ 1” and we decided it was not feasible/worth the sacrifices for side-to-side. The Transit is 77” wide at its absolute max, without any insulation or wall material.
Ikea’s “SKORVA” Beam
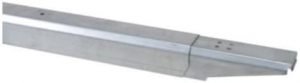
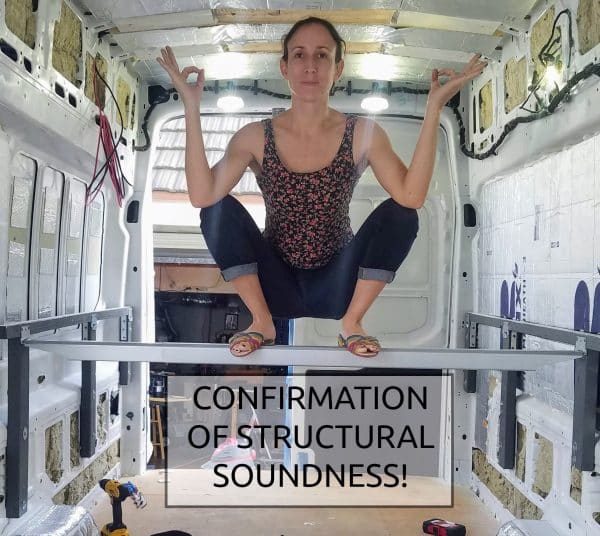
The SKORVA beam by Ikea is super easy to install and slides so that it can easily be added to any width bed. A single beam fully supported our weight.
Note, you can also buy direct on Ikea.com but shipping is a pain!
Mounting Plates for Skorva Beam
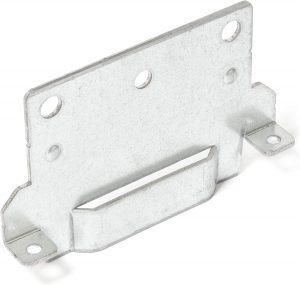
You’ll need these Mounting Plates to install the Skorva beam. The beam notches into the plates and sits on top.
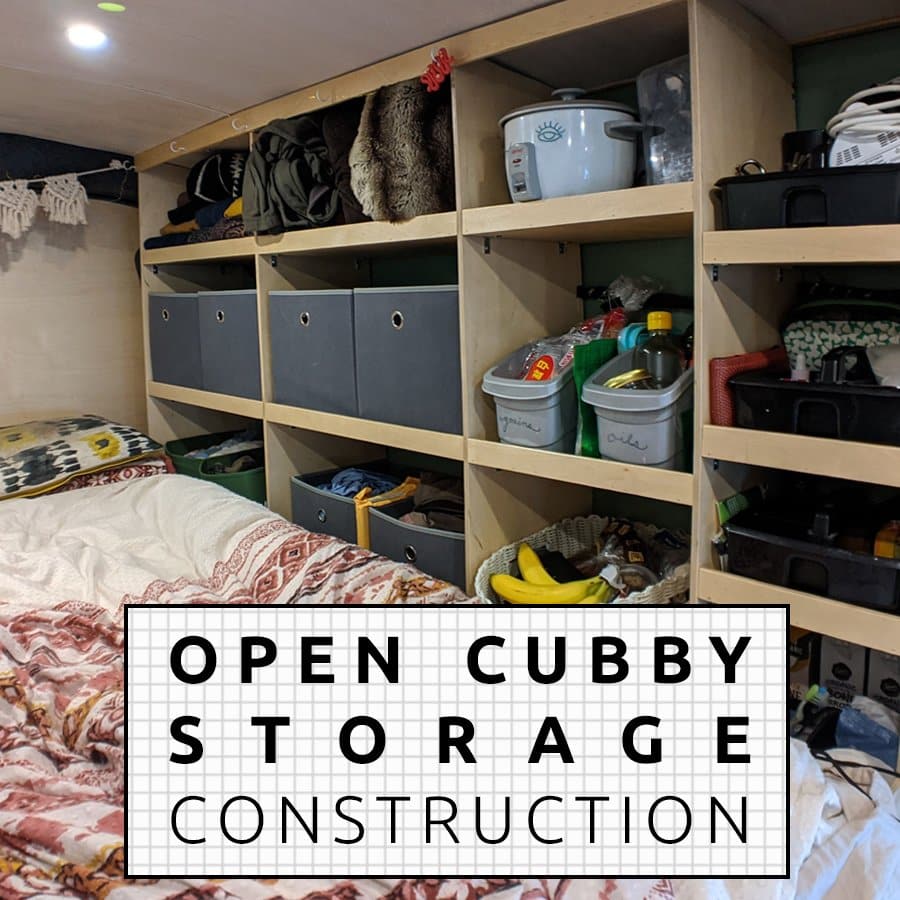
Our bed is front to back, and does not occupy the full width of the van. There are 15” deep cabinets that occupy the remaining width to the driver side wall. We have a full size mattress, dimensions 54” x 75”. The mattress overhangs the plywood on the long sides, but it’s not noticeable.
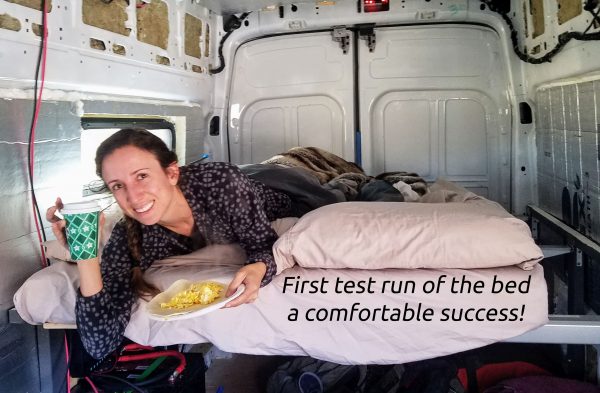
We did ourselves a favor and chose a nice comfortable mattress. Sleep time is not something to skimp on!
We need a comfy mattress!
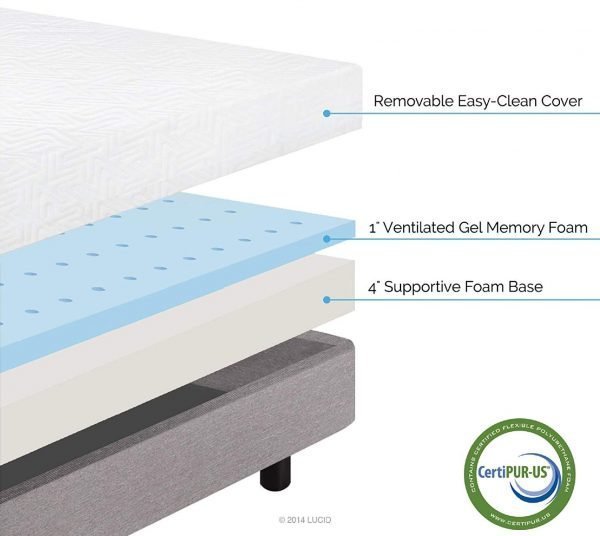
5-inch Gel Memory Foam Mattress
We chose a 5” memory foam mattress and it’s really comfortable and quite affordable! Not too firm, not too soft. For us, 5″ strikes the correct balance between comfort and height. We’ve slept on our mattress down to 15F degrees and it stays pleasant and cozy. It weighs 25 pounds and is easily movable.
Height of the Bed
We tried to make the bed as high off the ground to maximize storage space underneath it. The measurement also allows Kevin to sit upright without hitting the ceiling (accounting for 5” mattress height).
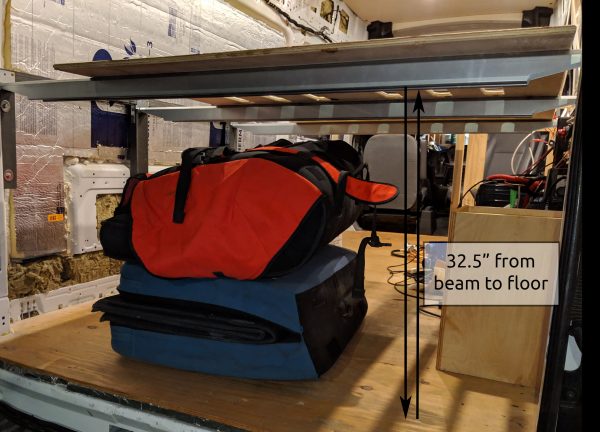
With everything installed though, we could have made the bed a couple inches higher. The plywood is 34-3/4” from the ground, but because the Ikea beams are 2-¼” tall, the lowest clearance is 32.5”. Good thing we won’t be hauling mountain bikes (which are usually taller).. our bouldering pads will fit just fine under there!
Designing the Bed Frame
The frame consists of a long 2×2 which the Skorva brackets are attached to, supported by three 2x4s. These supports aren’t “legs” because they don’t touch the ground, instead they are bolted to plusnuts in the van wall. We are going to call them legs anyways! The legs were placed based on the available plusnuts and each leg is long enough so it can be fastened by two bolts. The correct bolt length needs to be selected based on the depth of the material being fastened. For a 2×4, which is 1.5″ deep, a 2.5 inch bolt is used.
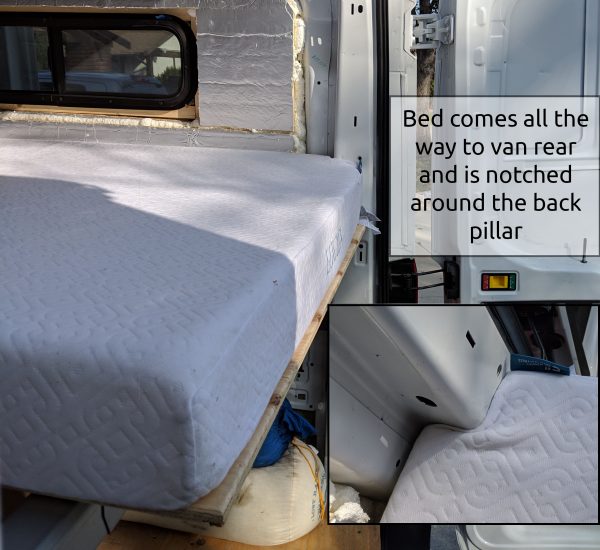
The 2×2 extends to the front of the mattress. This will give us something in the future to attach cabinets or a curtain to. At the back, the 2×2 meets the back van column at the rear door. The plywood bed platform will extend about 6” farther back to the door.

Heard of plusnuts? They provide a very strong fastening point in existing holes in the van, minimizing the need to drill holes and risk rust. Read More >
The weight from the bed is all transferring downwards. Instead of using pocket screws, we connected the horizontal 2×2 to the legs with big 3″ corner braces. This adds additional horizontal support to the 2×2, which receives the weight load.
Building the Bed Frame
 Building the frame is one of the simplest woodworking projects in the van! The driver and passenger sides are identical. The 2x4s do not reach the floor. They are long enough to be fastened with plusnuts to two bolts each.
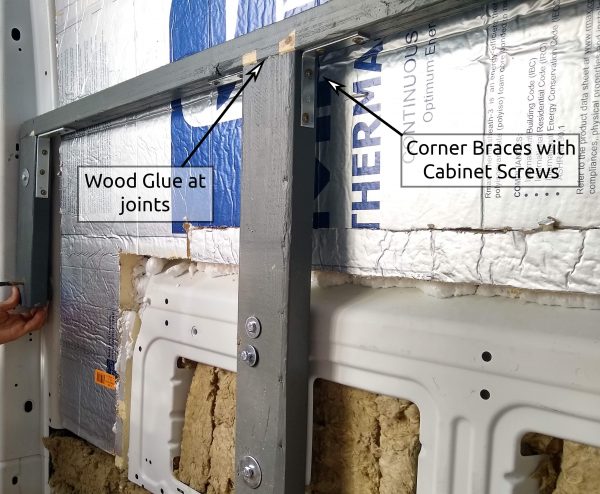
The 2×2 and 2x4s are joined with wood glue then corner braces.
We used 1-¼” washer head cabinet screws for the corner braces which is longest that can be used since the wood is 1.5”. Cabinet screws are good for this because they are designed to bear heavy weight. The washer head maximizes the surface area of the screw that is compressing the corner brace.
Bolting the Bed Frame to the Van
 We now need to drill holes in the legs for the bolts. The bolts need to hit the plusnuts perfectly straight. They cannot come at an angle (read more in our Guide to Using Plusnuts). Placing these holes is tricky. Fortunately we can oversize the holes since the width of the washer will still hold the wood. We started with 5/16” holes (slightly larger than the 1/4″ bolts), then oversized if the hole was misaligned.
The thickness of the material being bolted (1.5” for our legs) determines the length of the bolt used. In this case it was a 2.5” length bolt, 1/4-20. We bought a big pack of these specific bolts because we are bolting lots of 1.5” thick wood to the van.
Assembling the Plywood Bed Platform
Thickness of Plywood for the Van Bed
A single 4×8 plywood sheet (5/8″) serves as the platform. We parked outside Lowe’s and brought out different thickness plywood to the van and laid on them. Yeah, we’re those people. We settled on 5/8” as the thinnest plywood that is rigid enough for our bed platform.
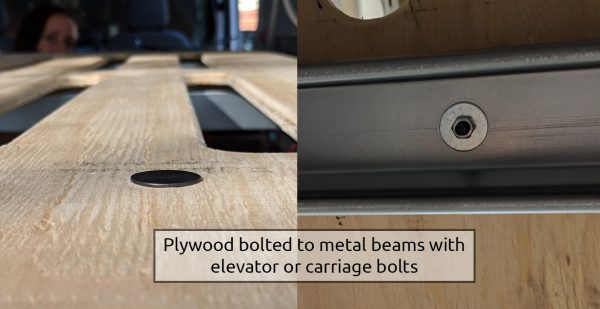
The plywood is bolted in four places to the Skorva beams so that the platform stays fixed. There were two existing holes, and two holes we drilled out with a 1/4” bit. The metal beams are pretty thick so be sure to use a quality drill bit for this one. It’s also advisable to use cutting oil, which acts as a lubricant, to extend the life of the drill bit.
We used flat head carriage bolts (also known as elevator bolts). It’s convenient to use the same bolt threading as other bolts in the van (1/4-20, which is the threading of the plusnuts).
Cutting Ventilation Slats
The plywood bed needs ventilation. Human body warmth and mattress moisture may create mold. Using a table saw, we cut slats out of the center of the plywood (visible on picture at beginning of post). There’s also the added benefit of a weight reduction.
After doing this, we realized the slat placement was a dumb mistake! The ventilation slats should have been made where the middle Skorva beam is, which provides support. Where we cut them means there are holes in the plywood away from a bracket support! Fortunately, we’ve heard no squeaks or scary “cracking” sounds.
The mattress was notched to fit around the back door pillar. The mattress extends to a few inches from the back door. Shorter Nadia sleeps on this side!
Finally, to protect the wood further, we sealed it with polyurethane.
Ready for more info?
Visit the Van Conversion Build GuideWe sincerely hope this information is helpful on your build journey!
This post contains affiliate links that may earn us a commission if a product is purchased. But, we always strive for the reuse and repurpose of materials – so we encourage searching for a local used option before buying from our links.

Hi, what brackets did you use to connect the Skorva cross beams to the wood bolted to the van?
The brackets are also from Ikea and are supposed to come with the Skorva beams. Sometimes you have to go to the spare parts area of Ikea and specifically ask for them
Thanks will try this one out 🙂
For anyone trying to get the brackets it appears the old part number was 116791 and there is a new and improved bracket that is part 116794 but they both fit the same Skorva bar. Tried to get them today in my store but they were transitioning between part numbers and didn’t have new one in stock yet.
Thanx for the numbers the first number came up but not the second when I tried to order online. I expected the brackets to come with the support beams as I could not see any in the catalogue online.
It’s a pain not being able to chat even remotely.
Will let people know if I’m successful in getting the brackets
Please let us know if you have any troubles!
Good luck! Definitely let us know if you find a way, I’m sure it will help others as well.
Hi – this is really helpful. Please could you advise how many Skorva cross beams you used?
We used 3 Skorva cross beams
Where did you get this plywood with the slats cut like that? Did you cut the slats yourself?
This was standard 5/8″ plywood from the hardware store. We cut the slats with a table saw (for the long straight cuts) then finished with a jig saw for the rounded ends. We routed the cuts for a smooth final finish, but that’s not necessary from a use standpoint.
I love this bed frame! I saw a similar one and ordered three Skorva beams last October, but they only sent me two brackets. After several attempts, I finally got a package…with only two more brackets! I’ve made numerous phone calls and three times I’ve been told two more brackets were on their way. A month later, I’m still waiting! The products are good, but trying to get help is a nightmare!
Anybody got two extra brackets they don’t need?????? 😱
Yeesh!! Sorry you’re going through that. If you get desperate, it does look like there are some for sale on Ebay (IKEA Part #116791 (old version) or 116794 (new version) – Mounting Plates), but of course that seems silly when you can get them for free from Ikea.
Here’s a cool tip I saw on a van conversion video by “Seven O’Savage”. Use Playdough on the back of your legs or furring strips, etc. to make an impression of EXACTLY where the plus nut is. Then you mark and drill.
Huh, I guess that would work! I love a creative solution.
Super helpful. Curious if you had to cut your mattress and cover around the corner or if it just wedges in.
Yep! We pulled back the mattress cover and cut a notch in the foam. Super easy!
Excellent and A wonderful read! Your article is the best one I have learnt, and it has helped me. Keep doing that.
I really like this design – and thanks for the super clear description of how you built it.
Curious – why did you opt for making your own plywood bed platform rather than using Ikea bed slats?
Was it size/fit or did you have structural concerns?
Thanks
Ikea slats are made to run width-wise (Side to side) across the bed. Because we ran the beams side to side, we couldn’t use slats.
My comment is a question. I’m wanting to finish my insulating.
So far, I put down double face bubble, throughout. Then thinsulate over that. Can I put a final layer of plastic over that before my final covering?
If you can direct me to a link answering my question, that’d be fine.
Thank you
The bubble wrap, assuming its faced with aluminum like Reflectix, requires an air gap to be able to effectively reflect heat. If you put the bubble wrap and then Thinsulate directly on top of it, then the Reflectix might not be doing much. Regarding a layer of plastic, we don’t recommend a layer of plastic because it acts as a vapor barrier and wont allow moisture to escape when moisture inevitably forms around your insulation.
Thank you so much for the incredible article! It helped to guide us in our bed frame design which we just finished this weekend. Next step is to buy a mattress – what did you guys cut the notch in your mattress with?
For those after the mounting brackets, you can go directly to the IKEA website and order spare parts for free. I have 6 mounting brackets on the way for no charge!
Just wanted to pass on a huge belated thank you for this post. Your bed design was instrumental in our GMC Savanah conversion we did over a year ago. Curved walls created more challenges than framing a garage!
Loving DIY van life and a solid bed and the storage underneath is the most important part of our build.