
We're an affiliate
We hope you love the products we recommend! Just so you know, we may collect a share of sales or other compensation from the links on this page. Thank you if you use our links, we really appreciate it!
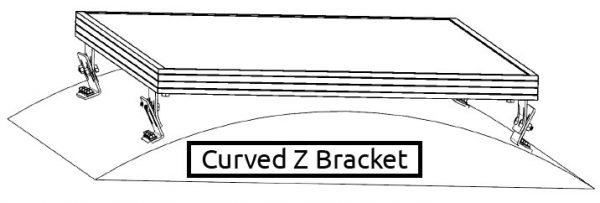
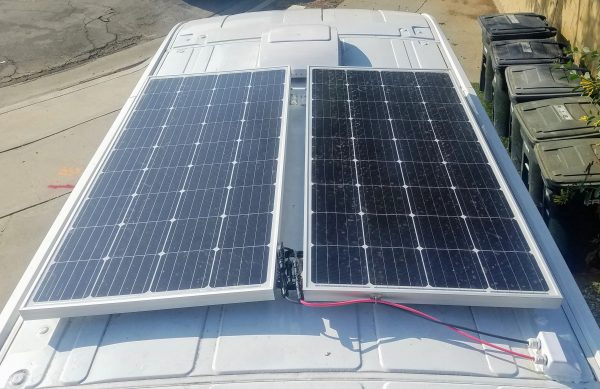 We mounted two 200 watt solar panels to our camper van roof. They are attached with Renogy Curved Z Brackets, which are made for a curved roof such as a van.
Why did we mount with Z Brackets? There are some installation options that just won’t work because of the curved roof, such as tilt mount brackets. There are a few other common options for mounting panels which we decided weren’t for us:
- Roof rack – Example: Ford transit forum. We considered this overkill since we aren’t mounting anything else, plus it’s 1) quite costly, 2) hurts gas mileage by about 1mpg, 3) less stealthy, 4) limited orientation options for additional components on rack because they need to avoid shading panels.
- 3M VHB tape – This ultra strong tape is used by many in lieu of drilling holes in the van. The tape essentially attaches the panels to the van’s paint, and therefore the panels are only as strong as the paint’s bond to the van metal. 3M does not endorse this and says fasteners are necessary in addition to VHB tape. Another concern of ours was potential damage to the roof when removing taped panels. Plenty of people have taped and not reported issues, but we couldn’t quite convince ourselves for such a critical application. A good discussion on it: sprinter source forum. However, if one went with flexible solar panels, we think VHB tape is the best decision.
- Brackets with regular bolts instead of expansion nuts – see example here. We did not want to glue wood supports to the van ceiling. A slat of wood significantly cuts down on the amount of insulation we can install in the ceiling, and we will need to cut insulation around it. The expansion nuts Renogy recommends are better suited for this installation.
Our Favorite Solar Panel for a Van
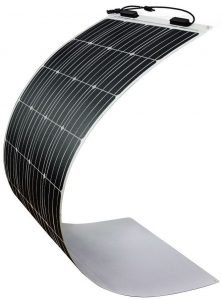
If we could do our van conversion over again, we would choose flexible solar panels. Rigid solar panels, being about 25-40% cheaper, are an easy choice for large fixed solar installations like a house rooftop. For a vehicle with unique installation difficulties and where every pound matters, the extra flexible panel cost is worth it. Flexible panels can be easily installed with VHB tape or adhesive to the roof.
→ How to Choose Solar Panels for a Camper Van ←
This article details our installation of rigid solar panels, and for those we heartily recommend the 200 watt panels by Hightec Solar. These are performing well for us after 2 years.
We recommend Renogy flexible panels because they are the best balance of cost and durability, with a 25 year warranty. Cheaper panels are made with a PTE coat that yellows and degrades much quicker than Renogy’s ETFE coating.
Where to Place Solar Panels on the Van Roof
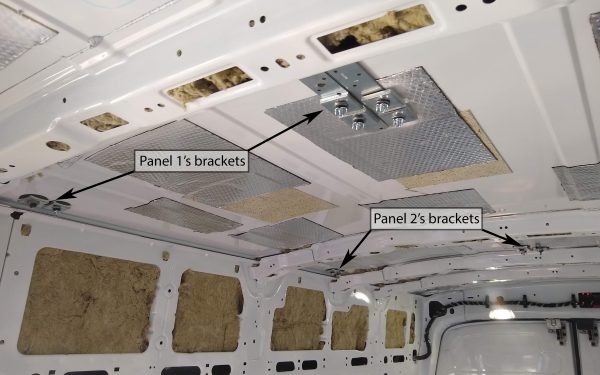
To secure the brackets, we needed the bracket fasteners to be accessible from inside the van. Therefore panels were placed so that the brackets would not land on top of an interior ceiling rib.
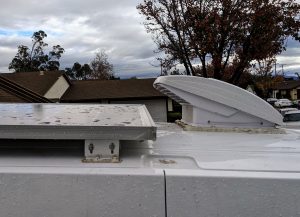
We placed our panels as forward on the van as possible to maximize the unused roof space for any potential future use (sun roof, second fan). After installation, the front of the panels are only a couple inches from the fan lid. In retrospect this is risky as we don’t want the fan lid to cast any shade on the panels. Fortunately, unless we were to park at a very certain angle while the sun is really low, there’s no shading.
Prerequisite? Locating the roof vent fan: MaxxFan Vent Fan Review and Installation
We left a small 3 inch gap between panels so that they are as far from the side of the van as possible and therefore less visible from the ground.
Z Brackets for Mounting Solar Panels
The typical solar panel is mounted with a Z Bracket which is simple and flat, but we elected to go with a “Curved” Z Bracket which is specifically made for a curved roof (like a van!). The Curved Z brackets are two separate sliding pieces. The upper piece is bolted to the panels, while the lower piece adjusts to sit flush on the curved van roof.
If doing it over, we would NOT use Curved Z Brackets, and instead would just use a standard Z Brackets. The curvature of the Transit roof just isn’t steep enough to necessitate the extra component. The downsides of the Curved version are:
- The panels are raised off the roof a few extra inches, increasing their visibility
- Since there are two components, the curved brackets are more cumbersome to work with
- The curved brackets are more expensive by $5-10
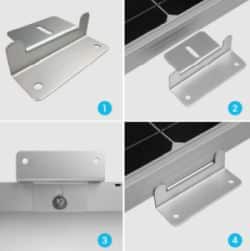

Images from Renogy’s product manuals standard & curved (pdf)
The Z Brackets from Renogy came with bolts, nuts, flat washers, and lock washers. The Z brackets also included screws to attach the brackets to the van, but those would need some sort of internal frame to screw into inside the frame (just screwing through van sheet metal is not strong enough). Screws are okay for attaching panels to a house roof, but not a moving vehicle! We used expansion nuts, see below…
What the Heck are Expansion Nuts?
We attached the brackets to the van with Brass Expansion nuts, also known as well nuts. We hadn’t encountered these before the van! Renogy specifies that, as opposed to just using screws for the brackets, “installation on the roofs of RV’s typically requires for more specialized instruction”
The well nuts were #10-32 x 1-1/16 in. “The expansion nut is comprised of two parts: a rubber outer sleeve with a flange that serves as a plug, and a brass insert. The plug is placed into the hole and a bolt is inserted. Upon tightening the bolt, the end of the rubber backs up toward the flange, expands, and anchors itself within the hole. They are good for applications where light sealing and vibration dampening are needed.”
A video is worth a million billion words. This one is a really helpful exhibit on the expansion nuts:
Inside the van, we need more support and anchoring surface for the nuts than just thin van metal. Per Renogy “A minimum roof thickness of 3/8″ is recommended,” which means we need to build up our van roof. Our components that the nut is compressing up to the van metal are, from top to bottom:
- Neoprene washer (0.065” thick) – to help the rest of the components conform to the roof curve
- Strap tie (20 gauge .0359” thick) – only on the bolts in the center near a roof rib. The metal at the center of the van has less support and flexes easier than metal nearer the sides. After everything was bolted, we used spray foam to “tie in” these straps to a horizontal rib, which we think added structural support to the bracketed area (less flexing/shaking of the roof on bumpy roads).
- 3/8″ Super Strut Square Washer (12 gauge .1046” thick) – adds thickness
- 3/8″ flat washer (0.078”) – more thickness, to meet minimum thickness for expansion nut
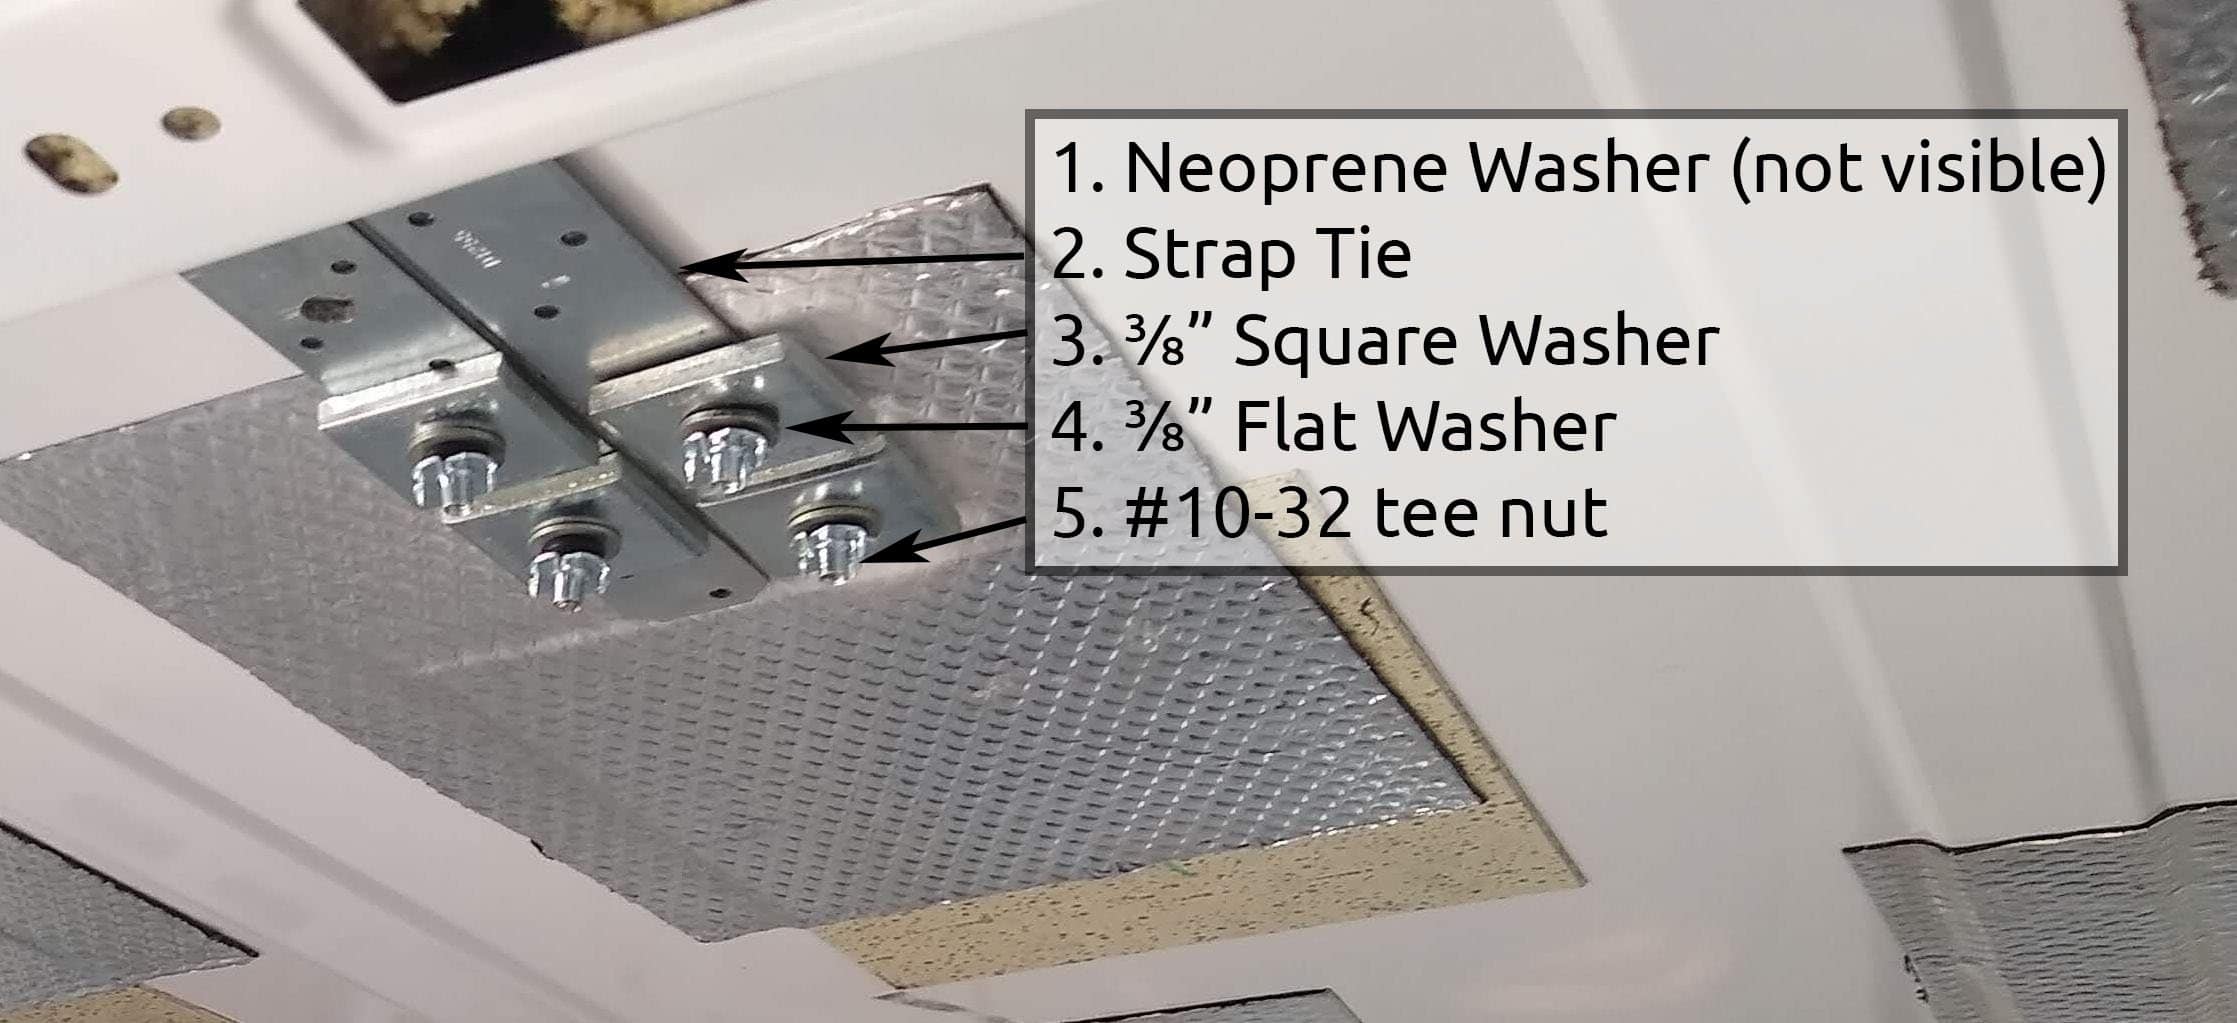
This is why we used a 1-1/16″ inch expansion nut, which is made for a material thickness 0.312″ to 0.625″. The van’s sheet metal is about 18 gauge or 0.05”. Total thickness of all components was 0.33”, plus some sections had sound deadening on the sheet metal which adds another ⅛ inch or so.
The other size expansion nut available is ⅝” (which is actually what Renogy specified in the bracket manual) is for material thickness 0.05” to 0.22”. Since we had more than just thin van metal, we needed a longer expansion nut.
After experimentation, we found 1-¼” screws were the shortest that could be used with a 1-1/16” expansion nut. Those were rarely in stock though, so we sized up and used 1-½ inch Machine Screws #10-32. #10-32 is the same threading as the expansion nuts, and stands for a #10 gauge screw, with 32 threads per inch. The screws and washers are stainless steel because they are outside the van and we don’t want them rusting. On top of the van, with the screws we used #10 stainless steel flat washers and #10 stainless steel split lock washers. Split lock washers are common in automotive use and prevent the loosening of a screw from vibration.
Attaching Solar Panels to Van Roof
 To determine where our bracket holes would be, we brought the panels up to the roof (with the brackets already attached), and laid out the panels and marked the holes in the brackets. We drilled 3/8” holes through the van metal roof for the expansion nuts. Fortunately, if the holes are not spot on, there is a little wiggle room with these nuts (but not much).
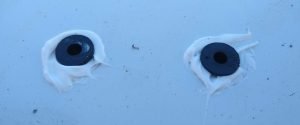
To ensure a water tight seal, we added a small amount of Dicor Lap Sealant caulk around the drilled holes. Then we placed the expansion nuts through the holes.
Side Note: A lot of people use silicone as a sealant on their vans and RVs. Silicone is not as flexible as Lap Sealant, and therefore is more prone to cracking from vehicle movement. The big problem is that it is really hard to remove (think hours of scraping and solvents). If it’s not completely removed, then no other sealant, including silicone, will ever stick to it.
One tube of Lap Sealant was all we needed for the fan installation and everything else (cable entry box, panel brackets), so do yourself a favor and buy the right product. If you insist of being stubborn and buying a silicone caulk, then buy Silicone II instead of Silicone I. It’s what’s called a “neutral cure” silicone which, per GE, enables Silicone II to adhere to a broader range of substrates such as metals.
We lined the brackets (attached to the panels) up to the 3/8″ pre-drilled holes. Nadia stood inside the van holding the aforementioned washers up through the expansion nut. Kevin was on top of the van and, after assembling the screw/washer/lock washer assembly, inserted a machine screw through the bracket (2 screws per bracket) and started to screw, “activating” the expansion nut. It’s worth noting that we ripped through an expansion nut when using an electric drill. To prevent this, use a low setting on the drill and finish tightening your expansion nuts with a screwdriver.
When everything was installed, we added #10-32 Tee Nuts (previously pictured) to the ends of the screws as a fail safe. If the expansion nuts somehow pulled up and through, the tee nuts prevent the screw from pulling through. A tee nut was simply the longest diameter (widest) nut we found.
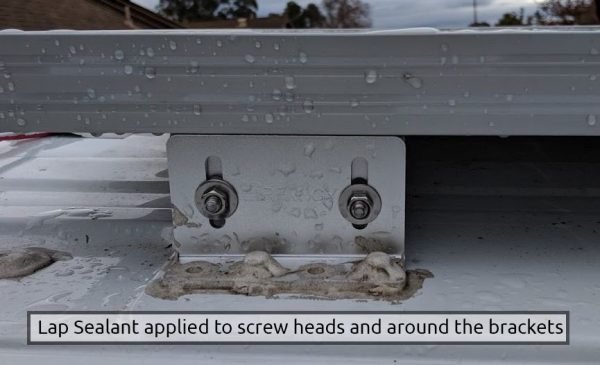
Water could potentially leak through the screw heads and between the brackets and rubber flange of expansion nuts, so we added more Dicor Lap Sealant to the screw heads and around the brackets. The lap sealant collected dirt for a few months before we took this picture. After this dried (definitely before covering this all with insulation), we sprayed the roof with a hose, and no leaks!
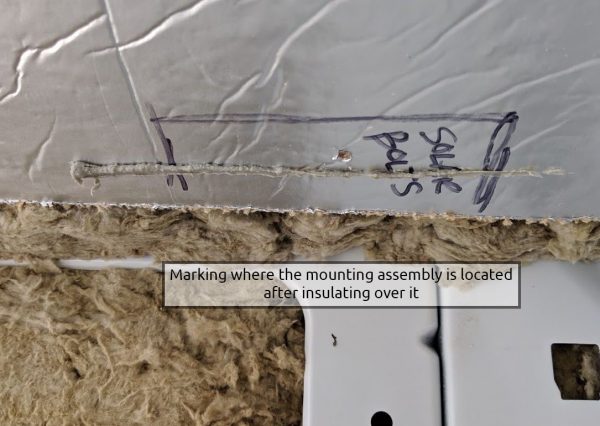
When we insulated our ceiling, we notched spaces for the expansion nut assembly out of the rigid polyiso insulation. Nadia (nicer handwriting than Kevin) then indicated on the faces of the insulation where these were located, so we know their placement if we need access the assembly in the future.
Running Wires from Panels to Inside Van
We ran the wires through the gland box (one person on top, one person inside pulling down the wires). The nuts on the gland box were then turned to fix the wiring. We then glued the gland box to the roof with a suitably strong (compatible with metal) weather resistant adhesive Sikaflex-221. The roof is slightly curved so we added extra adhesive where the flat bottom of the gland box did not sit flush with the roof.
After the adhesive set, for waterproofing we added Dicor Lap Sealant around the gland box.
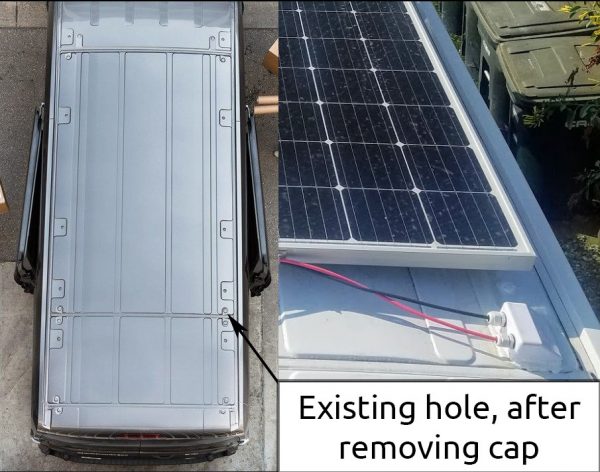
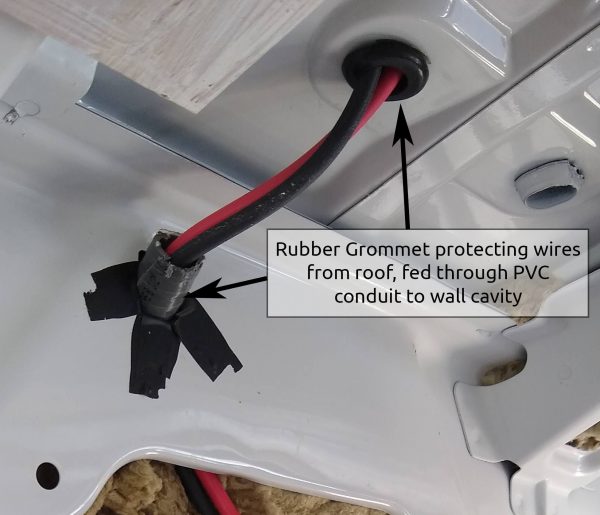
Rather than drilling yet another hole in the roof, we ran the wires through one of Ford’s holes on the roof using a Double Cable Entry Gland Box. These boxes are water tight via a rubber seal that is compressed around the wires once they are in place.
To protect the wires we added a Rubber Grommet in the van hole. We bought a bunch of grommets and test fit, and the linked size is correct for the roof holes. Two 8 gauge wires fit snugly through this grommet. We also added a small amount of PVC conduit inside the van through which the wires run down to the charge controller.
The wiring in the grommet and the conduit will fit behind our ceiling and wall, respectively.
Are the Solar Panels “Stealthy”?
After installation, the most glaring aspect of the installation visible from the ground were the red & black positive and negative wires running from the panels. To blend in with the white van, we painted the wires with a white outdoor paint.
With the wiring not visible, we are happy with the look of the installation.

Materials List
-2x 200 watt 12 volt panels
-2x Renogy Z Brackets: Amazon or eBay
–Dicor Self Leveling Lap Sealant 501LSW
Screw components on bracket
–1-½ inch Machine Screws #10-32
–#10 stainless steel split lock washers
–#10 stainless steel flat washers
Washers inside van
–Neoprene Washer 3/8 in. x 2 in.
–Strap Tie 20-Gauge 1-1/4 in. x 9 in.
–3/8” Super Strut Square Washer
-3/8” Flat Washer
–#10-32 Tee Nuts
Ready for more info?
Visit the Van Conversion Build GuideWe sincerely hope this information is helpful on your build journey!
This post contains affiliate links that may earn us a commission if a product is purchased. But, we always strive for the reuse and repurpose of materials – so we encourage searching for a local used option before buying from our links.

hi! how are these panels working out for you? did you have to drill to get the renogy brackets attached?
Panels are still working great! We did drill a hole in the aluminum of the solar panel to order to bolt on the Renogy bracket. The panels come with no pre-drilled holes, which is likely preferable so that the installer can position the hole where they want it
This was SO helpful! Thank you so much for posting this!!!
Glad we were able to help!
I don’t know how long ago this was posted but would you still go with flexible if you had it to do again? I’m making these decisions now. Do you know others who have? with or without problems?
Yes, we would go with flexible panels. I have heard positive and negative from people with flexible panels. Biggest risk factor is heat – since flexible panels lay flat on the roof, there is no airflow and they get really hot. Ive heard reports of people whose panels have essentially melted, and those who have had no issues. For us, we avoid super hot areas, so we would be comfortable with flexible panels.
I am mounting 1 regular 100w panel to the top of my camper van. It’s a high top (fiberglass) conversion van with finished interior and roof. What do you recommend since I can only attach from the exterior without nuts or washers on the interior? Thanks!
Question for you: Why use tee nuts? They are designed for the prongs to go into soft material like wood, but from what I can see in your picture, you have them installed backward and the prongs aren’t going into anything. Why not just use a regular nut?
The tee nuts are merely a fail-safe mechanism. We chose tee nuts simply because they are big, not being they are actually fastening something.
Given that you could access the mounting bolts from underneath, why did you opt to use the well nuts which need a 3/8” hole rather than just 1/4” bolts with nyloc self locking nuts? Then you’d have no worry of the well nut pulling through the hole?
We used well nuts because they were recommended by the manufacturer of the mounting brackets, Renogy. Nyloc should also work!
Many thanks for the reply. I have the Renogy brackets and read in their instructions that they suggested well nuts for a roof with access only from one side. Have you been happy with how secure they have been after some years’ (?) use? They use quite thin bolts (No 10 or M5 here in Europe).
Our solar panels have been installed for 2 years, and everything is still secure and we’ve observed no issues!
Great! Many thanks.
Hi guys…installed my two 175W solar panels exactly like you did on our promaster. I was so nervous about them coming off that i actually used 6 z brackets on each panel. So 12 penetrations through the roof. I use LAP sealant liberally. However with the small gap left between the roof and the solar panel the seam on the backside of each bracket ( under the panel) was difficult to reach. So I didn’t. I was hopeful the sealant I applied before I put the bracket down was sufficient. We had several rains here at home over the last month and didn’t notice anything…so last week we took our first cross country from Albuquerque to Indianapolis. Driving rain from Oklahoma city to indy. 8 hrs of hard rain, sleet, you name it…well we had some water ( not a lot but enough to make my wife worried we would have to tear out the ceiling. ) Anyway,it dried out ( thinsulate should be dry I think…no signs of any water at all) now…I am rushing to seal up around those brackets now. I it is impossible to get the lap sealant to flow through a flexible extension bent around to get into the that seam. I put expanding foam with a 6 inch flex hose extension and got it to coat the whole back side on one of the brackets as a test…I like the outcome. Great stuff actually makes a foam called pond and rock for water sealing. It is supposed to be good for finding cracks and being impervious to water uptake. Have you had any similar experience with leaking on the underside between the z bracket and the roof ? how did you deal with it ?
thank…sorry so long winded
John
Hi John, thanks for sharing your experience! We did not have a similar issue with water leakage, but I know exactly the seam you are referring to. We shared the same concern, but since we haven’t had any water penetration (even through severe rain / sleet / snow), we haven’t given it more thought. However I think what you did sounds like a good solution. Perhaps we’ll add this extra step when we’re in maintenance mode, just to be safe.
You mentioned that you would not use the curved brackets if you had to do it over again. But isn’t there a big advantage of using the curved brackets in that if you had to replace/service a panel, you wouldn’t have to remove with the brackets that are bolted/sealed to the roof?
It’s true that it is easier to work on panels with the curved brackets because they are a bit easier to get off. But with a standard single component bracket, one can still remove the panel. You would simply unbolt the panel from the bracket, and just leave the bracket attached to the roof.
Thanks for the helpful information. I am looking into mounting options for the roof of our skoolie. As Chip said, I like the idea of the curved brackets for removal of the panels in the future if necessary. It seems difficult, if not impossible to unbolt the panel from the bracket after it is bolted to the roof. Am I wrong?
Hi, Thanks for article. I have renogy 175w flex solar panel that I am fitting to poptop. Was going to use what renogy recommend for glueing ie Structured Silicone Adhesive & 3m Primer. Your article implies you wouldn’t do this which makes me a bit unsure how best to proceed. Any further clarifying comments about the best way forward for this situation? Thanks