
We're an affiliate
We hope you love the products we recommend! Just so you know, we may collect a share of sales or other compensation from the links on this page. Thank you if you use our links, we really appreciate it!
We built lightweight and sturdy cabinets for our camper van conversion. This step of the van build was where we really came to realize the difficulties imposed by the curved walls and weird protrusions in a van interior. We worked with and overcame those difficulties!
Priorities for our build were to:
- Minimize Weight
- Maximize circulation space, and minimize dead space
- Keep down cost of materials
Stick Built vs. Traditional Construction Cabinets
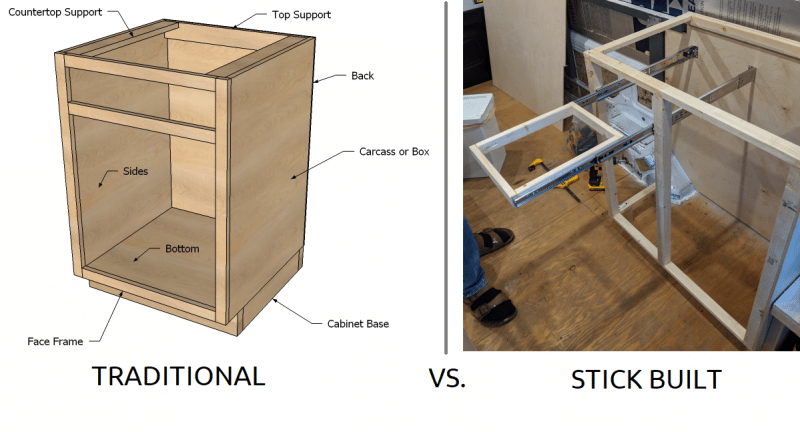 We elected to stick-build our cabinets due to the significantly lighter weight and lower cost, along with the added flexibility in construction. Traditional cabinets in a house are typically built with ¾” plywood, but as each sheet of ¾” plywood weighs about 70 pounds, that’s a lot of unnecessary weight and material.
Stick built cabinets means the structure of the cabinet is made of “sticks” of standard lumber, mostly 2×2, 2×3, and 2x4s. After the full structure is built, the sticks can be faced with a thin plywood. In our case, we faced with ¼” baltic birch plywood, and ⅛” plywood where the faces aren’t visible or used (like under the bed).
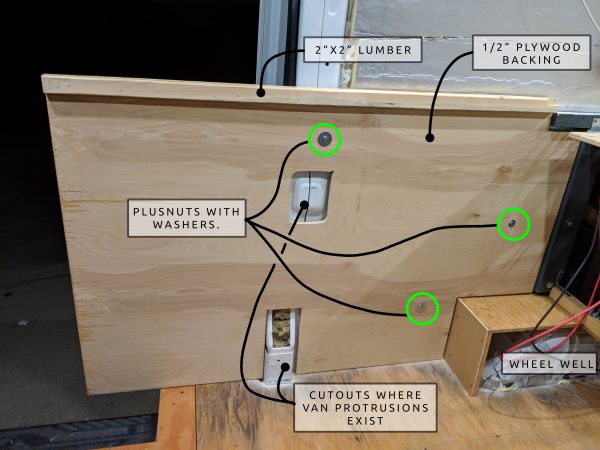
How to Anchor the Cabinets to the Van
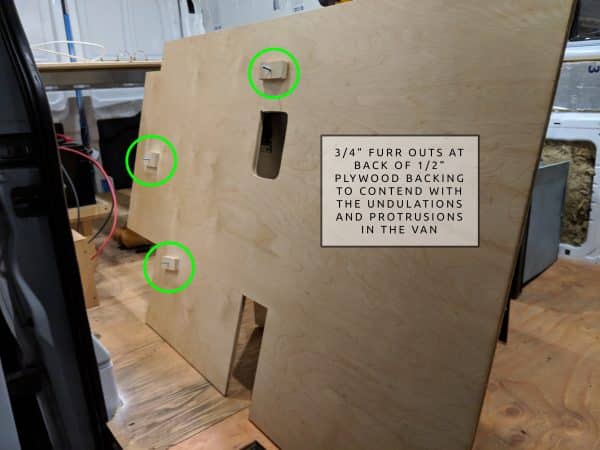
A backing panel of ½” plywood is bolted into the plusnuts installed in the van, and cabinet frame sticks are glued and nailed/screwed into the panel. This backing panel serves two purposes: first, backing provides a straight and flat surface for the back of the cabinet, which relieves us from the undulations of the van wall. Second, it secures the entire frame to the van.

Heard of plusnuts? They provide a very strong fastening point in existing holes in the van, minimizing the need to drill holes and risk rust. Read More >
We would have loved to use a thinner plywood for the backing panel (as always, for weight and cost). We used ½” because the bolts through this plywood are the critical points where the entire cabinet is kept in place.
The feet of each cabinet are also screwed, using pocket holes, to the van’s ½” subfloor.
Pocket Holes: THE Method for Wood Fastening
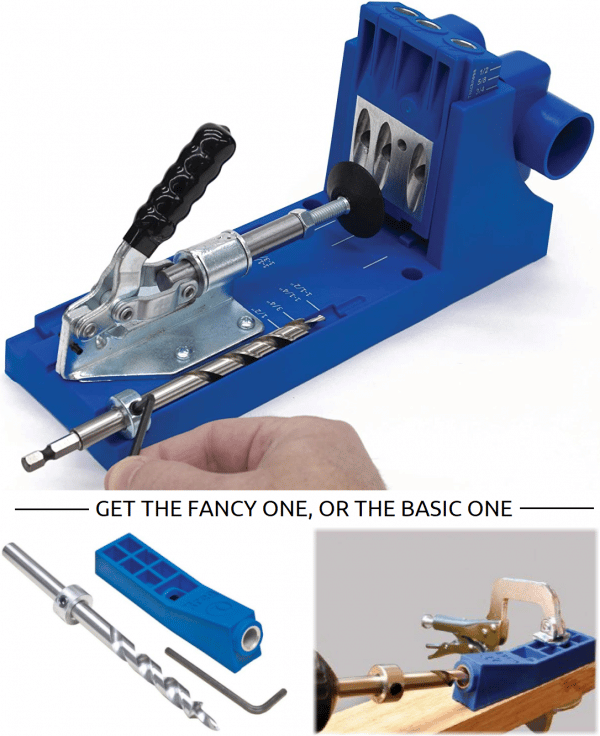 Let’s get to the point: You want to do yourself the favor of purchasing a pocket hole jig. We tried to resist at the start of our build, and quickly relented.
Choose your adventure.. the pricier and more capable K4 Pocket Hole Jig or the simple but adequate Pocket Hole Mini Jig Kit.
There is no better way fastening pieces of wood at a corner “butt” joint that is so strong and effective, but still pretty easy. It’s certainly much better than adding thousands of corner braces to your build (dead giveaway of a noobie), and a lot simpler than fancy woodworking joinery.
We recommend watching this video to get a feel for the benefits of pocket hole joinery. That video will be clearer than any explanation we try to write up.
(We think the Mini Jig is plenty adequate for a beginner, and a big cost savings. You will need to get a C-Clamp to use the Mini Jig, and a set of Pocket Hole Screws which have a special flat bottom head)

Designing the Cabinets
 The first step was to decide our main priorities for these cabinets:
- Stove at the sliding door, for ventilation and a view when the weather allows
- Large refrigerator
- A big drawer for pots and pans
- Sink & water tank on the driver side, as this will balance the weight of the solar batteries on the passenger side
- Space for an easily accessible trash can
- Ample counter space, not relying on flipping up counter top space every time we cooked
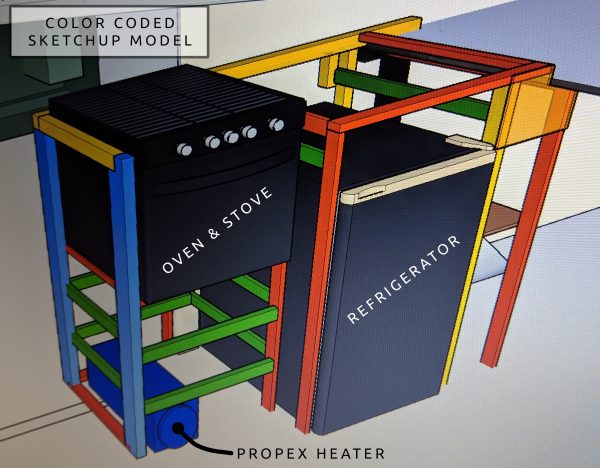
We modeled our cabinets in SketchUp using color codes for the different lumber sizes (red are 1x2s, yellow are 2x2s, etc). As you can see by the colorful model, we really were trying to make the most of the lumber, minimizing waste and going with smaller profile lumber where possible, and also keeping in mind what lumber we already had on deck. A digital mock-up is not strictly necessary, but it helped us narrow down our thoughts as we were talking it over.
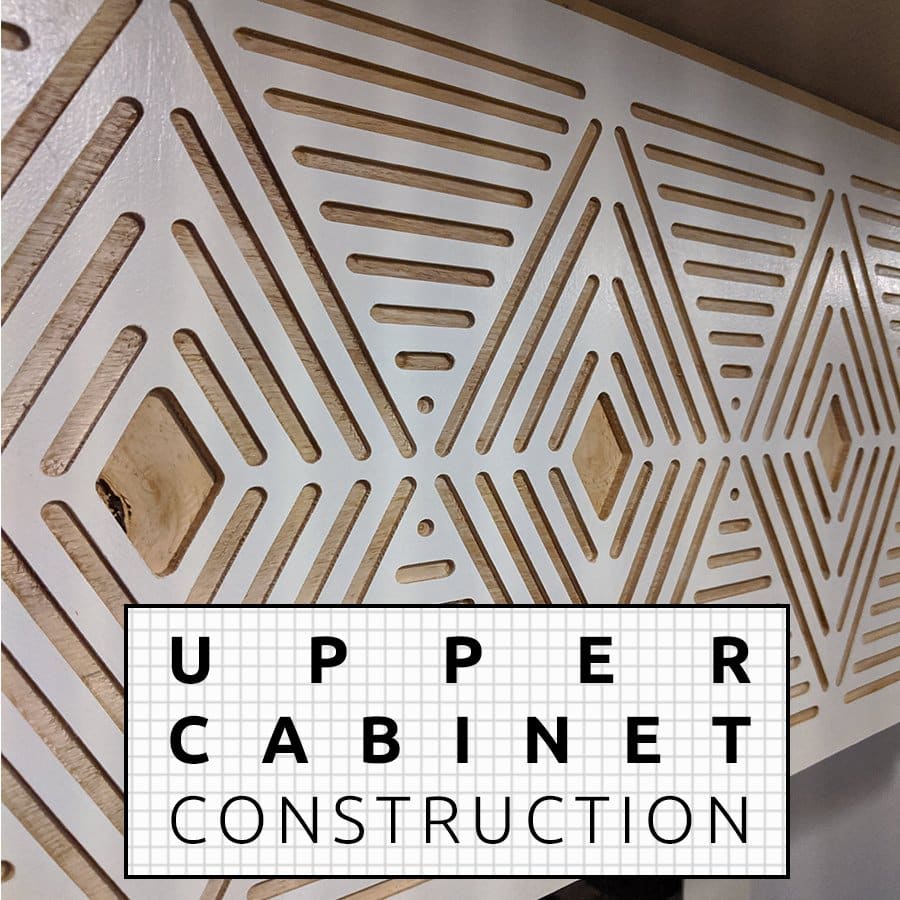
The flip-up Upper Cabinets were our next cabinet build. Check out the process ->
Stove & Refrigerator Cabinet Appliances
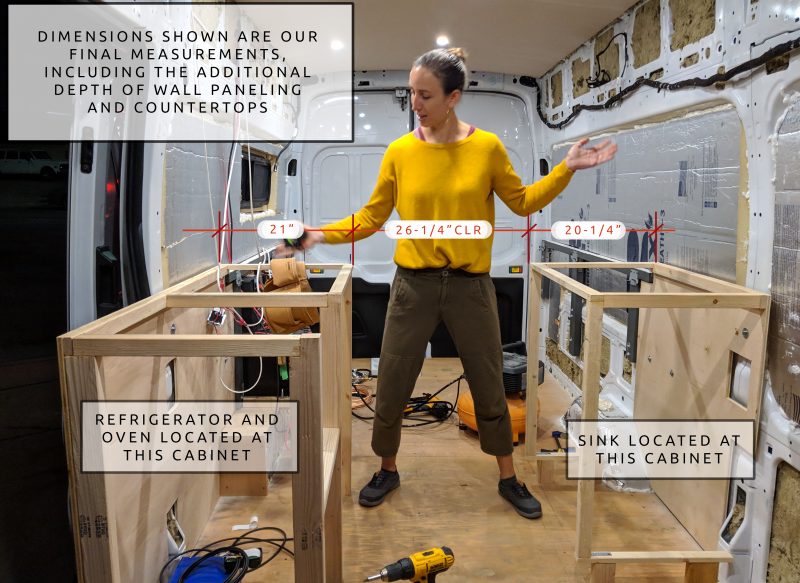
On the passenger side of the van, we have our stove/oven combo, refrigerator, and some storage drawers. This is the side we started with, since we knew it would be the more complicated design in order to house the appliances and still make the best use of the space. We made sure to have the appliances delivered and measured for accurate directions and measurements before constructing the cabinet. For example, the stove required support below and on all sides, and the refrigerator came with clearance requirements to allow for proper air flow.
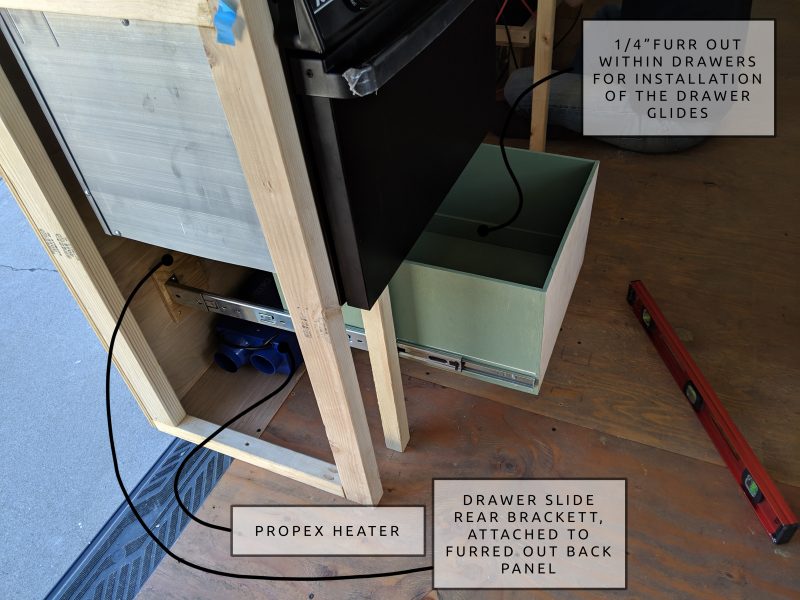
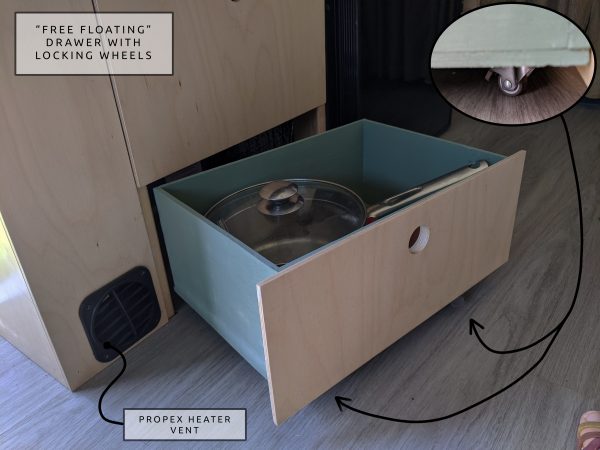
Our Propex Heater sits to the back of the cabinet under the oven, and the duct leads to a vent at the cabinet face at the bottom.


Side note: astute readers will notice that placing the hot oven adjacent to the refrigerator may not be ideal. That is where the flexibility of stick-built cabinets shines! We stapled a piece of Reflectix between the two appliances, which acts as a radiant barrier meaning it reflects the oven’s heat away from the refrigerator. The Reflectix has an air-gap of at least 1inch on either side, a necessity for its barrier to be effective.
Stove & Refrigerator Cabinet Storage
We decided to do one large drawer over the refrigerator for all of our cooking utensils and silverware. It’s nice, we think, to be able to see it all in one glance, though we may further compartmentalize the silverware at a future time.
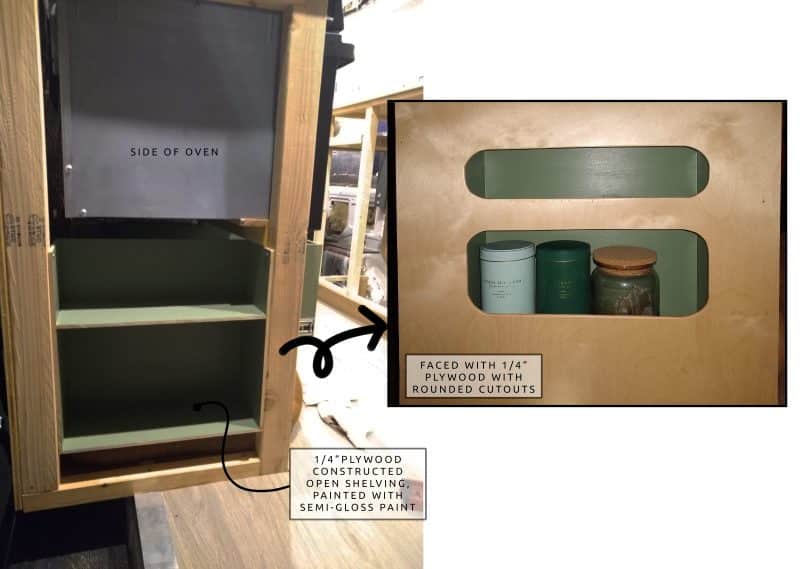
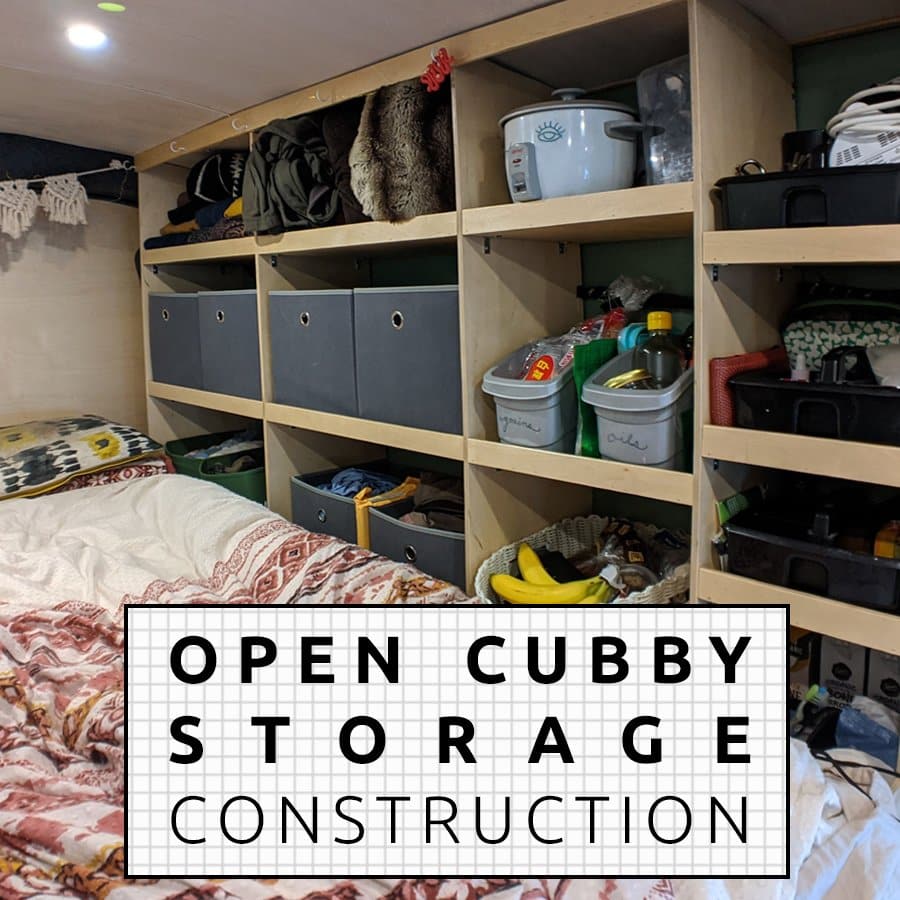
We had some available space on the side of the cabinet near the oven which we used to carve out some open cubbies. We use these for our tea canisters (we love our brews), vitamins, and other miscellaneous items that we want easy access to.
To the far right of the cabinets, we did step down the cabinets to make use of some of the space under the bed. These are currently open shelves:
- Top shelf – Spices on a slide out shelf. We originally built this as a fixed shelf, but can attest that trying to find spaces in the back of a deep shelf is a pain, so we altered the drawer and added drawer slides.
- Middle shelf – Collapsing Mixing Bowl, (2) dinner plates, (2) salad plates, (2) large bowls, (2) smaller bowls. We thought we would need to make slots for the plates to sit in, but surprisingly they have not fallen out even on bumpy roads! So it accidentally worked just with the ledge as built.
- Bottom shelf – This bottom shelf is open to the floor, and we added a bottom ledge so that whatever we put down there doesn’t vibrate out on the bumpy dirt roads we frequent.
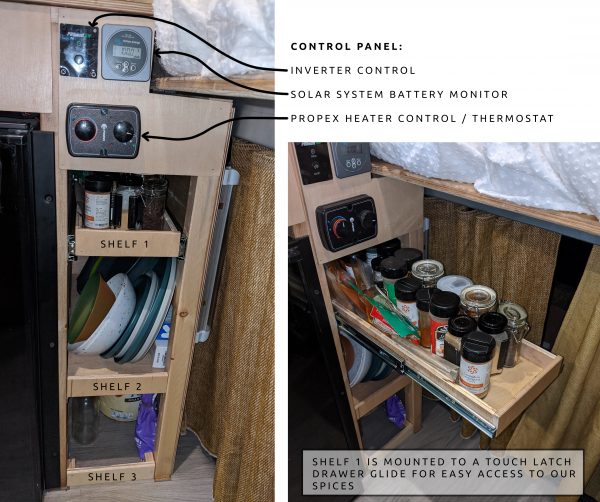
We also have our control panel mounted here, which has:
- Battery monitor – Provides data about the health of our solar system, charge of our batteries, and current electrical usage.
- Inverter switch – Turns inverter on and off depending on if we need it or not (it helps save on battery when it’s turned off if we’re not using our 120v electrical outlets.)
- Propex Heater Control – Turns the heater on/off, and set the temperature level.
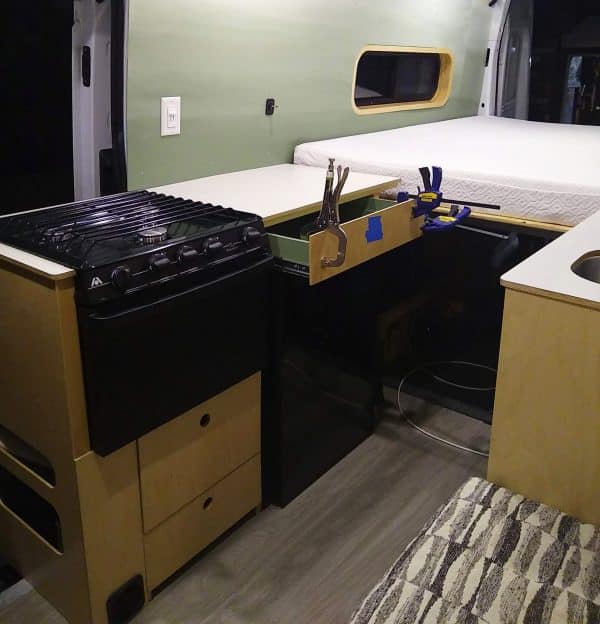
Sink & Trash Cabinet
The other cabinet is our sink / trash cabinet, and was more straightforward. Design included:
- Faucet away from the bed, so we wouldn’t worry about splashes.
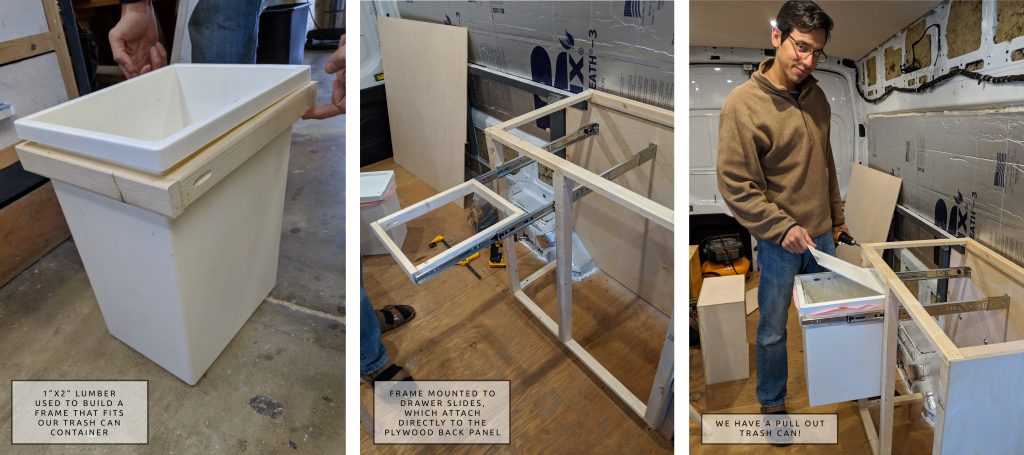
- Pull-out trash can on drawer glides
- Trash can adjacent to the bed so it can be pulled out without blocking the aisle
We also have a gray water tank that our sink drains into, which takes up a significant amount of the space under our sink cabinet. The fresh water is in a 25 gallon tank under the bed.
We included a toe kick on this side for extra toe room. We started the sink/trash cabinet construction by attaching the toe kick studs to the plywood floor using pocket screws, and building the stick frame upward off of that foundation.


For the pull out trash can, we already had this Ikea trash can in our home, and decided to simply use it in our van, since this would be our new home! We like it because it has a flip up lid to keep smells from creeping out. We took the container dimensions and created a wood frame that the trash can could sit into, then attached the drawer slides to the frame.
Another difference from the Oven/Refrigerator cabinet is that we used a thicker plywood for our doors, since we had a hinged doors here. It’s hard to find concealed hinges that could work with a thinner plywood at a reasonable price, and we had the perfect amount of ¾” plywood on hand for these doors. We didn’t add the doors until we had everything within this cabinet sorted out (including the plumbing setup) which is why the image below includes the installed countertop and sink.
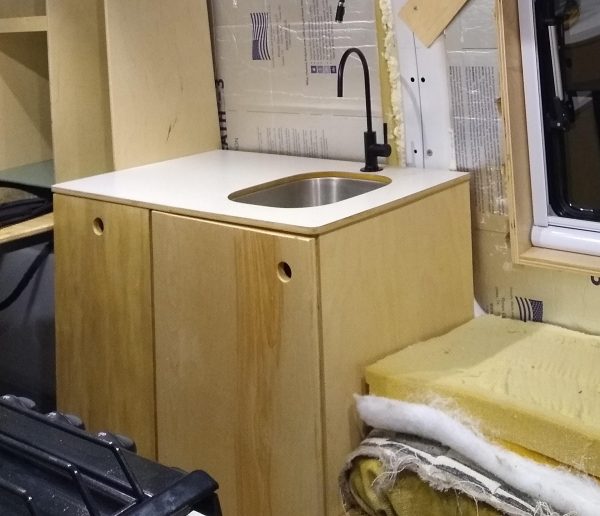
As far as storage inside the cabinet, we constructed a perfect little shelf above the gray water tank in order to make use of this space. We currently use this space for cleaning supplies, and our fire extinguisher. On the trash can side of the cabinet, we have space underneath the trash can which perfectly fits our coffee machine.
Cabinet Facing
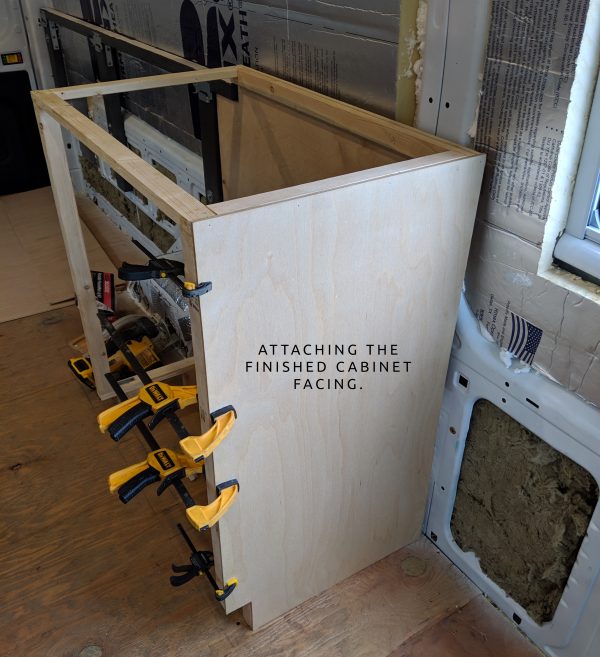 The cabinet facing is ¼” Baltic Birch plywood finished with polyurethane, and was attached with glue and finishing nails to the cabinet framework. On top of the plywood, the outside corner for the Stove cabinet was finished with a ½” aluminum angle trim piece.
Lastly, sides under the bed which won’t be visible were faced without leftover 1/8″ plywood that was screwed to the stick legs of the cabinets.
We have a separate article detailing our DIY Laminate Countertops.Drawers
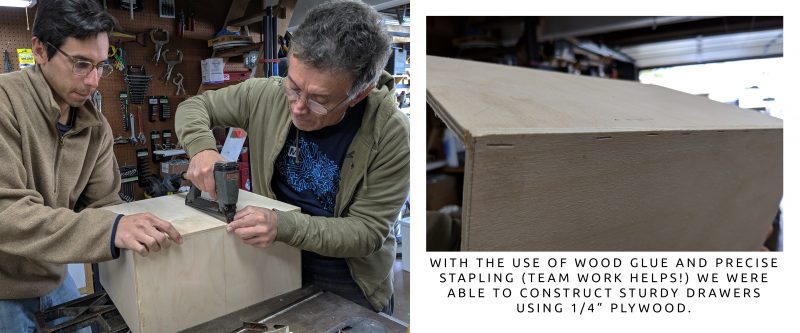
The drawers were constructed using only ¼” plywood, wood glue, and staples for the box. The drawer faces are also ¼” plywood, and were also glued and stapled from the inside. This is a very thin plywood to use on drawers, but we are happy to report that they are totally sturdy, even our large drawer that is holding a few pots and pans.
This is only possible because we used Baltic birch plywood, check out this article if you’re unfamiliar with its superiority. We purchased ours from a local lumber shop (and we’re happy we had the van to transport the awkward 5′ x 5′ sheets). Baltic birch is not usually available at Home Depot/Lowe’s, and the Birch plywood they sell is a veneer of birch with soft lower-quality plies.
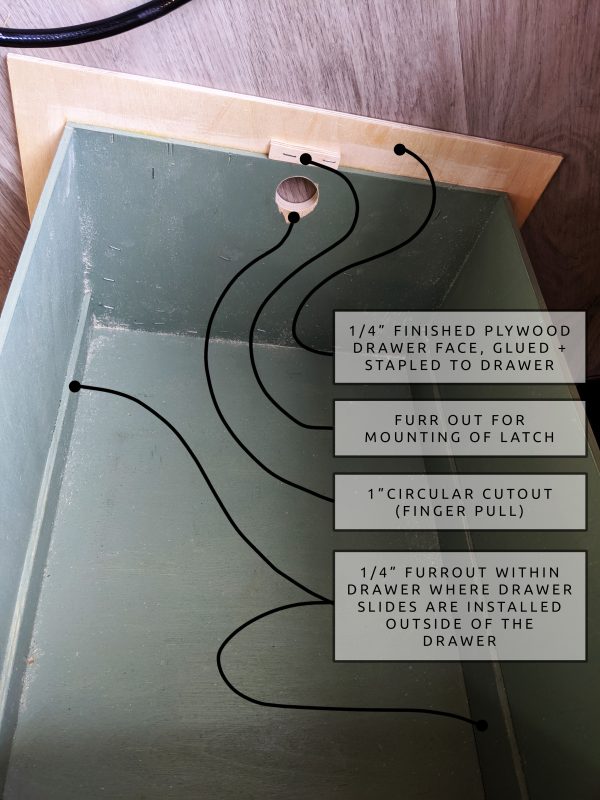
The wood needed to be thicker than 1/4″ to accept the screws where the drawer slides attach to the drawer box. There is an additional strip of ¼” plywood on the inside drawer in order to accommodate this.
The drawer at floor level was not put on slides as the Propex heater was blocking access to the back wall. Therefore, our bottom drawer is instead on locking caster wheels. It’s okay, but can sometimes get finicky if you don’t know how to work it, since the wheels we used do turn. Perhaps a floor track would have been wise. Nevertheless, it’s totally functional and the inconvenience is not unmanageable.
Drawer & Cabinet Hardware
For our pulling mechanism, we elected to keep it simple and do 1-⅜” holes straight into the cabinet drawers and doors. The main benefit is there is nothing sticking out into our kitchen space, plus the ease of installation.
We love the minimalism, but will caution that dust can fly into those holes and may be a concern for some. As strange as it sounds, we are considering making a little finger glove inside of our silverware drawer to block the hole from the inside, as that’s the only one that seems to collect dust in our case, currently.
Cabinet door hinges are a surprisingly confusing topic. We recommend a read of this primer. We recommend these hinges we used which are basic and adequate, and affordable!
Drawer & Cabinet Latches
How do we stop our van drawers from opening while driving?
Here’s our final answer: Touch Release Push to Open Drawer Slides. These have a built in locking mechanism, no additional hardware necessary. Although they are more expensive than typical full extension drawer slides, these are worth it because they add functionality and aesthetics. After all, you don’t need handles or holes to open your drawer when you have push to open.
However, we only stumbled on this superior option when constructing our last drawer. So, for the rest of them.. We used fairly standard full extension drawer slides and tried a few iterations of cabinet latches and ended on these latches as the most effective to keeping our drawers closed. We’ve had our heavier drawers open a couple times on sharp turns, but we deal with that.
Latches
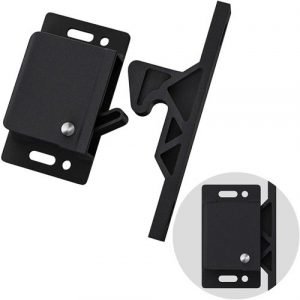
We are really happy with these latches. Trust us.. you don’t want your cabinet doors flying open when you’re driving! These latches have kept our doors closed through the bumpiest of driving conditions.
We thought we could skip latches on the upper cabinets. But the bottle of soy sauce that exploded on the floor on a bumpy dirt road said otherwise!
We’ve seen other vans have luck with these magnetic locks, but didn’t like the idea of having to keep track of a key.
Ready for more info?
Visit the Van Conversion Build GuideWe sincerely hope this information is helpful on your build journey!
This post contains affiliate links that may earn us a commission if a product is purchased. But, we always strive for the reuse and repurpose of materials – so we encourage searching for a local used option before buying from our links.

very well done nice detail thank you
This is very helpful and well documented! Are your cabinets a d drawers still going strong? I’m looking to copy your framing and drawer ideas I. My transit conversion.
Thanks
Cabinets and drawers are still strong! No problems with any drawer slides, doors, or frames. Good luck on your conversion!
This is just what I have been searching for! Thank you so much for the comprehensive how to. I was terrified of screwing up and having things just shatter after a clumsy temporary closet build went to pieces. I hope you don’t mind my posting the link to this on the GAB van life community.
Happy to help!
All your info is so helpful! I really like your cabinets, but I’d like to know if you go on many backroads that are bumpy/ uneven? I’ve read that aluminum frames hold up much better than wood frames for backroads that get pretty rough – but it’s also a lot more expensive. How are your cabinets holding up? Would you make any changes? Thanks!
We are happy to report they have held up great and we haven’t had any issues with drawers coming out of alignment or any common wear and tear issues. And yep, we’ve taken the van on a lot of washboard roads, so these cabinets have seen their fare share of abuse!
Just about to embark on my own van conversion. I also have a ford transit high top extended and I am so thankful that I came across your site!! Information will help a lot. THANK YOU
Glad to be of help!
Thanks for this great info. Currently converting a mini school bus to live in for the next year. I was originally going to go with 3/4 ply cabinets, but wood prices have $kyrocketed. I will now go Stick frame.
I like the recessed slides great move
Really appreciate your guides! They are so helpful for us as we convert our Ford Transit! We are in the process of building our fridge and oven compartments similar to yours, and I was wondering how the reflectix barrier between the oven and fridge has held up? I’m a bit worried about putting such a large heat source so close to our fridge.
The reflectix between the fridge and oven is doing great, and we haven’t noticed any significant inefficiency with the fridge. We were a little scared that when the oven was running, the fridge would be constantly cycling, but fortunately we haven’t noticed that.
I am annoyed by the RV’s cabinets and drawers swinging open every time they hit a bump on the road. Knowing how to keep RV drawers closed is essential for a peaceful journey. You can tie child safety locks onto the handles of your cabinet or drawer or you should place magnetic latches on the sides, top, or bottom edges of the cabinet or drawer. Another way store your items in baskets, boxes, or bins, this method can even help you maximize your space. Avoid overloading the RV’s cabinets and drawers. This way, when the drawer does open, only a few items will get pushed out.
Moreover, I recommend placing your heavier and bulkier items at the back to prevent them from spilling out. Also, make sure to pack the items snugly to keep them from moving.
I’m encountering this issue everywhere on the internet. Everyone says “board” or “lumber” or “Solid wood” but not one place in the 30 “guides” i’ve visited actually makes a recommendation on the actual wood used. Is it pine? Cedar? what’s the wood?!?!?
In our case, all the wood (besides plywood) is Douglas fir. You might be over complicating it.. The reason people rarely mention the type of lumber they buy in these contexts, is because they are just buying the cheapest wood available. For example, when you go to buy a 2×4, the store doesn’t state what type of wood was used
I bought a 2018 RV about a month ago, and 3 of the original drawer latches broke on our first trip. Rather than fool around getting poor replacements from the manufacturer, I replaced them with these Camp’N RV cabinet door latch, and they work great. It was made by Durable ABS plastic: high impact ABS plastic material ensures that the device remains functional for years to come, simple to install with necessary mourning hardware. It can offer this benefit because of its 5lbs of pull force, which ensures the device won’t have trouble even in bumpy traffic.
Nice!
Most bulk buyers won’t be able to help themselves, either, considering this Camp’N RV cabinet latch option comes as a 4-pack. It represents a perfect bargain for these shoppers, especially with its lower cost and excellent performance results.
For those of us who are frustrated first time builders, “mourning hardware” is an appropriate Freudian slip! 🙂
You’ve helped me decide to reverse the sides for my sink vs Propex, but where did you store your Propane tank?
Hi, Thank-you for sharing.
It looks like you are using a very wide staple gun. Can you comment on the size of stapes you commonly used (both width and depth), and did you use it for more than fixing plywood?.
ie, Did you also use this stapler to bridge joins in timber framing for ease of construction, as was common in the caravan industry, given your pocket hole screw method is probably much superior strength-wise?
Hi! We used standard staples with lengths of 1″ or 1.5″ depending on the plywood. We only used them when fixing plywood – we stuck to glue + screws or glue + nails when using actual timber.
I am very pleased with the Camp’N RV cabinet latch, these latches firmly and keep the door closed. One feature not mentioned is that, if parking, you don’t need to fully close the latch, it will latch in a preemptive fashion, keeping the door open about 1/4″.
When I ordered these locker latches for our trainer, I found many that would work, but honestly, there are things like this that you simply don’t need stock parts for. after you can get nearly 3x more for fewer money, go for it. This product works great and is all you may need.
Thanks so much for sharing! I really like your post as well as its content. It is useful for me to make a decision to buy a new one for my RV. I have no reasons to stop following your other article.
I found the need for cabinet latches in my class A motorhome. So I designed a few alternatives one of which works very well. As a hobby, I have helped a lot of people with special cabinet securing problems. Maybe I can help some of your readers? Here’s a link to the first style latches that I came up with and I am always working on adding more solutions. https://www.youtube.com/watch?v=REcd-hJUjNw
Just started on my van. This is the best lecture on the whole internet!!!!
Thanks
Herb
Thank you for posting. Reading your article about building cabinets and drawers for van kitchen and storage was interesting to read. This content will be bookmarked for sure.