
We're an affiliate
We hope you love the products we recommend! Just so you know, we may collect a share of sales or other compensation from the links on this page. Thank you if you use our links, we really appreciate it!
The power inverter in a camper van conversion or RV’s DIY solar electrical system allows the use of 120 volt appliances like a microwave, coffee maker, or standard laptop charger.
Without an inverter, you can’t use standard 2- or 3-prong plugs like in a house. These plugs are 120V, but the batteries in a solar electrical system are (almost always) 12 volt. The inverter converts the 12V DC supplied by the battery to supply the appliances with 120V AC.
When shopping for electrical goods (fridge, lights, vent fan, etc), you will always want to be looking for 12V versions. But there are some devices that won’t have 12V versions, such as a microwave and a blender.
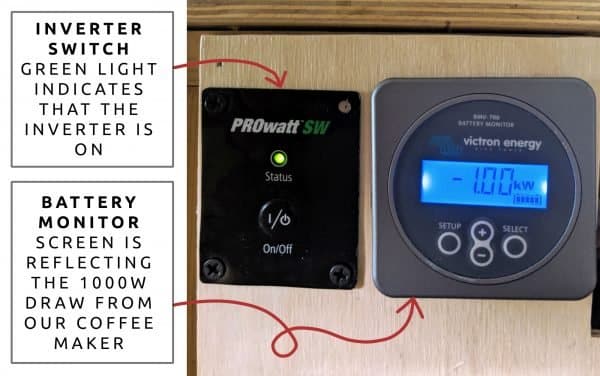
We have a Xantrex ProWatt 2000 inverter that we use every day to charge our laptops and coffee machine (so obviously, it’s essential equipment!). We also use it to recharge our cordless drill, ShopVac, and hair clippers.
What Size Power Inverter do you Need?
Inverters are rated based on the watts they can supply continuously. We will total of the wattage of potential power draws to correctly size the inverter.
Inverter DC to AC Inefficiency
Before sizing the inverter, we need to account for some inherent inefficiency in the conversion process. Inverters average about 85% efficiency. That is, about 15% of the DC power drawn from the battery is lost in conversion to AC.
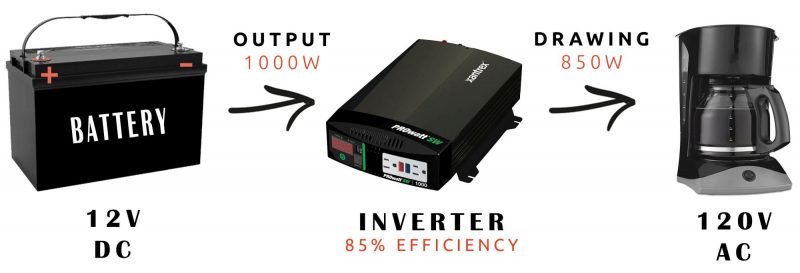
That means when sizing the inverter, we need to add 15% to the appliances wattage draw rating when comparing it to the inverter’s wattage.
To decide what size inverter you need, simply total the wattage requirements of all the equipment you want to power at the same time.
Here is a real-life example of our AC power consumption and how we sized our inverter:
| DEVICE | WATTAGE |
|---|---|
| Cuisinart Coffee Maker | 1,000W |
| Nadia’s laptop | 65W |
| Kevin’s laptop | 50W |
| Rice cooker | 250W |
| Rechargeable batteries | 20W |
| TOTAL: | 1,385W |
Our potential total consumption is 1,385 watts. Adding 15% for inefficiency brings us to total potential consumption of 1,593 watts. Here’s the thing: we probably wouldn’t be running the coffee maker and rice cooker at the same time (not exactly complimentary food groups). And we can unplug our laptops while making coffee. So based on day-to-day usage we can size our inverter for 1,150 watts (after adding 15%).
(A shout-out here for the Cuisinart 10-cup coffee maker we splurged on. Specifically it’s got an insulated carafe which means the device turns off when the coffee is done, and the coffee stays hot for at least an hour. That means once the coffee is done we can turn off the inverter and know we aren’t drawing any more power. Most coffee makers electrically cycle on and off to keep the coffee hot. Also it’s great that it’s 10-cup capacity allows total over consumption of coffee by two people.)
In reality, we opted for a 2000 watt inverter, the Xantrex ProWatt 2000. When we were designing our electrical system we were planning on including a microwave in the van, and your standard household microwave can draw up to 2,000 watts. We didn’t end up getting a microwave (which we still think was the right decision), but at least we have an extra powerful inverter.
How to Choose and Install a Battery Monitor →
Inverter: Continuous Watts and Peak Surge Watts
But wait! Some appliances actually draw anywhere from 3x to 7x more watts than their rating at start up. These “surge watts” are drawn for just a couple seconds and helps the appliances start up. Appliances with surge requirements include microwaves, and those with pumps, compressors, and heaters.
If you will have one of these appliances, double check the surge requirement of the appliance, and the peak watts of the inverter. The peak watts is in the documentation for most inverters, with most handling peak watts that are double that of the continuous watt draw.
Difference between Pure Sine Wave vs. Modified Sine Wave Inverters
There are two types of power inverters: modified sine wave and pure sine wave. Here are the currents they are supplying to the 120V devices:
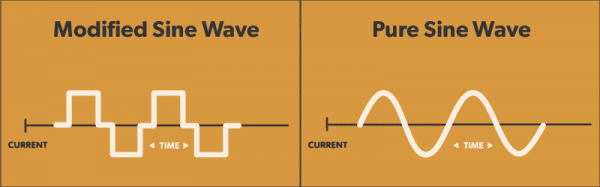
Modified Sine Wave – the voltage rises and falls unevenly and abruptly, and sits at zero for some time before changing its polarity. This uneven fluctuation creates an “unrefined” signal.
Pure Sine Wave – a clean wave form like what is received from a main electric grid. This consistent current can run any AC device.
As you might expect, Modified Sine Wave inverters are up to about 60% cheaper than Pure Sine Wave inverters.
Some van life devices that may not work properly with modified sine wave and may also get damaged:
- Re-chargers for battery packs used in hand power tools.
- Microwave
- Potential reduction in lifespan of laptop chargers
- Newer LED monitors and TVs
- Audio equipment
- Sensitive medical equipment
- Devices you probably wouldn’t have in a van: 120V appliances with motors such as refrigerators (12V), compressors, printers
Which Type of Inverter Should You Get?
Unless you’re running one of the products listed above (double check your laptop power supply manual), a MSW inverter will suit you. If you want guaranteed clean current now and the flexibility to add appliances in the future, spring for a PSW inverter.
If you’re running an induction cook top, 1) be sure you size up adequately. For a standard 1,800w cook top we recommend a 3,000 watt inverter, and big battery bank. 2) Get pure sine wave.
Do you want Shore Power charging capabilities?
Shore power is the term for plugging into an external power source to charge onboard batteries. These sources include hook-ups at an RV campground or just a standard outlet at a friend’s house. The term confused us at first, but turns out it originated in the marine industry which, well, makes sense in retrospect.
We didn’t include shore power capabilities in our electrical design since most of our time is spent boondocking around rock climbing areas which get good sun. There isn’t much in the way of external power at these spots.
Shore power is typically accessed by installing a battery charger as part of the electrical system.
Combo Inverters/Chargers provide a 2-in-1 device. An Inverter/Charger will do three things:
- Charger – Charge the house battery from a 120V source
- Transfer Switch – sense when you are plugged into an AC shore power source. When AC is recognized by the inverter charger, the unit will act as a pass through, power your devices from the AC source and also charge the batteries if desired. When the inverter charger detects a loss of AC, the unit will switch over to invert or DC mode and power your devices off of the batteries.
- Inverter
Shore power may be a good idea for you if you will be near charging sources and traveling during cloudy winter days. An inverter/charger will simplify your system.
Best Power Inverters for Van and RV Solar System
Favorite Overall Inverter for Most Systems:
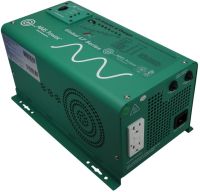
AIMS Power Pure Sine Wave Inverter
Pure Sine Wave
Lowest price of PSW competitors
(select 300W, 600W, 1,000W, 1,500W, 2,000W, 3,000W)This 1,000W pure sine wave inverter is the best balance of cost and performance among pure sine inverters. 1,000W will supply almost all road warrior’s power needs. If you have a microwave or induction cook top we recommend the 2,000W version. It’s got all the specs we look for: UL certified, grounded GFCI outlet, and 90% efficiency, while being a good chunk cheaper than equivalent competitors. AIMS is a 20 year old company and includes a 2 year warranty from its headquarters in Reno, NV.
You’ll want to add-in a AIMS Remote Switch to turn the inverter off between uses.
Budget Inverter if you won’t be using sensitive electronics
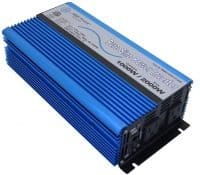
KRIËGER Modified Sine Wave Inverter
Works with any 12V battery (some MSW inverters are incompatible with Lithium batteries)
Modified Sine Wave incompatible with many appliances
(also available 1,500W | 2,000W)Modified sine wave inverters are significantly cheaper than Pure sine wave, but they can’t safely power some “sensitive” appliances. Some laptops and monitors/TVs may have issues with the unrefined power. But if modified sine wave will work for you (check our comparison section above), the KRIËGER inverter has everything we look for, at the best price.
If you’re looking for a smaller capacity budget inverter, we recommend Samlex SAM inverters: 250W | 450W | 800W
If you’re designing a new system and don’t have an inverter or shore power charger yet:
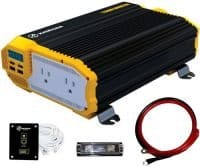
AIMS Power Pure Sine Inverter/Charger
Simplifies shore power charging, potentially extending life of batteries
Significantly cheaper than other inverter/chargers
Not UL certified. AIMS offers UL certified inverter/chargers at higher price point (but still cheaper than competitors)
(also available as 2,000W inverter)This AIMS unit isn’t actually just an inverter, it’s a combo inverter AND shore power charger. Combo inverters and chargers have all the functionality of the separate units, but in one package. This significantly simplifies your system, and cuts down on cabling and fuses to buy. It’s also smaller and lighter than installing the devices separately. The AIMS inverter/charger is only about $100 more than equivalent inverter and charger separately.
This inverter/charger has all the standard features we’d expect in an inverter like low-voltage battery alarm, GFCI outlets, and a 3x surge capability. Plus, you can use shore power (plugging into an external outlet/hookup) to charge your battery. The charger rate on this unit of 35 amps or 420 watts will quickly charge batteries and the built in “smart charger” will adjust charging profiles based on the battery state.
Read more about charging from shore power.
AIMS sells a few different external switches for different inverter types, make sure to buy this LED Remote Panel which is compatible with this inverter/charger.
Take note this inverter is not UL certified. AIMS also sells 1,000W and 1,500W UL certified inverters/chargers at a higher price point. These inverters are also about 4% more efficient (92% vs. 88%).
How to Use and Install Power Inverter
Here’s a few things to keep in mind for installation and operation of your new inverter:
Connections between your battery and inverter need to be tight and perfect. The larger the current, the higher the danger. A loose connection is when the nut on the terminal is not tightened enough against the ring connectors, and unfortunately we speak from experience. When we initially ran our coffee maker (our largest 120V load), our inverter would squeal indicating low battery voltage. After some trouble shooting and help, we realized the positive connection on the inverter was loose. In reality it didn’t look loose, but upon checking it for tightness, it could be tightened quite a bit more. This is a story with a happy ending since everything works fine now, but it could have turned out much worse, and it can happen to you! Again, connections between your battery and inverter need to be tight and perfect. These are the most critical to get right in your solar system.
Make sure your battery’s discharge rate can support your inverter. This rate will be on your battery’s spec sheet. For example, the RELiON 100Ah battery has max continuous discharge of 100A, or 1,200W. You’d only want to run 1,000W loads through the inverter with that battery. We’ve got more details on How-to Choose a Battery.
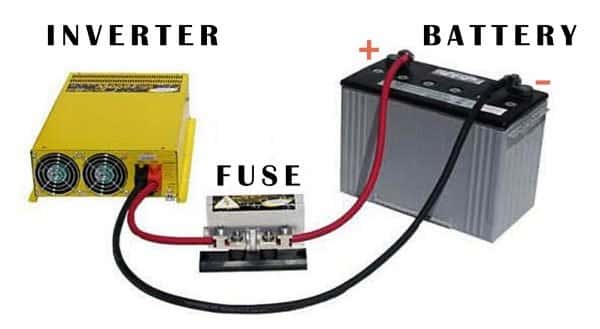
Locate your inverter as close to your battery as possible in order minimize the length of wire run.
Select the correct size cables and fuses. The larger the electrical current and/or the longer it has to travel, the larger the wire necessary. There should be a fuse on the positive cable to protect against a surge. We recommend this terminal fuse (one side attached to the bolt on the inverter’s positive terminal). Here’s the rule of thumb for cable sizing:
* For the fuses you will need to buy the terminal mount block as well. Your specific fuse then gets placed on the mount block.
Your wire run from inverter to battery may be greater than 5 feet (but seriously, plan ahead to minimize that). If so, check out this article for recommend cable/fuse sizes for runs up to 10 feet.
Ready for more info?
Visit the Van Conversion Build GuideWe sincerely hope this information is helpful on your build journey!
This post contains affiliate links that may earn us a commission if a product is purchased. But, we always strive for the reuse and repurpose of materials – so we encourage searching for a local used option before buying from our links.


Leave A Comment