
We're an affiliate
We hope you love the products we recommend! Just so you know, we may collect a share of sales or other compensation from the links on this page. Thank you if you use our links, we really appreciate it!
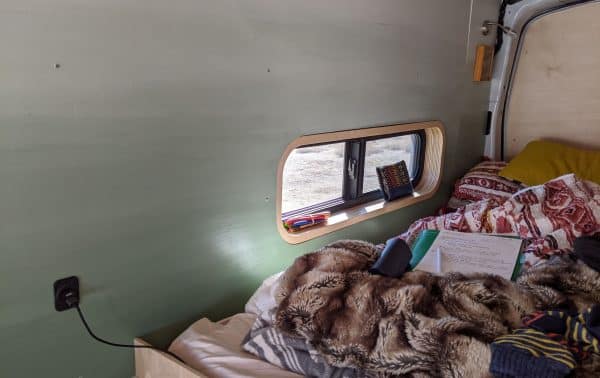
We installed a curved sliding window above the bed in our van conversion, and we were determined to achieve a curved frame to match the window’s profile. Since we are sleeping and waking up next to the window, we are going to spend a whole lot of time looking at it, and through it!
The window frame is made from 3/4″ plywood and an attractive design element as well as functional as a bedside shelf. Now that we are living in the van, Nadia stores her phone and Kindle there each night.
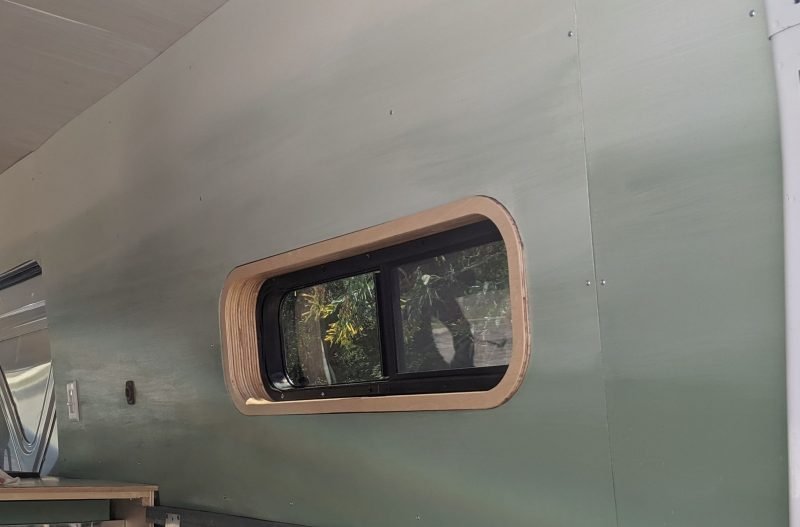
Beautiful AND functional window frame, inset with Nadia’s painstakingly hand done ombre gradient wall
How to Curve Wood?
There are a few ways to make “curved” wood. We brainstormed different options, including the legit method of bending and laminating plywood (example here), but ended up deciding to use technology we had on hand in order to make our dream a reality in a less laborious (though still quite time consuming) way.
By the way, we made insulating blackout covers for the windows. Check them out
We used a CNC (Computer Numerical Control) machine, which allows us to upload a computer drafted drawing, which then directs the CNC what to cut. Check out an example of a CNC machine at work:
We realize this isn’t something everyone happens to have immediate access to, and will describe an alternative method at the end of this article, which although requiring a more steady hand, could yield the same result.
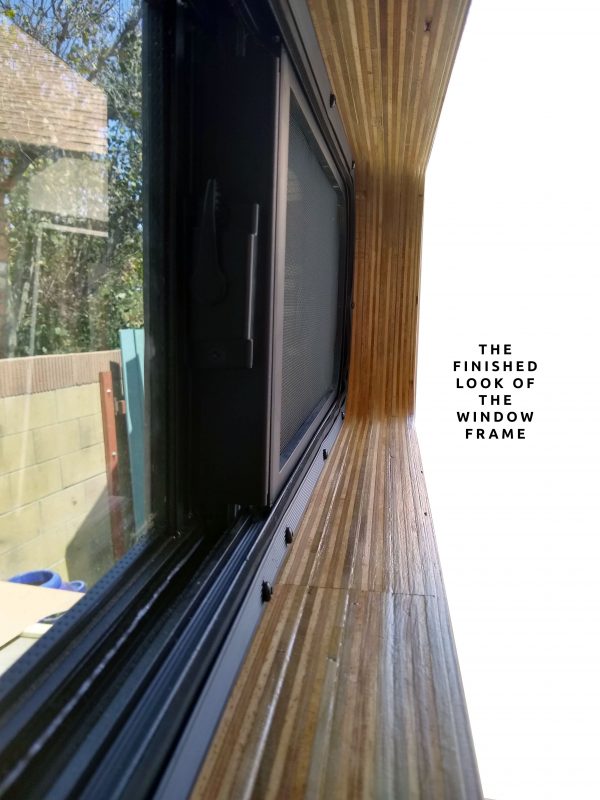
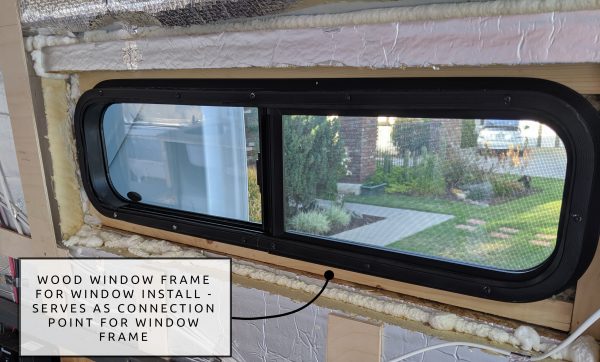
We are fans of the exposed plywood edge. Here was another opportunity to let our plywood shine! We attempted to measure how far the finished wall would stand from the van metal around the window, in order to determine the overall depth necessary for the frame. To sit approximately flush with the finished wall, the frame needed to be about 4-¼”. The overall idea was to take several pieces of ¾” plywood, cut out the same shape for each one, stack them up, and glue them together. In the end, we use five layers of ¾”: plywood, and a final ¼” face frame piece for a total depth of 4”. Looking back, we would probably have added an additional layer, because our wall ended up coming forward more than the window frame on one side (that’s van curves for you).
Cutting the Window Frame
Step one was to take overall measurements of the window itself. We measured the overall width, height, and the radius of the curves. To get the radius, we simply found an object that matched the curve, and figured out what the radius of that circle was.
These measurements were then taken into a computer drafting program called Fusion 360, where we created this file to send to the CNC machine. One small hiccup! We realized that the overall frame size (38″ wide) was too large to fit on our particular CNC machine, so we ended up doing half the frame at a time, with a seam on the top and bottom of the frame.
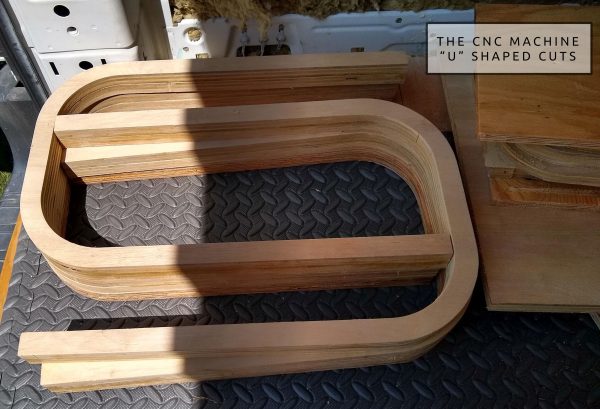
We let the CNC machine do it’s magic, cutting this same exact “U-shaped” pattern over and over again until we had all the pieces cut.
Gluing and Clamping
It was then time to glue and clamp. Nadia’s dad put together this awesome clamp jig for us, which ensured that the frames were nice and flat as we glued them together. Clamping to a flat wood board with more standard clamps would also do the trick. The one downside is that we could only glue two pieces together at a time if using these clamps. Therefore, this was the most time consuming part of the process, since we only had one such jig, and we had to wait for the glue to dry before moving on to the the next piece.
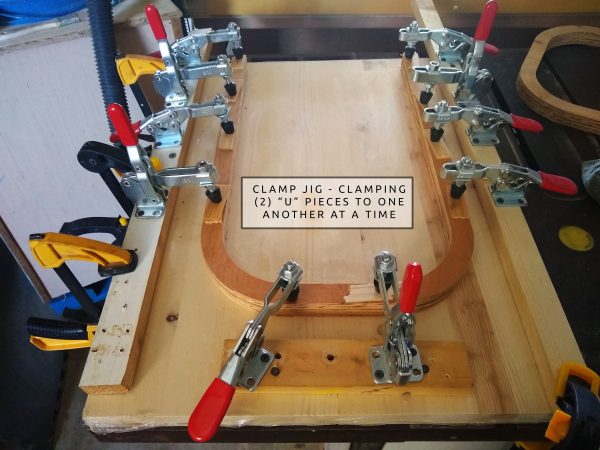
Once we had several 2 layer “U’s” glued together, we moved on to our more typical clamps with higher clearance, gluing and clamping this 8 layer “cake” flat against a piece of plywood, to avoid any warping.
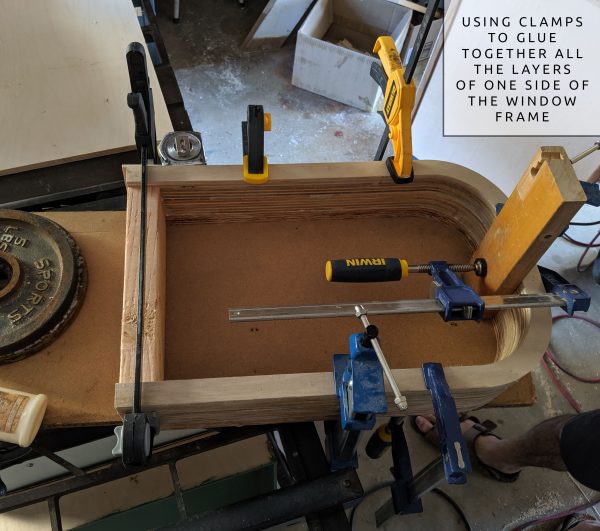
Hot Tip: Remember to keep rags with water nearby, for all the drippy glue. It’s easier to manage this now, than when the glue is dry!
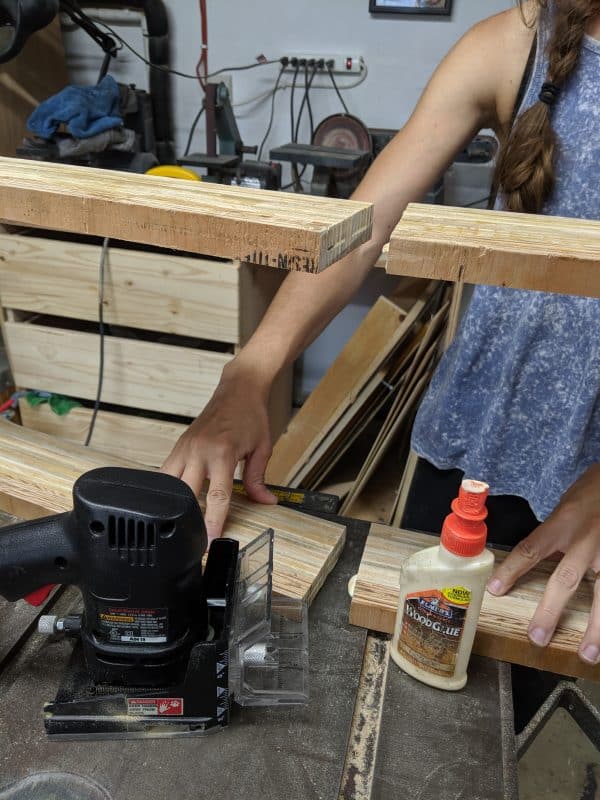
Choosing a Wood Glue

Don’t overpay for wood glue! The standard wood glue in the industry is Titebond, but should we go with Titebond Original, or pay double the price for Titebond III Ultimate? “Ultimate” sure sounds good right, don’t we want our van to be ultimate?
The bond that any version of Titebond provides two pieces of wood is stronger than the wood itself. That is, if you glue two pieces of wood together then try to pry them apart, what will split first is one of the pieces of wood, not the glued joint itself.
That is plenty strong for us! Titebond III (bond strength of 4,000 psi) is only 11.1% stronger than Titebond Original (3,600 psi). While Titebond III is waterproof, if any of the wood in our van is exposed to water, we have bigger problems than just the glue joints (like a leak we’d need to fix). We don’t need waterproof glue!
Stick with the Titebond Original for your van build, and spend the money extra money elsewhere (you’ll certainly find another part of the van to spend it on).
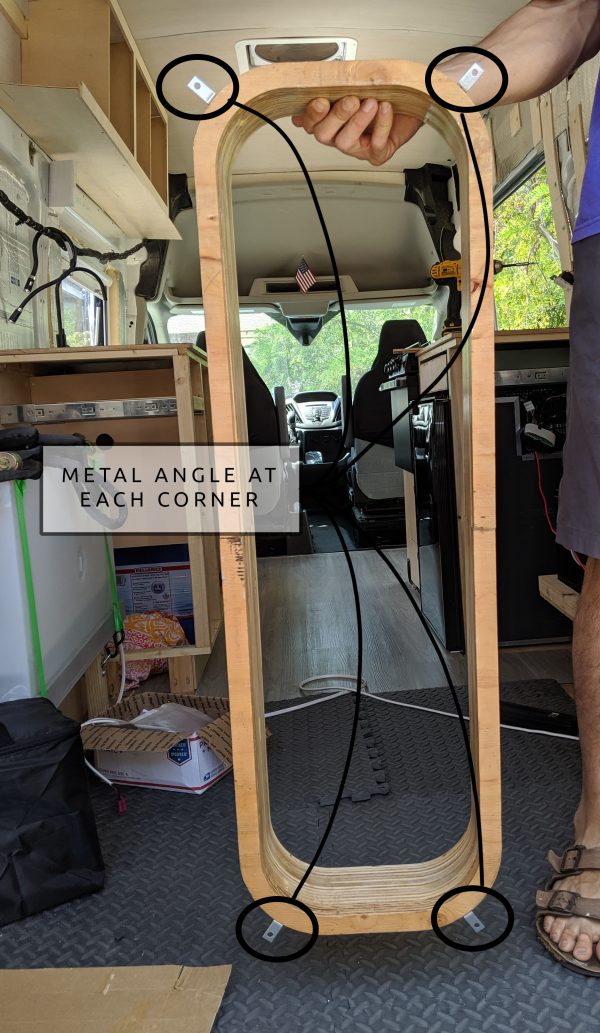
Once glued, it was time to join the halves together. We used a biscuit joiner and lots of glue to do this. Biscuits don’t add much strength, but their main benefit is keeping the two “U’s” aligned. See this video on how biscuit joints work. Dowels could have been another option here.
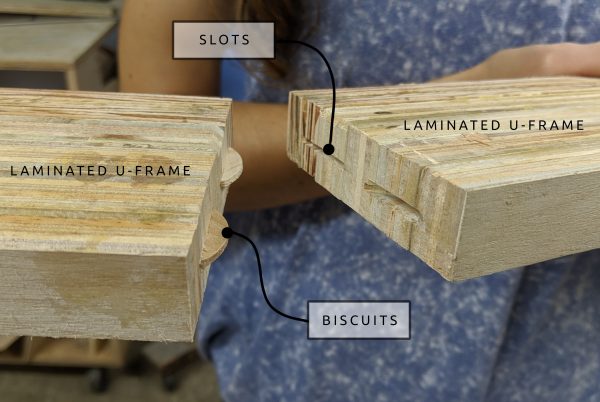
We used weights and clamps to keep things tight while the glue at the biscuits dried.

Prepping the Window Frame
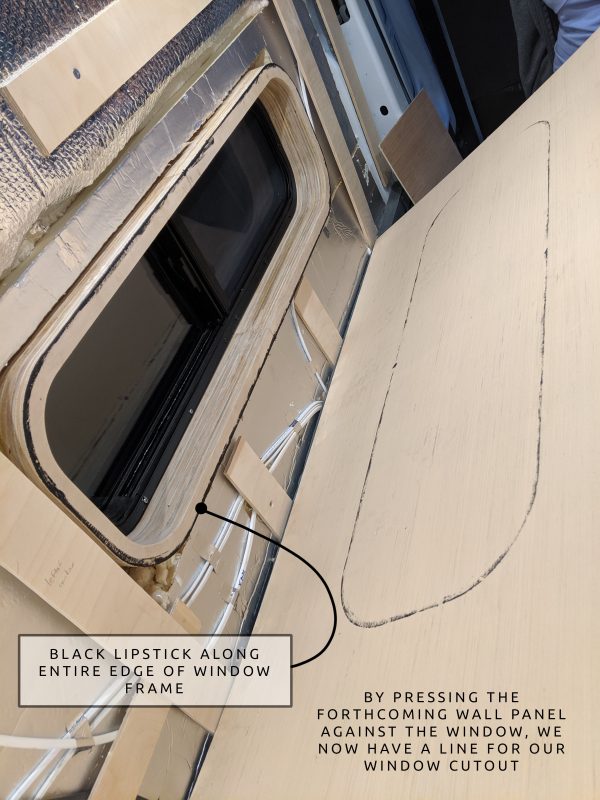
There was still the final layer of plywood missing, for which we would use ¼” baltic birch to match the baltic birch we have elsewhere on our project. The reason we held off on this final layer is that we were about to make a mess. You see, in order to figure out the wall cutout, we smeared black lipstick leftover from a Halloween party all around the edge of the frame in place. We then pushed the wall against the frame which created an imprint on the backside of wall of where to cut out for the frame.
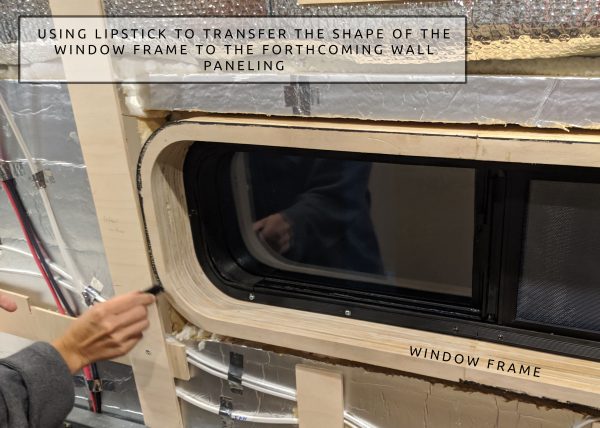
We pushed the wall panel firmly in place against the window frame to ensure a clean mark.
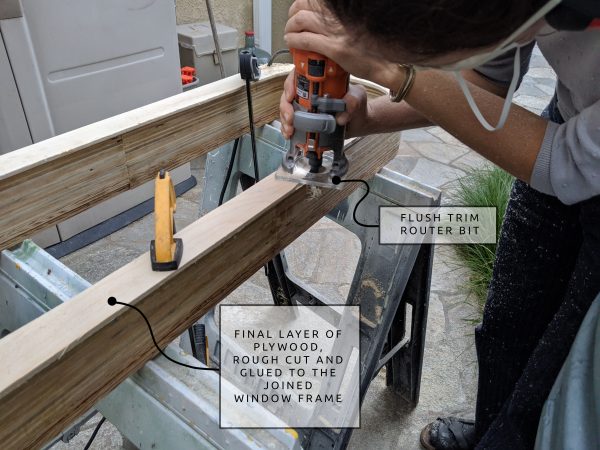
We were now ready to do our final seamless layer of ¼” baltic birch. Rather than using the CNC (due to the aforementioned limitations), the natural choice was to use a router with a flush trim router bit. We cut our ¼” plywood roughly to size, glued it on top of the glued together “U” frame construction, and then routed away. Lots of sawdust during this step!
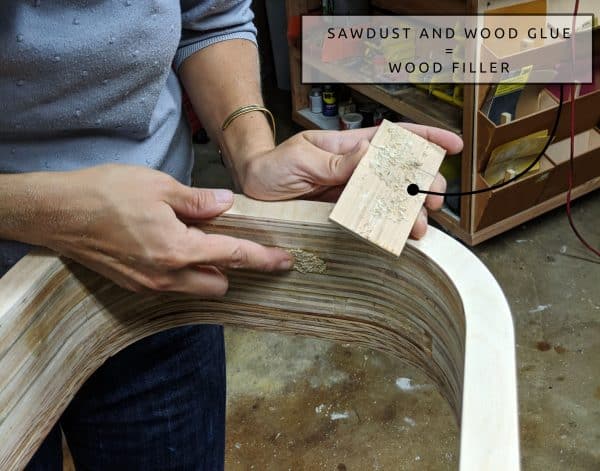
Finally, we have our window frame, but the work is not done. We used a lower grade of 3/4″ plywood in order to keep costs down, which means we were dealing with some quality issues (holes / checks), which we filled with a concoction of sawdust and wood glue.
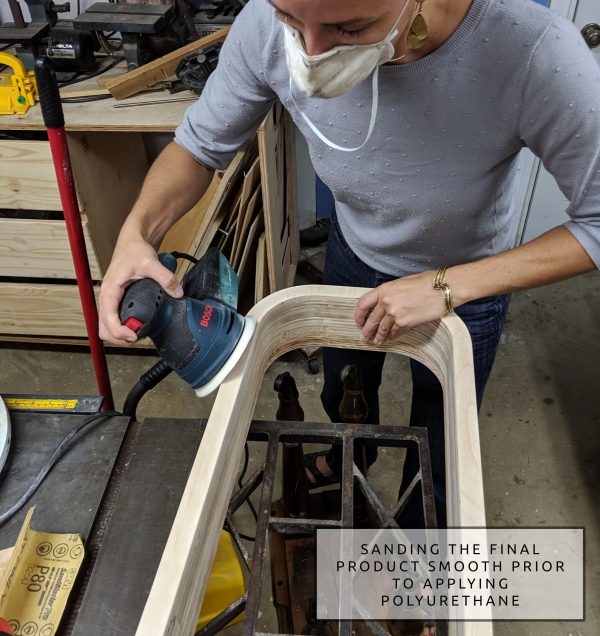
We then did a lot of sanding down starting with 60 grit and working our way up 220, until we had a silky smooth finish. We sanded with a random orbit sander (a worth investment for a van build), because sanding by hand would have taken forever, and/or likely resulted in coarse wood. Finally, we finished with a couple coats of Polyurethane to protect the plywood.
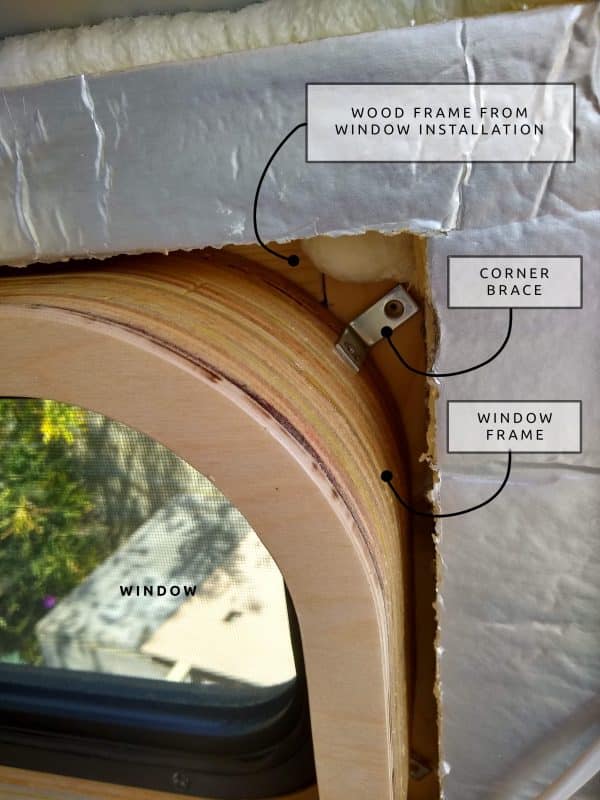
Attaching the Window Frame
Installing the window frame was as easy as adding some corner braces at the outside corners, and screwing into the wood frame already in place from our window installation.
Final Thoughts
Now as for how to achieve this look without a CNC router, this would require a great template, and a steady hand. We’d recommend cutting a rectangle to the overall size, and then using a jigsaw for the curves, for your first piece of wood. Sand as needed to really get the shape right, and then you have your template for the remaining pieces, for which a flush trim router can be used. The perk of this method would be no need to do “U” shapes, which would yield a more seamless result. Let us know if you try this method out, would love to see it executed!
Worth Noting: We were recently up in higher elevations doing some bouldering, and noticed this window became much more difficult to slide open! The window still opens, but we have to pull with some strength. Our guess is that due to the moisture (or elevation) the wood had expanded just enough to compress the window frame, because once we got home the window slid open just fine. Knowing this, we recommend giving your window a little bit of breathing room (an extra ⅛” or so should do the trick).
Ready for more info?
Visit the Van Conversion Build GuideWe sincerely hope this information is helpful on your build journey!
This post contains affiliate links that may earn us a commission if a product is purchased. But, we always strive for the reuse and repurpose of materials – so we encourage searching for a local used option before buying from our links.

Leave A Comment